
In both Hour 1, “Introducing Android,” and Hour 2, “Understanding Intents,” you created projects using Android Studio and updated specific resources like the layout files. In this hour, you take a detailed look at Android resources and how to use them. Resources include simple values such as strings and values that you will use in your app and more complex resources like layout files. You can specify alternative resources based on different conditions. For example, resources can be specified for device attributes like screen size and for locales. This chapter covers different types of resources, and you learn about using alternative resources.
Android applications are made up of functions (Java code, classes) and data (including resources such as graphics, strings, and so on). Android application resources are stored under the /res subdirectory of the project.
Create a new project in Android Studio called Hour3Application. The generated project includes a number of resources that are helpful to understand.
The generated project includes a single activity and an associated layout file. That layout file is a resource. The layout file includes a TextView that is populated with the words “Hello World.” The text “Hello World” is stored in a resource file. The generated project also includes image resources and dimension resources.
There are several options for viewing the project structure in Android Studio. Figure 3.1 shows the project set to the Android view. Note the drop-down option is set to Android.
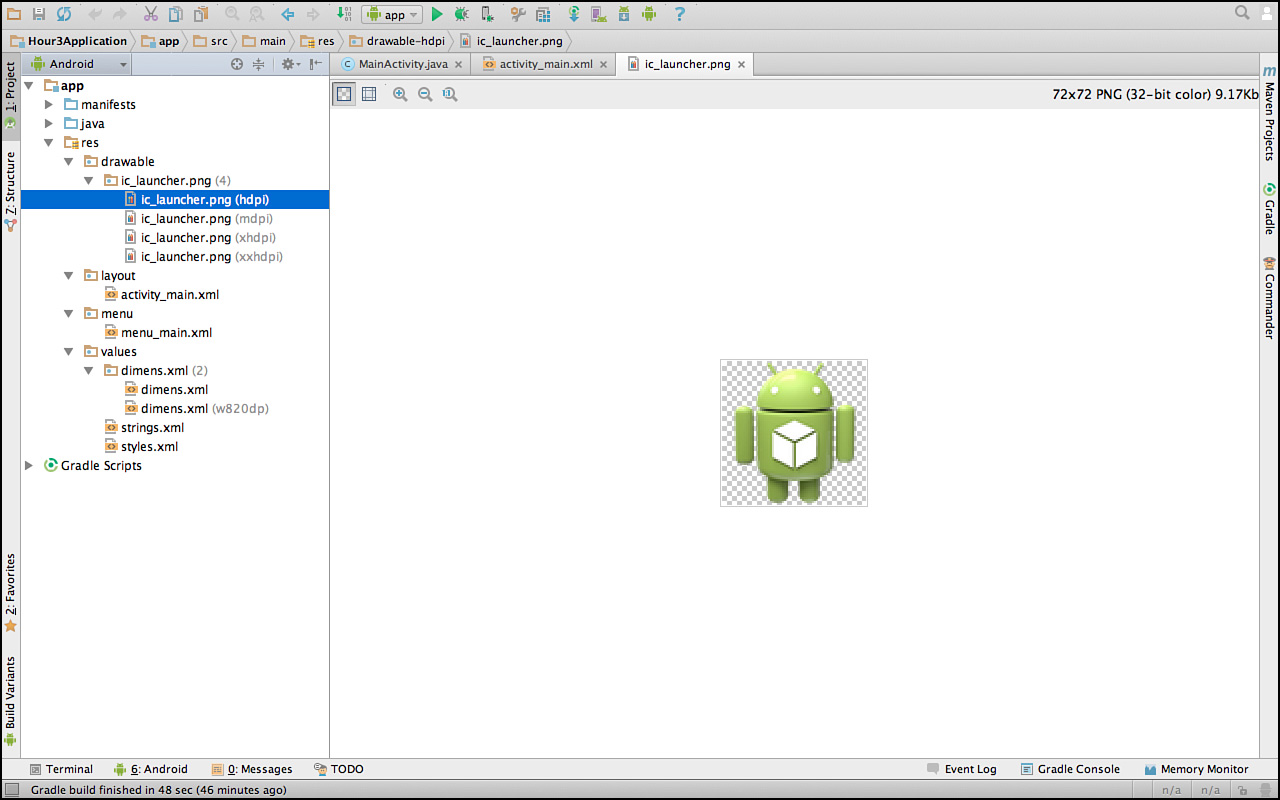
FIGURE 3.1 Android View for Hour3Application.
In the Android view, you can see the resource folder (res), and subfolders for drawable, layout, menu, and values. There are four icons in the drawable folder, activity_main.xml is in the layout folder, menu_main.xml is in the menu folder, and four XML files are in the values folder.
Figure 3.2 shows the same information in the project view in Android Studio. The specific folder names are displayed. The four icons of different densities exist in four separate folders.
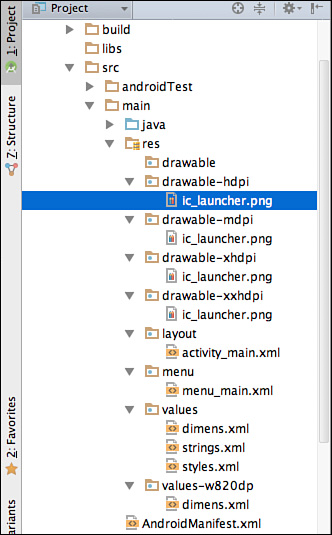
FIGURE 3.2 Project View for Hour3Application.
You can review the contents of the res folder. The following files and directories have been created:
MainActivity screen.Activity can be defined here. You use menus in the chapters on the ActionBar and navigation./res/values/strings.xml: File where string resources are defined.
/res/values/styles.xml: File where style resources are defined.
/res/values/dimens.xml: File where dimension resources are defined.
/res/values-820dp /dimens.xml: File where dimension resources are defined for these devices.
The folder structure created by Android Studio when you use the wizard to create an activity includes the most common resources and illustrates the basic concept of providing an alternate resource depending on the device where the app is running. Images in the drawable folders are appropriate for devices with different screen densities. In the project, alternative dimensions are provided for devices with a minimum width of 820 devices independent pixels. You learn more about additional resource folders and providing alternative resources in the section “Providing Alternative Resources.”
Common resources for a project include layout files, image drawables, string definitions, and more.
As you have seen, resource files are stored within /res subdirectories. Filenames follow these rules:
All application resources are stored within the /res project directory structure and are compiled into the project at build time. Resources can be used in programs. One application resource can also be referenced in another resources.
To reference a resource from within your Activity class, you will be using the getResources() method to access the resources. Then, you make the appropriate method call based on the type of resource you want to retrieve.
For example, to retrieve a string named hello_world defined in the strings.xml resource file, use the following method call:
String greeting = getResources().getString(R.string.hello_world);
When you use the string resource hello_world as a value for another resource, the format to use is as follows:
@[resource type]/[resource name]
For example, the same String used earlier would be referenced as follows:
@string/hello_world
A TextView is created in activity_main.xml file that references the hello_world string resource using this format. Open activity_main.xml and view the file in text mode rather than in design mode. You will see a reference to the hello_world string resource in the first line:
<TextView android:text="@string/hello_world"
    android:layout_width="wrap_content"
    android:layout_height="wrap_content" />
Simple resources such as string, color, and dimension values are defined in XML files under the /res/values project directory in XML files. These resource files use XML tags that represent name/value pairs.
You can use string resources anywhere your application needs to display text. You define string resources with the <string> tag, identify them with the name property, and store them in the resource file /res/values/strings.xml.
Here is an example of the string resource file that was created when you created the Hour3Application:
<?xml version="1.0" encoding="utf-8"?>
<resources>
    <string name="app_name">Hour3Application</string>
    <string name="hello_world">Hello world!</string>
    <string name="action_settings">Settings</string>
</resources>
String resources have a number of formatting options. Strings that contain apostrophes or single straight quotes must be escaped or wrapped within double straight quotes. Table 3.1 shows some simple examples of well-formatted string values.

TABLE 3.1 String Resource Formatting Examples
You can access a string resource programmatically in several ways. The simplest way is to use the getString() method within your Activity class:
String greeting = getResources().getString(R.string.hello);
You can apply color resources to screen controls. You define color resources with the <color> tag, identify them with the name attribute, and store them in the file /res/values/colors.xml. This XML resource file is not created by default and must be created manually.
Android Studio makes it easy to do this. When you choose the values folder and right-click to open the menu, you will see the option to create a new resource file. Figure 3.3 shows this. Create a new file called color.xml. When prompted for a filename, enter color.
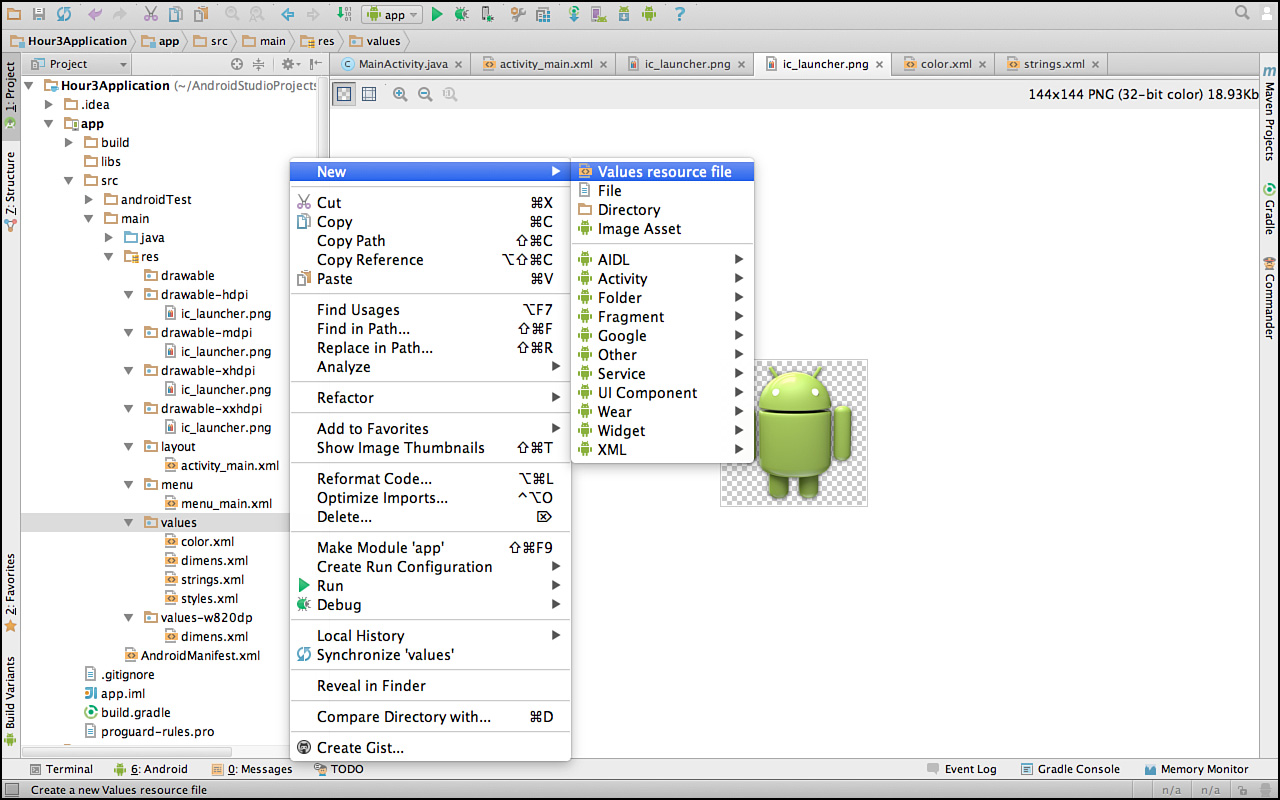
FIGURE 3.3 Creating a resource file.
Here is an example of a color resource file:
<?xml version="1.0" encoding="utf-8"?>
<resources>
    <color name="background_color">#006400</color>
    <color name="app_text_color">#FFE4C4</color>
</resources>
This resource file defines background_color and app_text_color. These resources can now be used in the app either programmatically or in other resource files. For example, these can be used in components in layout files. In the “Try It Yourself” section, you define a new color and use it for the background in your activity.
The Android system supports 12-bit and 24-bit colors in RGB format. Table 3.2 lists the color formats that the Android platform supports.
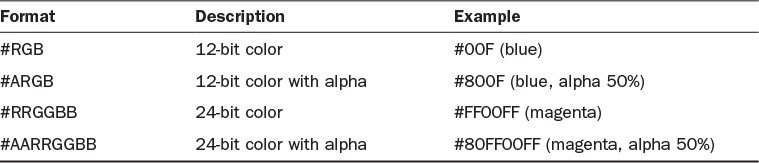
TABLE 3.2 Color Formats Supported in Android
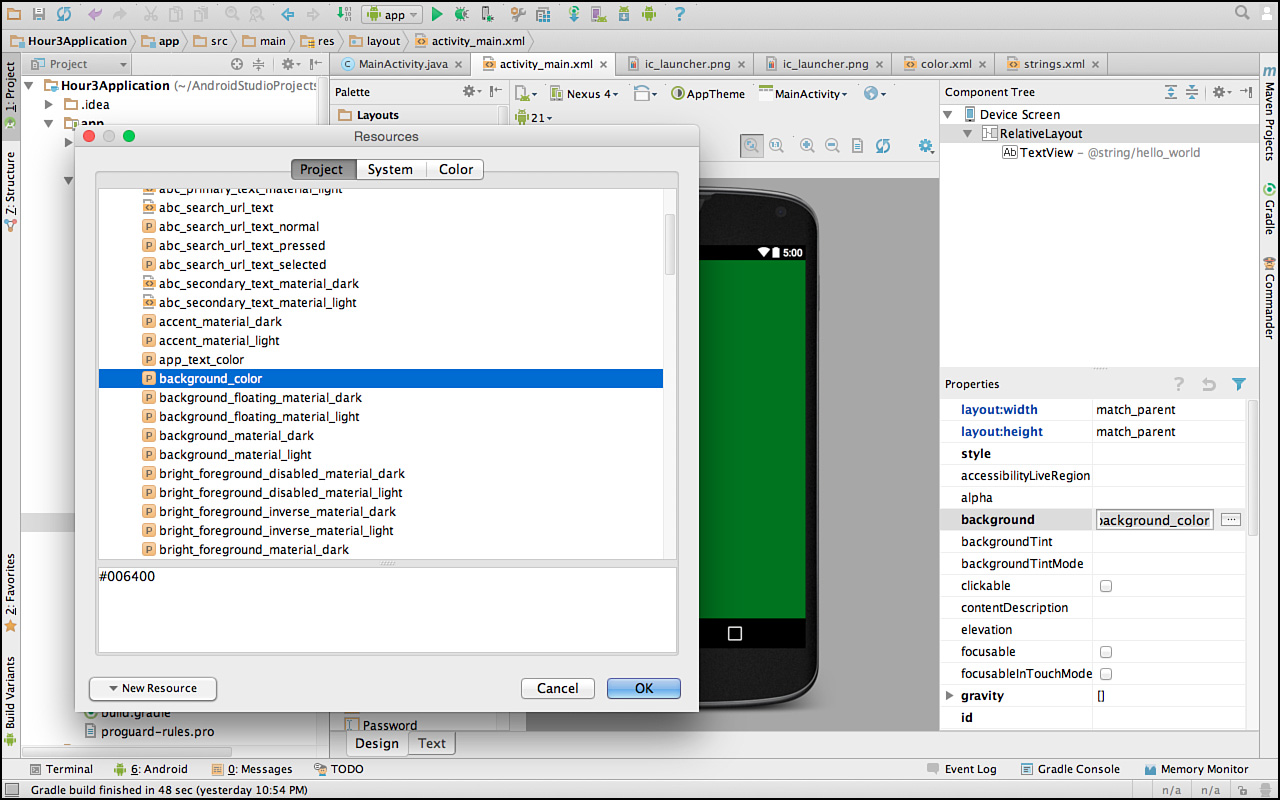
FIGURE 3.4 Using a color resource.
Dimension resources are helpful for font sizes, image sizes, and other physical or pixel-relative measurements. You define dimension resources with the <dimen> tag, identify them with the name property, and store them in the resource file /res/values/dimens.xml.
In Android Studio, two dimension resource files are defined. A default file is used by most devices, and a separate file is used for devices that have 820dp of available width. Device-independent pixels are referred to as dp. Seven-inch and 10-inch devices will have a width of at least 820dp.
The dimens.xml resource file defines margins that are used in the activity_main.xml file to specify padding.
This is the dimens.xml file in the values folder. Each margin is defined as 16dp:
<resources>
    <!-- Default screen margins, per the Android Design guidelines. -->
    <dimen name="activity_horizontal_margin">16dp</dimen>
    <dimen name="activity_vertical_margin">16dp</dimen>
</resources>
This is the dimens.xml file in the values-w820dp folder. In this case, a larger horizontal margin is specified. You can check the activity_main.xml file to see how these dimension values are used:
<resources>
    <!-- Example customization of dimensions originally defined in res/values/
         dimens.xml (such as screen margins) for screens with more than 820dp
         of available width. This would include 7" and 10" devices in landscape
         (~960dp and ~1280dp respectively). ->
    <dimen name="activity_horizontal_margin">64dp</dimen>
</resources>
Each dimension resource value must end with a unit of measurement. You should use density-independent pixels as logical pixels for a device. The unit of measure is a dp. For fonts, use scale-independent pixels, referred to as sp.
The use of device-independent pixels and scale-independent pixels is highly recommended. In Android, there are not fixed screen sizes, so using device-independent values helps to ensure that your layout displays well on different devices.
Note: Density-Independent Pixels
Screens have a density expressed in dots per inch (dpi). A density-independent pixel (dp) has the size of 1 physical pixel on a device with a 160dpi screen. So, a density-independent pixel is equivalent to 1 physical pixel on a medium device. For higher-density screens, the number of physical pixels increases with the dpi:
1 device-independent pixel = 1 physical pixel on a 160dpi screen
1 device-independent pixel = 1.5 physical pixels on a 240dpi screen
Physical pixels can be determined from the dpi as follows: px = dp * (dpi / 160), where px is physical pixels, dp is the number of device-independent pixels, and dpi is the dpi of the device. Ten device-independent pixels is equivalent to 15 physical pixels on a 240dpi screen.
Drawable resources, such as image files, must be saved under the /res/drawable project directory hierarchy. Android devices have different sizes and different pixel-density screens. Android provides a mechanism to show an appropriate image for each type of screen. When applications provide multiple versions of the same image for different pixel-density screens, the appropriate image is shown for the screen.
The Android project generates four drawable directories: drawable-mdpi (medium density), drawable-hdpi (high density), drawable-xhdpi (extra-high density), and drawable-xxhdpi (extra extra-high density). The system picks the correct version of the resource based on the device the application is running on. All versions of a specific resource must have the same name in each of the drawable directories.
You can drag and drop image files into the /res/drawable directory using Android Studio.
The most common drawable resources used in applications are bitmap-style image files, such as PNG files. These files are often used as application icons and button graphics, but may also be used for a number of user interface components.
In addition to graphics files, you can also create specially formatted XML files to describe other drawables.
For example, you can create a shape in the drawable folder. The shape defined by the following XML is a rectangle with a thick red border. If you right-click the drawable folder, you are given the option of creating a new drawable resource file. The following was saved in a new file called background_shape:
<?xml version="1.0" encoding="utf-8"?>
<shape xmlns:android="http://schemas.android.com/apk/res/android"
android:shape="rectangle">
        <stroke android:width="20dp" android:color="#ff0000" />
        <padding android:left="20dp" android:top="20dp"
        android:right="20dp" android:bottom="20dp" />
</shape>
When this shape is used as the background in the relative_layout in activity_main.xml, a red border is displayed, as shown in Figure 3.5.

FIGURE 3.5 Defining a shape drawable.
The styles.xml generated with Android Studio defines a default app theme. Different theme options are available in different versions of Android.
Android styles can be used to set a multiple attributes for a view. Rather than setting font size to 20sp in 10 TextViews, you can define a custom style for these views.
Consider a more complex example. If you want to define a TextView with blue text color, italics, and a font size of 20sp, you could define each of those individual values, or you could define a style that uses all of those characteristics and assign that style to the TextView.
These two snippets of XML code show the same result when it comes to displaying a TextView. In the first snippet, the values are set directly in the TextView attributes:
        android:text="TextView"
        android:textColor="#0000ff"
        android:textSize="20sp"
        android:textStyle="italic"
In the second case, we define a style called CustomText in the styles.xml file in the res/values folder:
<style name="CustomTextStyle"  >
    <item name="android:textColor">#0000ff</item>
    <item name="android:textSize">20sp</item>
    <item name="android:textStyle">italic</item>
</style>
Then, we use the style we defined in a TextView with the following line:
style="@style/CustomTextStyle"
The result is that the TextView controls are displayed in an identical manner. Figure 3.6 shows the TextView in activity_main.xml set to CustomTextStyle.
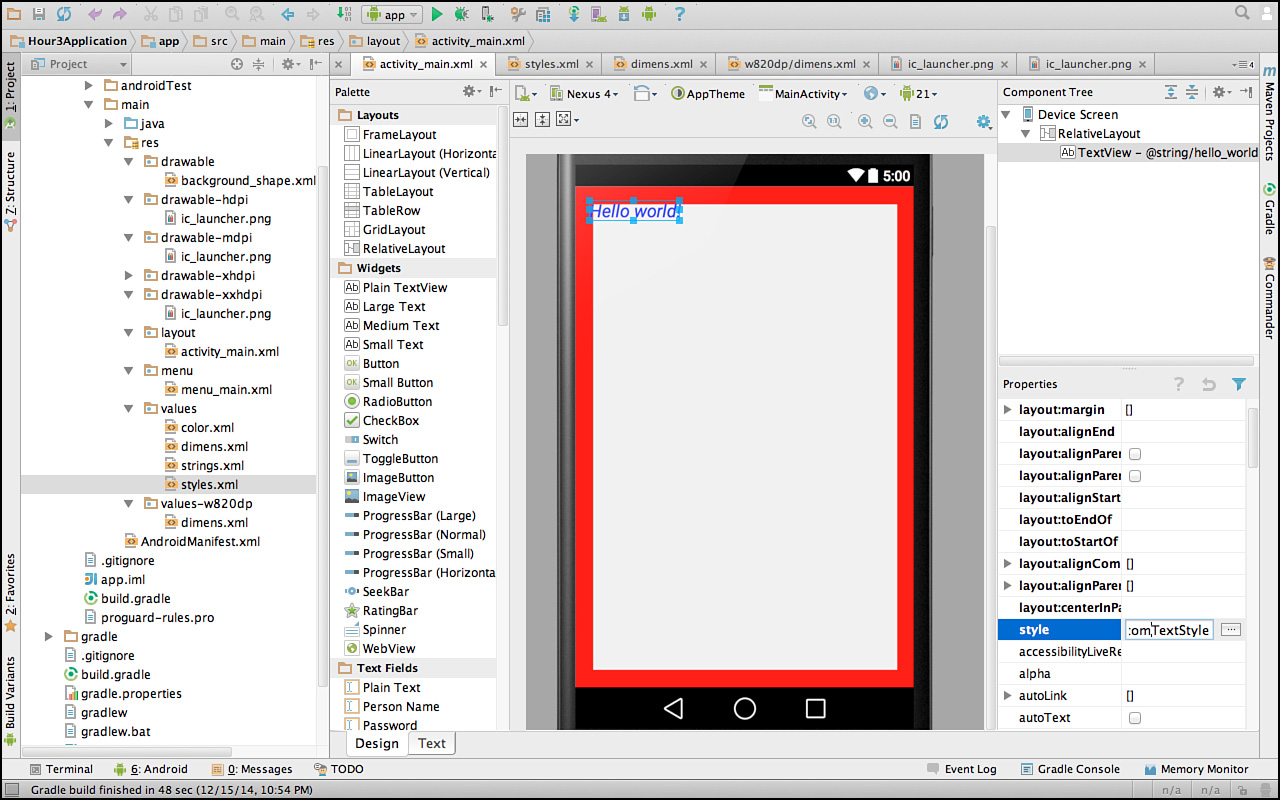
FIGURE 3.6 Simple style applied to TextView.
By defining and using styles, you can give your app a distinct look and feel. Your results will be consistent, and you can change the look of the app easily by changing the contents of the style files.
There are different versions of images in different resource folders. That is an example of using the alternative resources based on the device running the app. By having a drawable-mdpi folder, you are specifying to the system where medium-density images can be found. That concept can be extended to create folders for different types of alternative resources.
In addition to the drawable density qualifiers like mdpi, you can use size qualifiers of small, normal, large, and xlarge.
To create an alternate layout for an extra-large screen, you append xlarge to the layout folder:
/res/layout-xlarge/activity_main.xml
Screen orientation can also be addressed by using alternative resources. To support portrait and landscape orientation, the qualifiers port and land are available.
Table 3.3 shows a list of import resource directory qualifiers. Note that the Android software development kit (SDK) version can be directly targeted using resources.
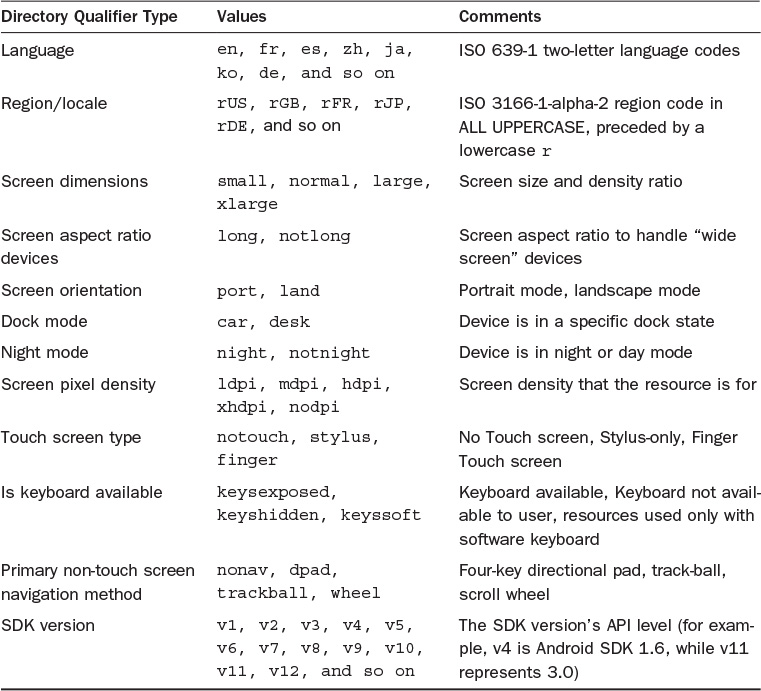
TABLE 3.3 Important Resource Directory Qualifiers
Resources qualifiers can be used in combination. This is a valid resource directory for landscape orientation on an extra-large device:
res/layout-xlarge-land/my_layout.xml
It may be beneficial to provide your app in different languages. You can create alternative resource files that specify the languages that you want to support. If you use resources throughout your app, your strings.xml file will contain every instance of text in the app. Providing the app in a new language will require creating an alternative language-specific strings.xml file.
At a high level, a locale is specified by language code and country code. For example, the constants en_US, en_GB, and en_AU represent the English language as spoken in the United States, Great Britain, and Australia, respectively.
The only locale that is guaranteed to be available is en_US locale. Not all devices will have all locales. A device sold in the United States will likely support en_US and es_US (English and Spanish for the United States), but will not necessarily support en_GB (English Great Britain).
Much like other operating systems, the Android platform has a system setting for locale. This setting has a default setting that can be modified by the mobile operator. For example, a German mobile operator might make the default locale Deutsch (Deutschland) for its shipping devices. An American mobile operator would likely set the default locale to English (American) and include an option for the locale Español (Estados Unidos)—thus supporting American English and Spanish of the Americas.
A user can change the system-wide setting for locale in the Settings application. The locale setting affects the behavior of all applications installed on the device. Some apps may support the selected language, and others may not. If the app does not support the selected language, the default language for that app will be used.
When an Android application uses a project resource, the Android operating system attempts to match the best possible resource for the job at runtime. In many cases, that means checking for a resource in the specific language or regional locale. If no resource matches the required locale, the system falls back on the default resource.
Developers can include language and locale resources by providing resources in specially named resource directories of the project. You can localize any application resource, whether it is a string resource file, drawable, animation sequence, or some other type. It is important to consider setting locales for layout resources. Layouts that are carefully reviewed in English may need to change for other languages. A short word in one language may be a long word in another language. If your buttons just fit in a layout, they may need to change for other locales.
A default resource is a resource that has no resource qualifiers.
Default resources are the most important resources because they are the fallback for any situation when a specific, tailored resource does not exist (which happens more often than not).
To specify strings for a specific language, you must supply the resource under a specially named directory that includes the two-letter language code. For example, English is en, French is fr, and German is de. Let’s look at an example of how this works.
Say that you want an application to support English, German, and French strings. To do so, follow these steps:
1. Create a strings.xml resource file for each language. Each string that is to be localized must appear in each resource file with the same name, so it can be programmatically loaded correctly. Any strings you don’t want to localize can be left in the default (English) /res/values/strings.xml file.
2. Save the French strings.xml resource file to the /res/values-fr/ directory.
3. Save the German strings.xml resource file to the /res/values-de/ directory.
Android can now grab the appropriate string, based on the system locale. However, if no match exists, the system falls back on whatever is defined in the /res/values/ directory. This means that if English (or Arabic, or Chinese, or Japanese, or an unexpected locale) is chosen, the default (fallback) English strings are used.
Similarly, you could provide German-specific drawable resources to override the default graphics in the /res/drawable/ directory by supplying versions (each with the same name) in the /res/drawable-de/ directory.
Android Studio makes this particularly easy to create folders with proper qualifiers because these are provided as options when you create a new resource file!
This hour examined the structure of an Android project and took a look at how to create and use common resources.
Once defined, resources can be accessed programmatically and can be used by other resources. String, color, and dimension values are stored in specially formatted XML files, and graphic images are stored as individual files. Application user interfaces are defined using XML layout files. It is possible to provide alternative resources based on device specifications such as screen density and size. Alternative resources can also be provided based on the locale supported by the device.
Q. Must string, color, and dimension resources be stored in separate XML files?
A. Technically, no. However, it is a good practice to follow. Keeping the resource types separate keeps them organized.
Q. What are some of the technical and practical benefits of using resources?
A. Using resources keeps your code cleaner and more readable. In practice, using resources for colors, text, and styles allows you to consistently and quickly change the look and feel of your app just by changing the resource files.
1. Add a new color resource with a value of #00ff00 to your project. Within the activity_main.xml layout file, change the textColor attribute of the TextView control to the color resource you just created.
2. Add a new drawable graphics file resource to your Hour3App project (for example, a small PNG or JPG file). In Android Studio, add an ImageView control to the layout. Then set the ImageView control’s src attribute to the drawable resource you just created. View the layout in the Android Studio.