
Hour 1, “Introducing Android,” provided an introduction to Intents. You learned that an Intent initiates an action, and can include additional data for that action. In this hour, you use an Intent to start a new Activity and you learn about some of the Intents that are built into Android that you can use in your apps. Finally, you develop an app that will be launched from another app via an Intent. When a user shares a web page URL from the web browser, your app will be included in the list of available apps that can handle that Intent.
To launch one Activity from another, you will use an Intent. To start one Activity from another, you need to create two activities. You should create one Activity called MainActivity and a second called SecondaryActivity. MainActivity is defined in the manifest file as the launch Activity and launches when the app is started.
To start the SecondaryActivity, you create a button in the user interface for MainActivity. That button includes code to create to start SecondaryActivity.
You do all of this using Android Studio.
The steps in this process are as follows:
1. Create a new project called Hour2Application.
2. Add a new blank Activity called MainActivity.
3. Put a Button on the user interface for MainActivity.
4. Create a second Activity called SecondaryActivity.
5. Add code to MainActivity that starts SecondaryActivity when the button is clicked.
In Hour 1, you installed Android Studio and went through the steps of creating a project with a blank Activity. To begin this chapter, do the same thing by creating an application called Hour2Application that includes a blank Activity called MainActivity.
Expand the folders in the project so that you can find MainActivity.java in the Java folder and activity_main.xml in the res/layout folder. When you select activity_main.xml in the res/layout folder, Android Studio displays the user interface, as shown in Figure 2.1.
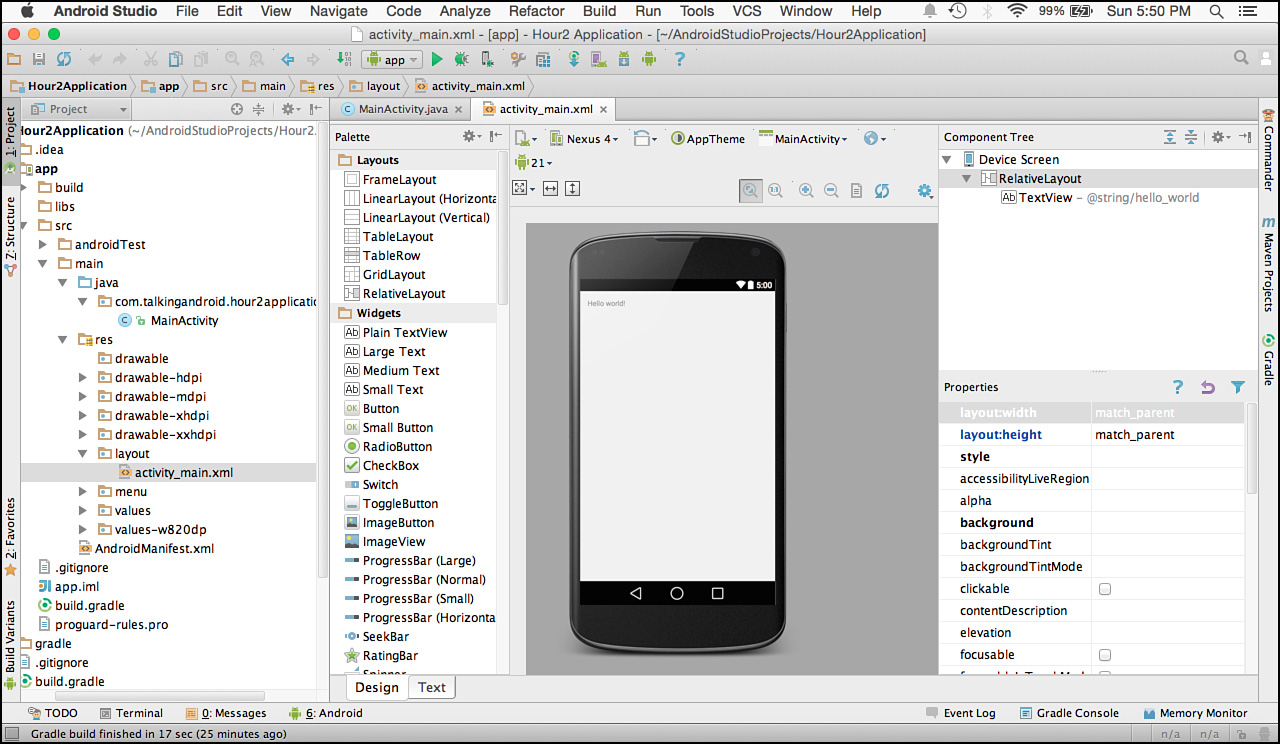
FIGURE 2.1 Viewing activity_main.xml in Android Studio.
In the view of Android Studio in Figure 2.1, the project structure is in the left section, the visual editor for the user interface is in the center, and the details for the selected property are shown in the component tree on the right.
Because your goal is to add a button to the user interface, you can drag and drop a button from the palette to the user interface. The result will look like Figure 2.2.
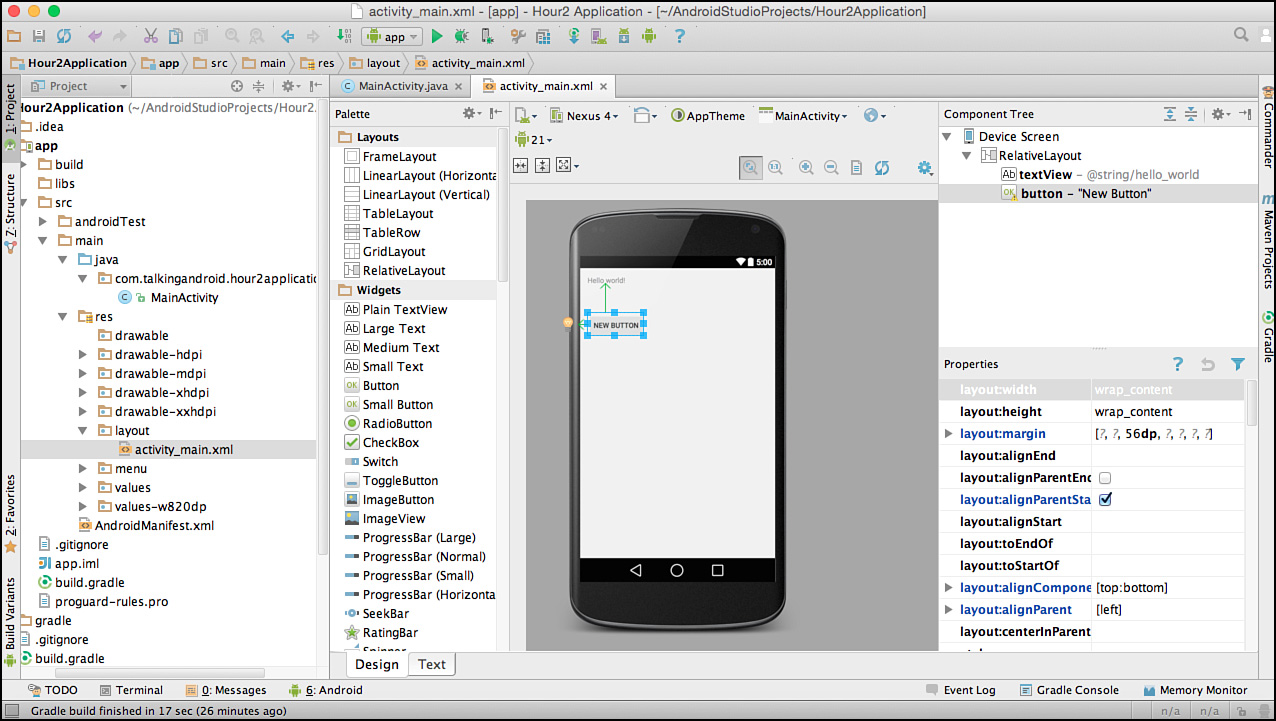
FIGURE 2.2 Adding a Button to MainActivity.
You can change the text on the button by changing the text property. Select the button component in the user interface and you will see both the component tree and set of properties. The component tree lists all the components in the user interface. When the button component is selected, you can change the text property. In this case, change it to Start Second Activity, as shown in Figure 2.3.

FIGURE 2.3 Update the user interface in Android Studio.
At this point, using Android Studio, you have created a single Activity called MainActivity and added a button to the user interface. You now add code to MainActivity so that when the button is clicked, it opens your second Activity. Now you need to create the second Activity.
When you created a new project, you were prompted to create an Activity. You chose to create a blank Activity, and MainActivity was created.
To create SecondaryActivity using Android Studio, select the Java folder and right-click to open the menu. Choose New, Activity, Blank Activity, as shown in Figure 2.4.
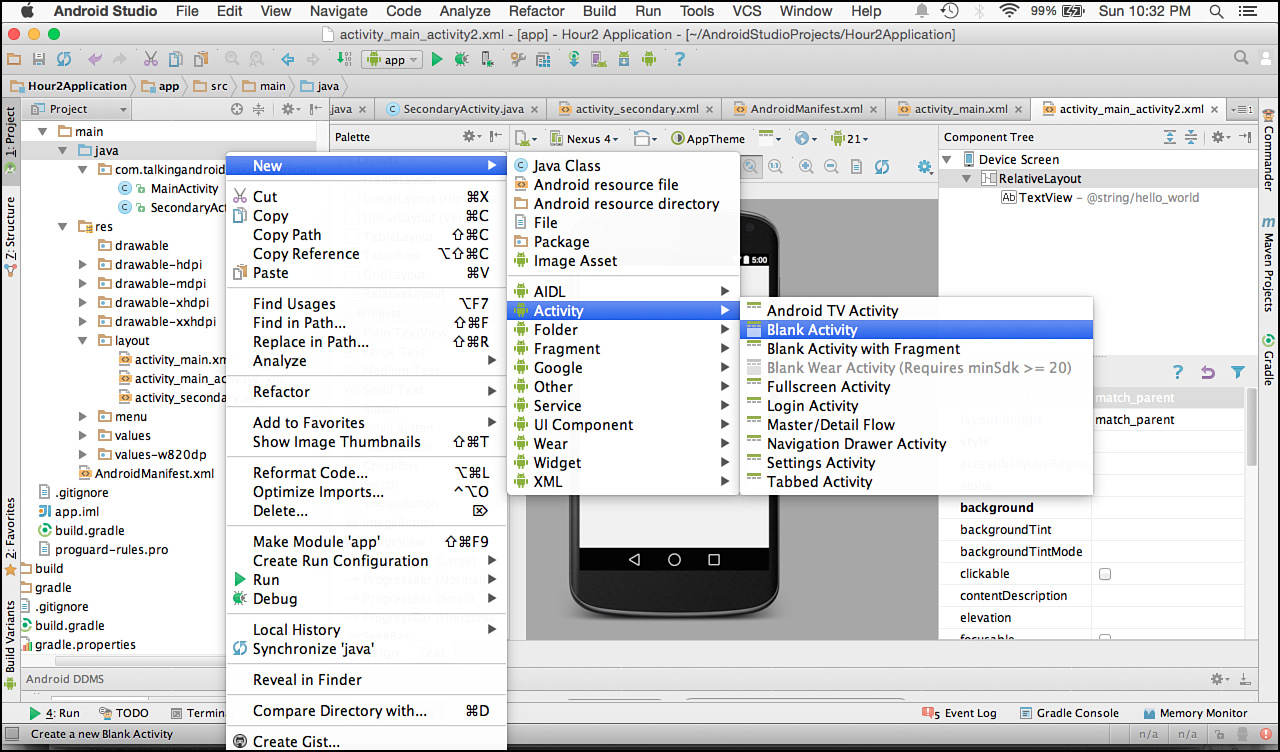
FIGURE 2.4 Create a new activity.
Continue to create SecondaryActivity. When you complete the wizard, the Activity should look like Figure 2.5. You can choose whatever company URL you want to be your package name. If you intend to create apps to put on the Google Play marketplace, you must use a unique package name. Typically, you use a reverse domain name convention. If your web domain is mydomain.com, for instance, your package name begins with com.mydomain.
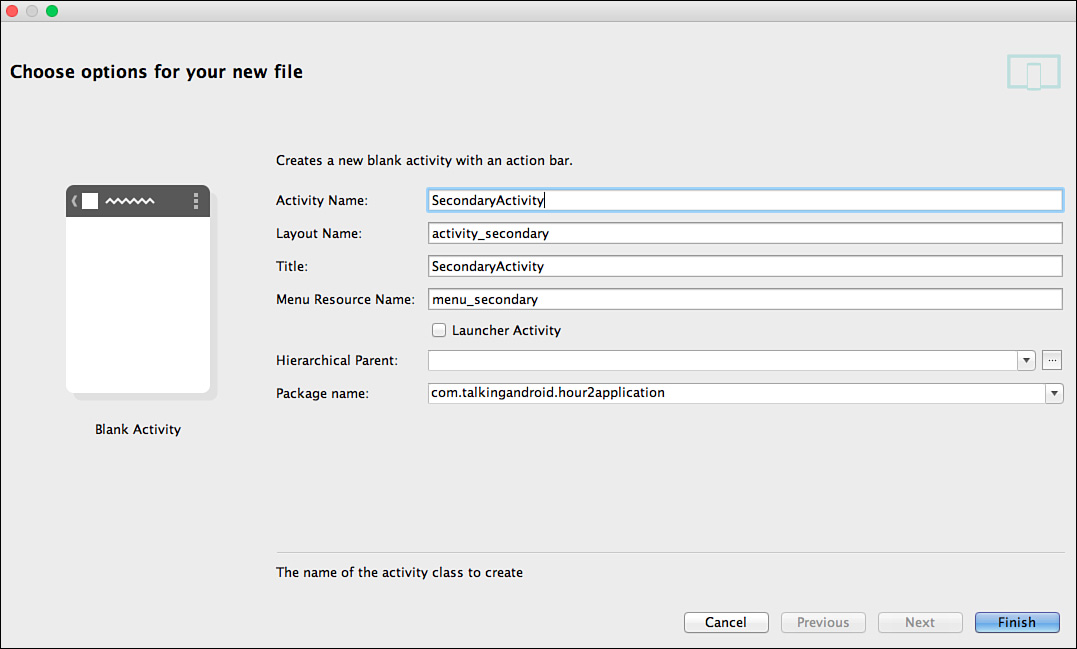
FIGURE 2.5 Create SecondaryActivity.
SecondaryActivity includes a TextView(android.widget.TextView) in the user interface that says “Hello World.” As you might have noticed, this TextView is included in each Activity that is created via Android Studio. You should change the text in this TextView to indicate that this is the SecondaryActivity.
You have learned about Intents and Activities. You have used Android Studio to create the foundation for a simple application in which MainActivity will start SecondaryActivity. The next step is to add code to MainActivity to detect when the button is clicked and to start SecondaryActivity.
MainActivity.java was generated with your project. The generated code includes a method called onCreate(). The onCreate() method runs when MainActivity is created in the app. The onCreate() method is used to define a Button and to specify an action to occur when the Button is clicked. You can think of the Android framework as having events that occur and a listener that listens for those events. To detect that the button is clicked, you add an onClickListener(). The code in Listing 2.1 defines a Button (android.widget.Button) and adds a listener.
A button named activityButton is defined in line 1. The setOnClickListener() method for activityButton is called on line 2. A View.OnClickListener(android.view.View.OnClickListener) object is passed as a parameter. The View.OnClickListener is defined inline in the code. To implement an OnClickListener, the onClick() method must be defined and overridden. The onClick() method is on line 4.
That seems complicated for this snippet of code in Listing 2.1! There is a lot going on. It is easy to look at code as setting an OnClickListener for the activityButton.
LISTING 2.1 MainActivity.java Clicking a Button
1: Button activityButton =  (Button) findViewById(R.id.button) ;
2:   activityButton.setOnClickListener(new View.OnClickListener() {
3:     @Override
4:     public void onClick(View view) {
5:       // add code here for button click
6:     }
7:   });
Here are a few more things to consider: In line 1, activityButton is defined with the method findViewById(R.id.button). R.id.button is a reference to the button that you defined in the activity_main.xml layout file. The findViewById() method associates the button resource to the Button activityButton.
When you use a new class like Button, you need to add the proper import file for that class. In this case, add two new imports for View and for Button:
import android.view.View;
import android.widget.Button;
Tip: Adding Imports On the Fly
There is a preference setting in Android Studio that proves very helpful when it comes to imports. The preference is for the Editor. Choose Preferences, Editor, Auto-Import, and add a check mark to Add Unambiguous Imports On the Fly. Then, when you use a class like Button, the import statement is added automatically. See Figure 2.6 for the settings.
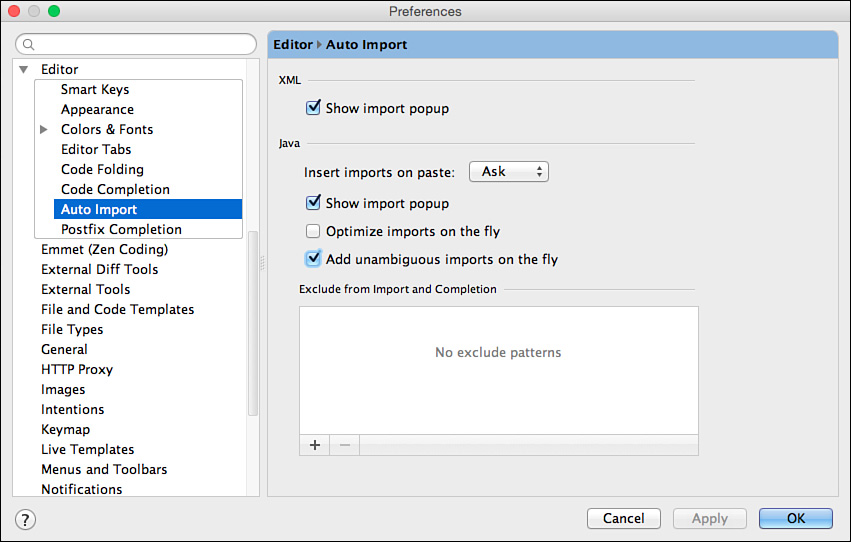
FIGURE 2.6 Setting imports on the fly preference.
Listing 2.2 adds code to create an Intent called startIntent on line 5. The startIntent is used as a parameter to startActivity() on line 6.
The Intent in line 5 is passed two parameters. A Context(android.content.Context) is passed as the first parameter. The application context is retrieved by calling the getApplicationContext() method. The second parameter refers directly to the SecondaryActivity class.
LISTING 2.2 MainActivity.java Starting an Activity
1: Button activityButton =  (Button) findViewById(R.id.button) ;
2:   activityButton.setOnClickListener(new View.OnClickListener() {
3:     @Override
4:     public void onClick(View view) {
5:       Intent startIntent = new Intent(getApplicationContext(),SecondaryActivity.
class);
6:       startActivity(startIntent);
7:     }
8:   });
You’ve created a simple app to open one Activity from another. MainActivity shows a button called activityButton that starts SecondaryActivity.
In Android Studio, you can run this code in the emulator. Android tools include the Android Virtual Device Manager. An Android Virtual Device is referred to as an AVD. An installation of Android Studio includes an AVD.
To see the list of available virtual devices, choose Tools, Android, AVD Manager. A list of available devices will be displayed. You can add new virtual devices using AVD Manager.
You can start the app from the Android Studio Run menu. You are asked if you want to choose a running device or to start a virtual device on the emulator. You can start a virtual device. If you have an Android phone or other device connected by USB, it should be detected, and you can use it to run the app.
Warning: Updating to the Latest Tools
When you downloaded and installed Android Studio, you set up a complete development environment. It includes Android Studio itself and tools like the AVD Manager. You can check for updates to Android Studio by choosing Check for Updates in the menu. You can also check for updates to the software development kit (SDK) by choosing Tools, Android, SDK Manager. In the SDK Manager, you will see the currently installed version of Android SDK Tools and whether updates are available.
It is possible to pass data from one Activity to another using Intents. To do that, you must enhance the code for MainActivity to include extra data in the startIntent and add code in SecondaryActivity to receive this data and use it.
In MainActivity, one line of code is added to the Intent definition. The putExtra() method passes a key and a value. In this case, the key is com.talkingandroid.MESSAGE, and the value is "Hello SecondaryActivity":
Intent startIntent = new Intent(getApplicationContext(), SecondaryActivity.class);
startIntent.putExtra("com.talkingandroid.MESSAGE","Hello SecondaryActivity" );
startActivity(startIntent);
You also need to make changes to SecondaryActivity to receive this data. The goal is to change SecondaryActivity to receive the data and show the passed message in a TextView.
You are going to add a TextView called message to the secondary_activity.xml layout file. Open the activity_secondary.xml file under the res/layout folder. You can edit the layout in either design mode or text mode. Find the TextView that was generated and verify that it has a property called id. In the design view, you can find the id property and enter message as the new id. In the text view, you will see android:id="@+id/message".
In the onCreate() method of SecondaryActivity, you get the passed Intent by calling the getIntent() method. After you have the Intent, you can get the String that was passed by using the getStringExtra() method with the same key that was used in MainActivity.
Listing 2.3 shows the getIntent() method on line 1 and the getStringExtra() method on line 2. The passed message is displayed by called setText() on line 4.
LISTING 2.3 SecondaryActivity.java Received Passed Intent
1:   Intent= getIntent();
2:   String message = Intent.getStringExtra("com.talkingandroid.MESSAGE");
3:   TextView messageTextView = (TextView) findViewById(R.id.message);
4:   messageTextView.setText(message);
Figure 2.7 shows both activities for this app.
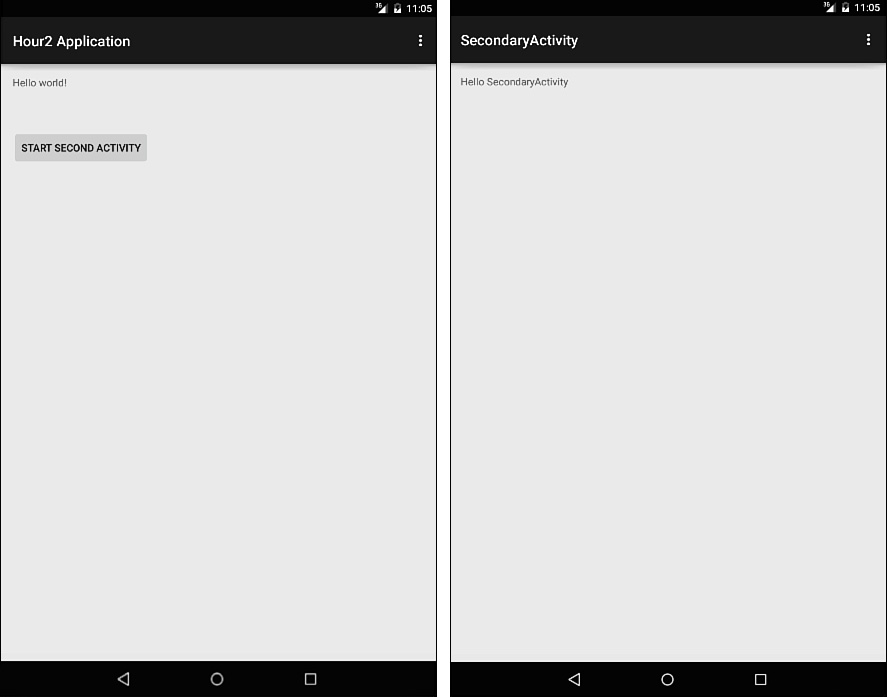
FIGURE 2.7 MainActivity and SecondaryActivity.
Listings 2.4 and 2.5 show the code for MainActivity.java and SecondaryActivity.java. When Android Studio generates Activity code, the methods onCreateOptionsMenu() and onOptionsItemSelected() are included. This code handles menus. The sample code does not use a menu, and that code is excluded from Listings 2.4 and 2.5.
LISTING 2.4 MainActivity.java
 1: package com.talkingandroid.hour2application;
 2: import android.content.Intent;
 3: import android.support.v7.app.ActionBarActivity;
 4: import android.os.Bundle;
 5: import android.view.Menu;
 6: import android.view.MenuItem;
 7: import android.view.View;
 8: import android.widget.Button;
 9:
10: public class MainActivity extends ActionBarActivity {
11:     @Override
12:     protected void onCreate(Bundle savedInstanceState) {
13:         super.onCreate(savedInstanceState);
14:         setContentView(R.layout.Activity_main);
15:         Button activityButton =  (Button) findViewById(R.id.button) ;
16:         activityButton.setOnClickListener(new View.OnClickListener() {
17:             @Override
18:             public void onClick(View view) {
19:                 Intent startIntent = new Intent(getApplicationContext(),
20:                                      SecondaryActivity.class);
21:                 startIntent.putExtra("com.talkingandroid.MESSAGE",
22:                                        "Hello SecondaryActivity" );
23:                 startActivity(startIntent);
24:             }
25:         });
26:     }
27:     // menu code excluded
28: }
In Listing 2.5, the message passed in the Intent is read and displayed.
LISTING 2.5 SecondaryActivity.java
 1: package com.talkingandroid.hour2application;
 2: import android.content.Intent;
 3: import android.support.v7.app.ActionBarActivity;
 4: import android.os.Bundle;
 5: import android.view.Menu;
 6: import android.view.MenuItem;
 7: import android.view.TextView;
 8:
 9: public class SecondaryActivity extends ActionBarActivity {
10:     @Override
11:     protected void onCreate(Bundle savedInstanceState) {
12:         super.onCreate(savedInstanceState);
14:         setContentView(R.layout.Activity_secondary);
15:         Intent= getIntent();
16:         String message = Intent.getStringExtra("com.talkingandroid.MESSAGE");
17:         TextView messageTextView = (TextView) findViewById(R.id.message);
18:         messageTextView.setText(message);
19:     }
20:     // menu code excluded
21: }
Intents include an action and may include additional data. In the case of the startIntent defined in MainActivity.java, the action is to start SecondaryActivity. The data passed was a message. Because the specific Activity to start was specified, this is an explicit intent.
An implicit Intent is defined by an action and data, but the specific action to take is resolved by the Android operating system. The action might be to display a map or to open a web page. The data contains the details of the map or the page. With an implicit Intent, if multiple apps can handle the action, those apps are presented to the user. As mentioned in Hour 1, an example of this is sharing a web page. Many applications can handle that Intent.
Many actions can be performed using an implicit Intent. They include showing a web page, showing a map, making a phone call, and picking an image from the device to use in your app.
Actions that show content are easy to use and can add a lot of value to the apps that you create. The Intent class defines a constant called ACTION_VIEW for actions that display content to the user.
To test some common view Intents, you can add update the user interface and code for MainActivity. You will add buttons to activity_main.xml and additional code to MainActivity.java. First you will do this for showing a location on a map and then for opening a web page.
Caution: What Happens If the Intent Is Not Handled?
Intents make Android powerful, and there are many built-in Intents. However, it is possible that an Intent that you are using is not available on a particular device. Your code should check to see whether the Intent is handled. That can be done by calling the method Intent.resolveActivity(). If the Intent is resolved, an Activity exists to handle it. Typically, Intents are available on devices for common actions. At times, the emulator may not handle certain Intents.
Apps that show maps handle the ACTION_VIEW Intent, including data that includes specific geographic coordinates. The data passed is a URI (Universal Resource Identifier) in a specific format. You can launch the Maps application to a specific set of coordinates using the following URI format string:
geo:latitude,longitude
Taken together, latitude and longitude provide coordinate system for specifying any point on earth. Latitude is used for the north-south position. Latitude is represented in degrees, with the equator being 0 degrees and the poles being 90 degrees denoted by north and south. Longitude is used for the east-west position. Greenwich, England is designated as the prime meridian, with a longitude of 0 degrees. The latitude for other locations is defined by the degree of difference from the prime meridian from 180 degrees to –180 degrees indicating east and west. North is 90 degrees, and south is –90 degrees.
To show an example of how using an Intent for maps works, you can use a preset latitude and longitude. The coordinates of Google headquarters, known as the GooglePlex, are 37.4220° N, 122.0840° W.
That translates to 37.422, –122.084 for your Intent. To begin defining the Intent, you define a String as follows:
String geoURI = "geo: 37.422, -122.084";
This geo URI also include a zoom level, which is a number between 1 and 23, where zoom level 1 shows the whole earth, level 2 shows a quarter of the earth, and each larger number shows a closer view. The following URI format string is used for zoom:
geo:latitude,longitude?z=level
Here’s how to format a URI string with the zoom level set to 8:
String geoURI = " geo: 37.422, -122.084"?z=8";
You use a string in this format and pass it to the parse() method of the Uri class to create the Uri that is used as the data for the Intent. You can then use that Uri with the ACTION_VIEW Intent, as follows, to open a map:
Uri geo = Uri.parse(geoURI);
Intent geoMap = new Intent(Intent.ACTION_VIEW, geo);
startActivity(geoMap);
You add a button in MainActivity that will open a map when clicked. To do that, you pass startActivity() and the Intent that uses ACTION_VIEW and a URI that specifies latitude and longitude. Your code checks to see whether there is an Activity that can handle the Intent. If you are using a device to test, you might have several apps available.
Add a button to the user interface in activity_main.xml. By default, Android Studio assigns the name button2. As you develop more complex apps, you want to use more meaningful names, but for now it is okay to use button2. Change the text on button2 to say, "Show Map".
Figure 2.8 is a screenshot of Android Studio with the changes made to android_main.xml.
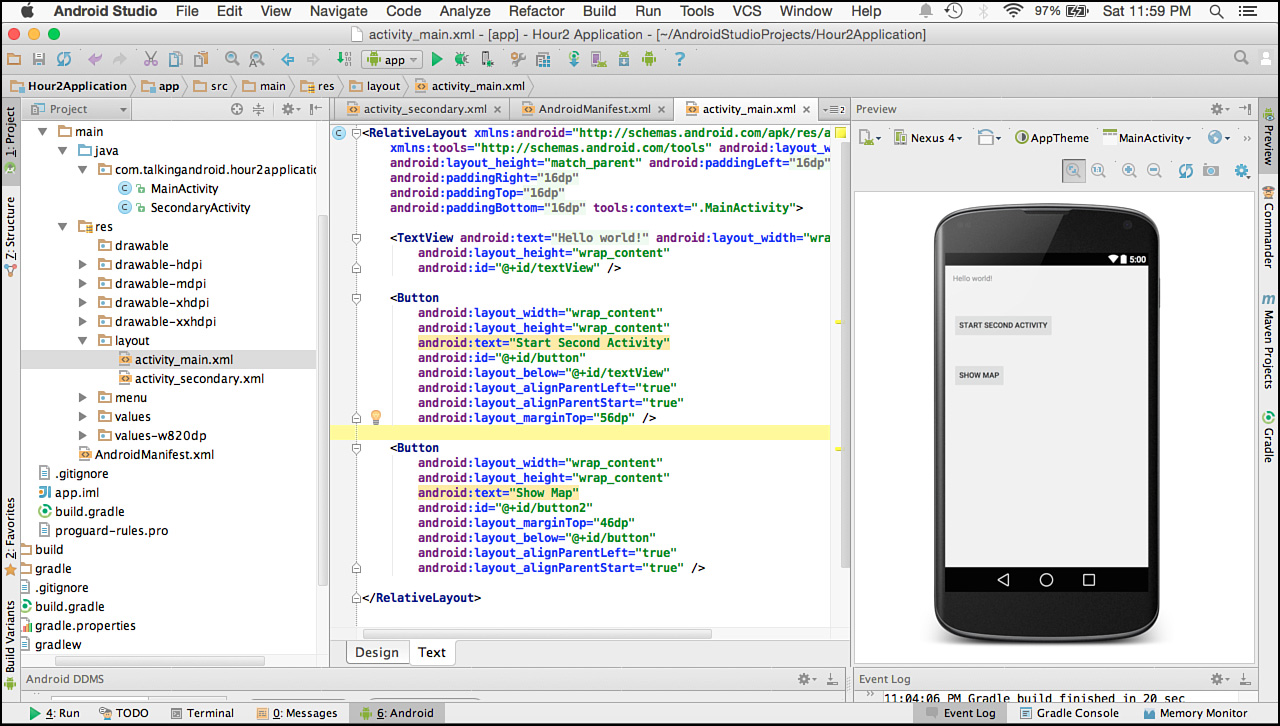
FIGURE 2.8 Adding a Show Map button in Android Studio.
Note: Using Maps in the Android Emulator
You can find online instructions for setting up Google Maps on the Android emulator. It is not a straightforward process. If you do not have access to a device, try using the map code as shown in Listing 2.6 and considering adding a message that displays to indicate that no map app is available. The emulator will have a browser, and you can work with the ACTION_VIEW for a web page in the emulator.
You will add code to MainActivity.java to show a map when the Show Map button has been clicked. The code is similar to what you did to start the second Activity. You will create the button and add an onClickListener(). The difference is the Intent definition.
Listing 2.6 shows the additional code that is added to MainActivity.java. The String geoURI is defined in line 5 using the format for location and a zoom level of 23. An Intent called mapIntent is created on line 8 and used in the startActivity() method on line 9. Line 8 uses the resolveActivity() method to determine whether an Activity exists that will handle the specified Intent.
LISTING 2.6 MainActivity.java: Intent to Handle Location
 1: Button mapButton =  (Button) findViewById(R.id.button2) ;
 2: mapButton.setOnClickListener(new View.OnClickListener() {
 3:     @Override
 4:      public void onClick(View view) {
 5:          String geoURI = "geo:37.422,-122.084?z=23";
 6:          Uri geo = Uri.parse(geoURI);
 7:          Intent mapIntent = new Intent(Intent.ACTION_VIEW, geo);
 8:          if (mapIntent.resolveActivity(getPackageManager()) != null) {
 9:              startActivity(mapIntent);
10:          }
11:      }
12: });
On some devices, the mapIntent may be handled by the Google Map app or the Google Earth app; the user is given a choice of which app to use. Figure 2.9 shows the app chooser screen and result of showing the GooglePlex at zoom level 23.

FIGURE 2.9 Showing GooglePlex using geo Intent.
Creating an Intent to view a web page is similar to showing a location on a map. For viewing a web page, the Intent.ACTION_VIEW is used. The URI to use is created from the string for the web page to view. To view the Google search page, use http://www.google.com.
Putting it all together, the code to create an Intent and start an Activity to show a web page is shown in Listing 2.7.
LISTING 2.7 Creating an Intent to Show a Web Page
1: String webURI = "http://www.google.com";
2: Uri web = Uri.parse(webURI);
3: Intent webIntent = new Intent(Intent.ACTION_VIEW, web);
4: if (webIntent.resolveActivity(getPackageManager()) != null) {
5:     startActivity(webIntent)
6: }
Many actions are available in addition to the ACTION_VIEW actions that you tried in this chapter. You can use ACTION_DIAL to dial a phone number and ACTION_SEND to send an email or text message. Actions such as ACTION_PICK can be used to select an image.
You have defined Intents using an action and additional data in the form of a URI. For more complex actions, you may create the Intent and then add multiple extras. For example, you could create an Intent with ACTION_SEND and add parameters for the recipient and subject. Any Activity that handles this Intent will be presented to the user, including email apps:
   String[] recipient = {"carmendelessio@gmail.com"};
   Intent emailIntent = new Intent(Intent.ACTION_SEND);
   emailIntent.putExtra(Intent.EXTRA_EMAIL, recipient);
   emailIntent.putExtra(Intent.EXTRA_SUBJECT, "About Android in 24");
   emailIntent.putExtra(Intent.EXTRA_TEXT, "Hi Carmen, ");
You have created an app to handle several kinds of Intents. When you are creating an Android app, it is a good practice to determine whether there are one or more existing built-in Intents that might help in your development effort. Need to take a picture, pick a photo, or send a text message? There’s an Intent for that.
You can also handle Intents that come from other apps. Currently, SecondaryActivity checks the Intent for data that was passed from MainActivity. You can modify SecondaryActivity to handle text being passed from other apps. That will require changes to the manifest file and changes to the code. The manifest file will be changed to show that SecondaryActivity accepts ACTION_SEND actions for plain-text messages. The code is changed to do three things. First, it checks to verify that the Intent is not null. Then it checks to see if the Intent has data passed from MainActivity. If there is no data from MainActivity, there will be a check to see whether data has been passed from another app. If any plain-text data has been passed, that data is displayed.
The changes to AndroidManifest.xml indicate that SecondaryActivity will handle ACTION_SEND. In Listing 2.8, the Intent filter is added. SecondaryActivity responds to the SEND action for plain-text data. That is indicated on lines 5 and 7.
LISTING 2.8 AndroidManifest.xml for SecondaryActivity.java
1: <Activity
2:   android:name=".SecondaryActivity"
3:   android:label="@string/title_Activity_secondary" >
4:   <Intent-filter>
5:       <action android:name="android.Intent.action.SEND" />
6:       <category android:name="android.Intent.category.DEFAULT" />
7:       <data android:mimeType="text/plain" />
8:   </Intent-filter>
9: </Activity>
Changes are required in the code in SecondaryActivity.java to check for an Intent and to see which type of Intent is being passed. You want SecondaryActivity to display a message from MainActivity.java and to display any text passed via an Intent that uses the ACTION_SEND action.
All changes for SecondaryActivity.java occur in the onCreate() method. Listing 2.9 shows the changes to the onCreate() method.
In line 6 of Listing 2.9, the method getIntent() is called to populate a variable named intent. Line 7 checks to see whether the intent is null. If it is not null, two more checks are made. To check the type of extra data, the method hasExtra() is used. In line 8, the hasExtra() method is passed com.talkingandroid.MESSAGE as a parameter. That is the check to see whether this code has launched from MainActivity.java. If it has, the extra data is retrieved. Similarly, on line 10, a check is made to see whether the Intent has an extra called Intent.EXTRA_TEXT. That is one of the predefined extras that is used with the SEND action. If the Intent.EXTRA_TEXT is available, it is used and displayed.
LISTING 2.9 SecondaryActivity.java Handling Implicit Intent
1: @Override
2:   protected void onCreate(Bundle savedInstanceState) {
3:          super.onCreate(savedInstanceState);
4:          setContentView(R.layout.Activity_secondary);
5:          String message = "no data from Intent";
6:          Intent= getIntent();
7:          if (Intent != null) {
8:              if (Intent.hasExtra("com.talkingandroid.MESSAGE")) {
9:                  message = Intent.getStringExtra("com.talkingandroid.MESSAGE");
10:             } else if (Intent.hasExtra(Intent.EXTRA_TEXT)) {
11:                 message = Intent.getStringExtra(Intent.EXTRA_TEXT);
12:             }
13:         }
14:         TextView messageTextView = (TextView) findViewById(R.id.message);
15:         messageTextView.setText(message);
16:     }
So, what happens when an app sends an Intent that can be handled by SecondaryActivity? You can check by using the browser app and sharing a page. The URL of the page is displayed in SecondaryActivity. Figure 2.10 shows how a web page is shared from the browser app in the emulator, the app chooser window, and the shared page URL being displayed in SecondaryActivity.
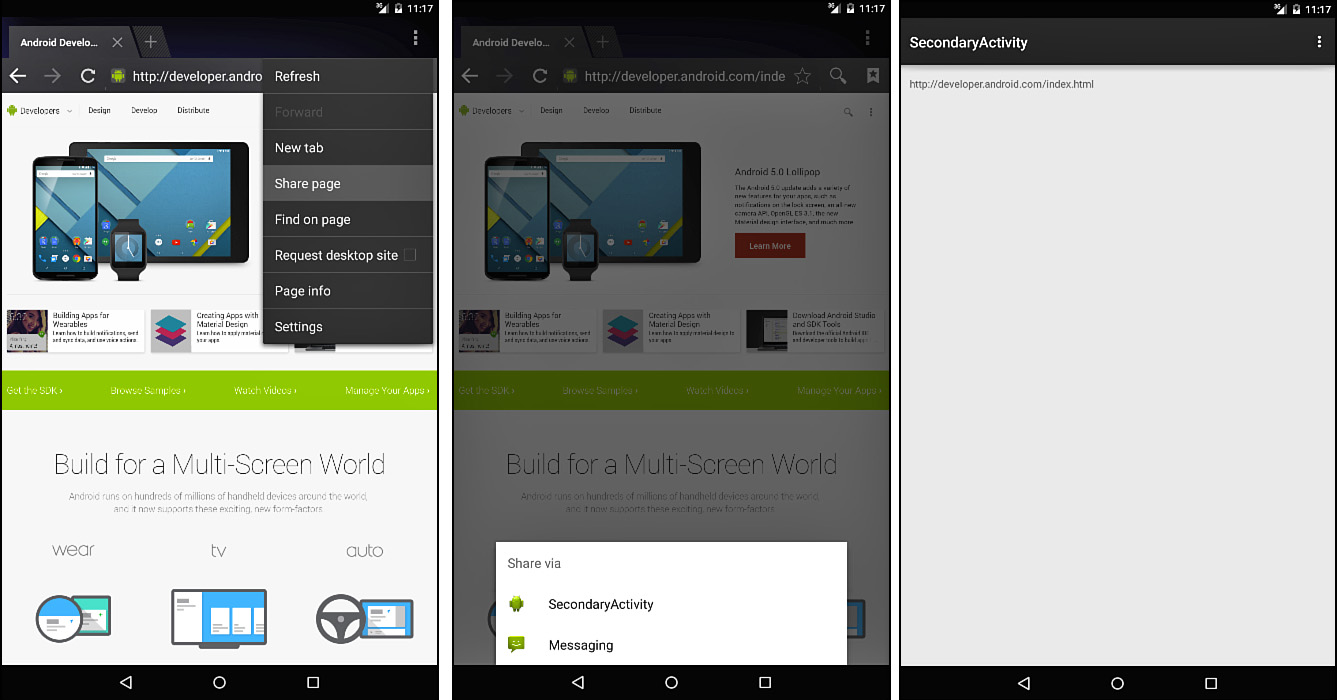
FIGURE 2.10 Starting SecondaryActivity via implicit Intent.
In this hour, you used Intents to start an Activity that you created and to start activities that are built in to Android such as showing a location on a map or launching a web browser to a specific page. In each case, the Intent consisted of an action to take and the data required to fulfill that action. You also saw how to create an Activity that responded to an Intent fired from another app. Intents are used throughout Android. You can create an app with your own set of activities, but each time you call the startActivity() method, you are using an Intent.
Q. What other Intents can I use?
A. The documentation for Android at http://developer.android.com has information on additional Intents. Looking at the documentation for the Intent (android.content.Intent) class can also be helpful. You might also sometimes find that a third-party app has published an Intent that you can use. The issue you may encounter in that case is determining whether the user has the third-party app installed so that you can use the published Intent! Typically, in cases like that, there is information on how to handle that case.
Q. Can I specify the exact app to use for an implicit Intent?
A. This concept comes up when you want to share data from your app and want to specify which apps can handle the shared data. The best advice is to let the intent resolution system do its job and show the list of apps that can handle the Intent. The user might have a preferred email or messaging app that will show up in that list.
The Intent to dial a telephone number is well-documented online at http://developer.android.com. Read about this Intent and implement a button in MainActivity.java that dials a specific phone number when clicked. Check the documentation on the Intent for making a phone call. How is it different?