Day 29. PC Component Installation, Part 1
CompTIA A+ 220-901 Exam Topics
- Objective 1.4: Install and configure PC expansion cards.
- Objective 1.5: Install and configure storage devices, and use appropriate media.
- Objective 1.6: Install various types of CPUs and apply the appropriate cooling methods.
Key Topics
In this day, we will install expansion cards on the motherboard and configure them to operate properly. We also will install the storage devices and discuss the various types of storage media. Finally, we will install the CPU on the motherboard and explore the methods that can be used to cool the CPU.
Motherboard Preparation and Installation
You install many components on the motherboard when building a computer. It is often much easier to install some of these components before installation of the motherboard itself.
CPU Characteristics
There are a few characteristics to consider when installing a CPU. The modern CPU has a lot of advanced technologies that provide increases in processing speed, memory bandwidth, and support for features such as virtualization and graphics.
Hyper-Threading
Hyper-threading is a technology used to enable a CPU to make calculations on two different sets of instructions at the same time. This simulates to the operating system (OS) two CPUs, often called virtual CPUs. The OS is able to divide tasks, or threads, between these virtual CPUs.
Cores
A CPU core is the part of the CPU package that performs calculations. The CPU package can contain more than one core. These types of CPUs are called multicore. A multicore CPU can have as many as 10 cores, or even more. Often, these cores share L1 cache, which increases the efficiency of the processor. Multicore processors create less heat, at lower frequencies.
Multicore CPUs can be combined with Hyper-Threading to enable the processor to work on as many as 20 threads or even more at the same time. Both Intel and AMD have processors with multiple cores.
CPU Cache
A computer has many types of storage. The farther away from the CPU data is stored, the slower the storage method is. For example, the hard disk drive (HDD) is a much slower storage media than dynamic random access memory (DRAM). The most frequently used instructions need to be accessed quickly, so they need to be very close, even within, the CPU. This is the function of the CPU cache.
CPU cache is made up of very high-speed RAM called static RAM (SRAM). SRAM is much faster than DRAM, but it is also much more expensive. Because SRAM is expensive and resides in the CPU package, the amount of storage is very limited.
There are three levels of CPU cache: L1, L2, and L3. L1, the fastest and smallest of the three, is built right in to the CPU and is where the processor stores the most commonly used instructions. L1 cache is very small—for example, a four-core processor can have only 32 KB for each CPU core. If the processor does not find the instructions it needs in L1 cache, it will then look in L2 cache.
L2 cache also is built right in to the CPU. This RAM is slower than L1 but is still much faster than DRAM. L2 cache stores frequently used data, but not as frequently used as the data in L1. L2 cache is a larger cache than L1. For example, a four-core processor can have 256 KB for each CPU core. If the processor does not find the instructions it needs in this cache, it will move to the largest and slowest cache, L3.
L3 cache may be the slowest of the three, but it is still much faster than DRAM. When the CPU cannot find the instructions it needs in L3, it will look to DRAM to find them. There is more L3 cache RAM than any other type of CPU cache. For example, a four-core processor can have 8 MB of cache. L3 cache is unlike L1 or L2, whereas it is shared between all the CPU cores.
Virtualization
Through the use of special hardware or software, called a virtual machine manager (VMM), or hypervisor, more than one OS can be run on a computer at the same time. The software emulates, or virtualizes, all the hardware of a physical computer. The computer or OS performing the virtualization is known as the host, and each installed OS instance is known as the guest.
There are two types of virtualization. The first type is where the guest installations, or virtual machines (VMs), run on dedicated hardware. This is known as a Type 1 hypervisor. A Type 2 hypervisor is a program that runs inside an OS to host additional OSes within it. With either type, multiple instances of multiple types of OSes can be run simultaneously.
It is important to note that a computer used for virtualization requires robust hardware. The more OSes that need to run, the more powerful the CPU needs to be and the more RAM the computer must have installed. Also, because each VM is stored as a large file, hard drive space must be available for each one.
For Type 2 hypervisors, the CPU must support virtualization. Both Intel and AMD CPUs use special extensions to support virtualization. Intel uses the VT extension, whereas AMD uses the AMD-V extension. The motherboard chipset, BIOS/UEFI, and CPU must support virtualization technology.
Architecture (32-Bit Versus 64-Bit)
For many years, the CPU was manufactured with registers that were 32 bits wide. The register is temporary storage in the CPU where the CPU processes data. This is a 32-bit (x86) architecture. OSes and programs were designed to work with this parameter. DRAM in an x86 computer is limited to 4 GB. The CPU simply cannot see or use any more RAM even if more is installed.
Today, the CPU is manufactured with a 64-bit (x64) architecture. The registers are much wider and therefore can theoretically address 256 terabytes! When using an x64 CPU, the OS must support the architecture as well. Although older programs based on x86 architecture usually are compatible with x64 OSes, x64 OSes and programs are not usable with a x86 CPU.
Integrated GPU
To display video, a graphics processing unit (GPU) is used. Some motherboards might have this chip added to provide basic graphics. The chip may be integrated with the northbridge, be separately installed on the motherboard, or even be integrated into the CPU.
An integrated GPU is fine for basic computing, especially in laptops, but for modern games, a separate, powerful graphics card is necessary. Even if the CPU or motherboard has an integrated GPU, a graphics card can still be installed. You might need to turn off the integrated GPU in the BIOS/UEFI.
Disable Execute Bit
To help prevent viruses and other malicious programs from damaging the OS files, the modern CPU uses special technology. Sometimes called the disable execute bit, the No-eXecute (NX) bit defines which areas of memory will be used for standard data storage and which will be used for storage of CPU instructions.
To use the NX bit, the OS must support its function. When enabled in the OS, the OS is able to mark areas of memory so that no code can be executed from these areas. This prevents malicious programs from being able to inject code into areas of memory where other programs are stored.
CPU Cooling
The CPU is an electrical device. The more work that a CPU performs, the more electricity it needs to perform calculations. The more electricity it uses, the hotter it becomes. This heat must be dissipated so that the CPU does not overheat. Heat can be dissipated from the CPU in two common ways: into the air using a heat sink and fan assembly or using a liquid-based solution.
Heat Sink and Fan Assembly
A heat sink is simply a block of metal installed on the top of the CPU to conduct heat away from the CPU. Metal fins on the heat sink increase the amount of surface area with which heat can be conducted and dissipated into the air. This is all that is needed to keep some CPUs cool. This is known as a passive heat sink.
Very often, a fan is attached to the top of the heat sink to blow cool air down onto the heat sink, rapidly removing the hot air from the fins. This is known as an active heat sink. The more powerful the CPU, the larger the fan needs to be or the faster the fan needs to spin to dissipate more heat.
Liquid-based
For very powerful CPUs, or CPUs that have been overclocked, a heat sink and fan assembly is simply not efficient enough to keep the CPU cool. A liquid-based cooling solution can be used to prevent the CPU from overheating.
In a liquid-based cooling solution, a cooling block is installed on top of the CPU instead of a heat sink. Hoses are attached to the cooling block to carry coolant to and from the cooling block. The other ends of the hoses are attached to a radiator outside the case.
This solution is similar to the cooling of an engine block. Coolant heats up in the cooling block and is pumped through the hose to the radiator, where it is dissipated into the air. The coolant is then returned to the cooling block.
This solution is risky. If leaks develop, the CPU and motherboard can be damaged. If the water pump fails or if air becomes trapped in the hoses, the CPU will overheat.
Thermal Paste
The CPU and heat sink or water block do not contact each other perfectly. This is because the metal has tiny grooves. These tiny grooves contain air and lower the efficiency of the cooling solution because there isn’t a perfect connection. To overcome this obstacle, thermal paste is used. The paste fills these grooves to provide much better contact between the top of the CPU and the bottom of the heat sink or water block.
CPU Installation
Before installing any components, you need to ground yourself to the device. Use an antistatic wrist strap and antistatic mat to keep you, the computer, and all the components at the same electrical potential.
To install the CPU, first remove any cover installed in the CPU socket. Unlatch the retaining lever and lift it fully. For Intel sockets, lift the retaining bracket.
The next step is to locate pin 1 on the socket and pin 1 on the CPU, as shown in Figure 29-1. Make sure that the CPU is aligned correctly, and gently place it in the socket. For an Intel CPU, lower the retaining bracket. Finally, lower the retaining lever and latch it into place.
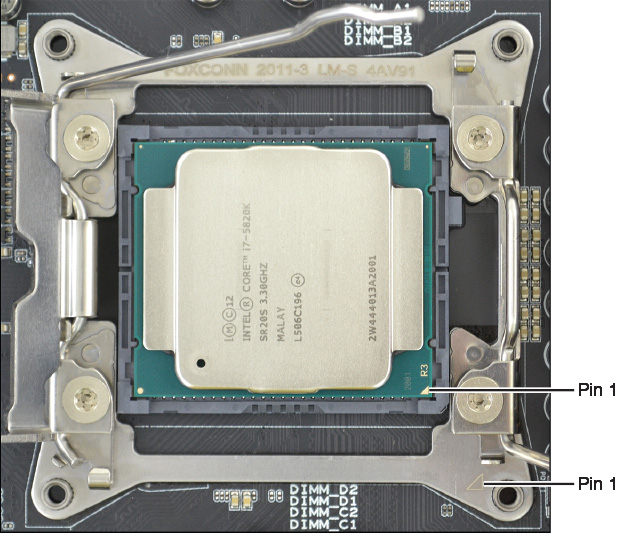
Figure 29-1 CPU Pin 1 Location
The final step is to apply a cooling solution. Follow the instructions that came with the CPU or thermal paste, and apply the paste. Attach the cooling solution using the instructions that came with it and the motherboard to ensure that it is installed properly. Don’t forget to connect the fan cable to the motherboard fan connector.
RAM Installation
Now that the CPU has been installed, you need to install the RAM modules. The first thing to do is to unlatch the locking mechanisms on all the RAM slots that will be used. Next, identify any groups of slots that would be used for multichannel RAM. These are most often indicated by color groups.
Finally, note the location of the notch in each stick and the orientation of where that notch will fit into the socket. Press each stick into the socket, straight down and firmly until the locking latch(es) click into the locked position.
Motherboard Installation
With the CPU and RAM installed on the motherboard, the motherboard can be installed into the case. Locate all the attachment points on the motherboard, and install the standoffs in the appropriate configuration locations in the case.
Next, install the I/O plate into the back of the case. Be sure to install it from the inside and align it with the orientation of the connectors on the back of the motherboard, which are shown in Figure 29-2.
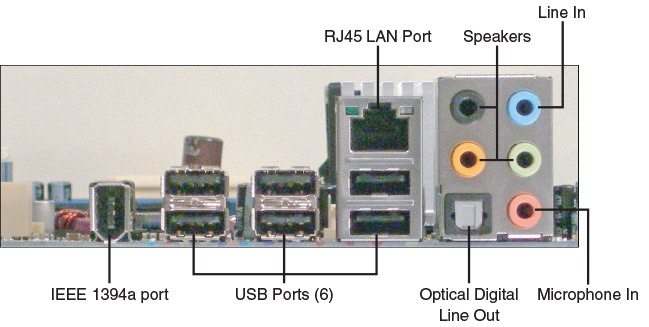
Figure 29-2 Motherboard I/O Connectors
Finally, place the motherboard on the standoffs and the connectors into the holes in the I/O plate. Secure the motherboard to the standoffs using the screws supplied with the motherboard.
Install Expansion Cards
With the motherboard installed, the next step is to install any expansion cards. There are several types of expansion cards and expansion slots. Make sure that each card is compatible with the motherboard and that available slots exist.
The steps to installing most expansion cards are basically the same. First, locate the proper expansion slot for the card and remove the cover that aligns to the slot from the back of the case. Next, press the card firmly into the slot and make sure it is seated all the way into the slot. Some slots have a locking latch that will click into place when the card is fully seated. Finally, secure the card to the case with a screw where the cover was removed.
After the card is successfully installed, connect any internal or external cables. Start the computer and let the OS find and install drivers, or install the drivers manually. Configure the expansion card using the software that came with the card or through the appropriate Control Panel application.
Media Cards
Media cards are installed to expand the audio and video capabilities of a computer. Here are some things to know about installing various types of media cards:
- Video cards—Video cards can be large, sometimes taking up two slots. Most often, they have fans, so it is a good idea not to install a card right next to the video card if possible. Video cards also might need additional power from the power supply.
- TV tuner cards—A TV tuner card needs to be connected to a signal source. This can be from cable TV or from an antenna.
- Video capture cards—Video capture cards require a source. Install this card where it can be most easily accessed for plugging in wires from the source.
- Sound cards—Sound cards can have multiple analog connections, a digital connection, or both. Make sure you have the proper connections for your speakers and microphones.
Communications Cards
Here are some things to know about installing the various types of communications cards:
- Network cards—Make sure you have drivers for these cards. You can’t download new drivers for anything else unless your network connection already works!
- Modem cards—Older modems use older slots. Check that you have the correct slot available for your modem.
- Wireless/cellular cards—These cards often have an antenna that needs to be connected to the back of the card after installation.
Cards That Add Ports
Here are some things to know about installing different types of cards that add ports:
- USB cards—Some USB cards have connectors for cables inside the computer. These can connect to ports on the front of the computer case.
- FireWire cards—The ports on this card look similar to USB ports. Do not confuse them.
- Thunderbolt cards—Use fiber if you need to connect devices more than 3 meters away.
Other Expansion Cards
Here are some things to know about installing other types of expansion cards:
- Storage cards—There are numerous different types of storage cards. Be sure to install memory on the card itself if it is required.
- Riser cards—This expansion device plugs into a motherboard to provide expansion slots of its own. Make sure there is enough space for this type of card.
Install Storage Devices
The installation of storage devices is easy. They are placed in either a 5.25-inch or 3.5-inch drive bay of a desktop case. For devices with removable media, the bay must be accessible from the outside of the case. Remove the bay cover before installing the storage device.
Magnetic Hard Disk Drives
Hard disk drives (HDD) are usually 3.5 inches in width and most often are installed in 3.5-inch bays. With an adapter, however, the drive can be made to fit in a 5.25-inch bay if necessary. Adapters can also be used for drives that are 2.5 inches wide. Simply slide the hard drive into the bay, align the screw holes with those in the case, and attach it to the bay using screws. After installation, connect the SATA data and power cables. Be gentle because SATA connectors are a little fragile.
Magnetic hard drives spin at very high speeds. The higher the speed, the faster the drive can read and write data to the platters. Most hard drives spin at 5400 rpm, 7200 rpm, or 10000 rpm.
Solid State/Flash Drives
Solid state drives (SSDs) are installed in the same manner as HDDs are. The exception to this is some SSDs are connected via PCIe x16. These are installed like any other expansion card. These storage devices are extremely fast.
Hybrid storage drives also are available. These combine an HDD with flash memory. These drives are faster than HDDs but slower than SSDs.
Many electronic devices use flash memory cards to store data. Often, a reading device can be installed that will read several types of memory cards. After attaching the device to the drive bay, they most commonly are connected to an internal USB connection. Available cards include Compact Flash (CF), Secure Digital (SD), miniSD, microSD, and xD.
Another type of flash storage—mostly used in mobile devices—is embedded MMC (eMMC). eMMC has very fast data transfer rates.
Optical Drives
Like HDDs and SSDs, optical drives are installed in drive bays. Optical drives are installed in 5.25-inch bays that have access from the outside of the case. Three types of optical media are used in optical drives: compact disc (CD), digital versatile disc (DVD), and Blu-ray disc (BD). A CD typically holds up to 700 MB, but some CDs can hold 650 MB, 800 MB, or even 900 MB. DVDs and Blu-ray discs can hold much more data than CDs, as shown in Tables 29-1, 29-2, and 29-3.
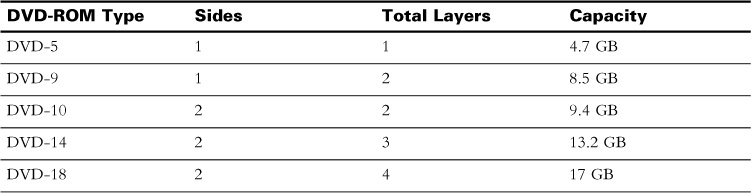
Table 29-1 DVD Types and Capacities
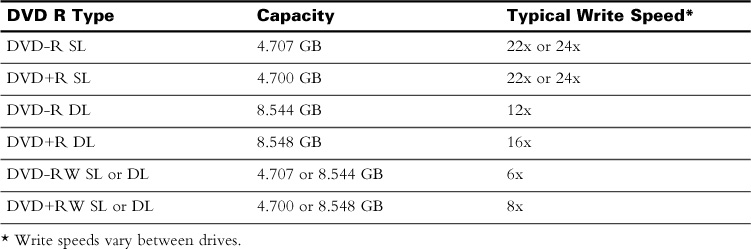
Table 29-2 DVD R Types and Capacities
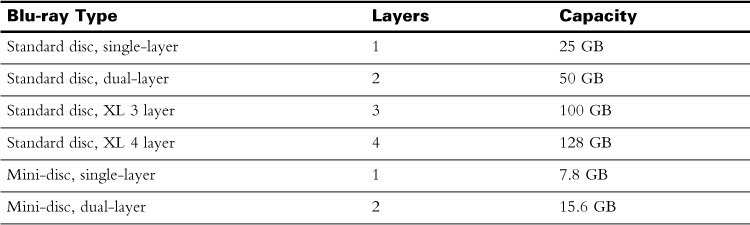
Table 29-3 Blu-ray Types and Capacities
Hotswappable Drives
Some storage devices are hotswappable. This means that the device can be removed while the computer is powered. USB, FireWire, and SATA all support hotswapping. Most often, the hotswappable drive must be “ejected” through the OS, which enables the OS to expect the removal of the device.
RAID Types
HDDs and SSDs are susceptible to corruption and failure. A backup solution should always be used, but to protect data from corruption, a technology known as a redundant array of independent (or inexpensive) disks (RAID) can be used. RAID can be built in to the motherboard or offered as an expansion card.
There are four common RAID levels, each with its own pros and cons. RAID type 0 does not provide fault tolerance, but it does increase data storage and retrieval speed. Table 29-4 describes the basics of the RAID levels.
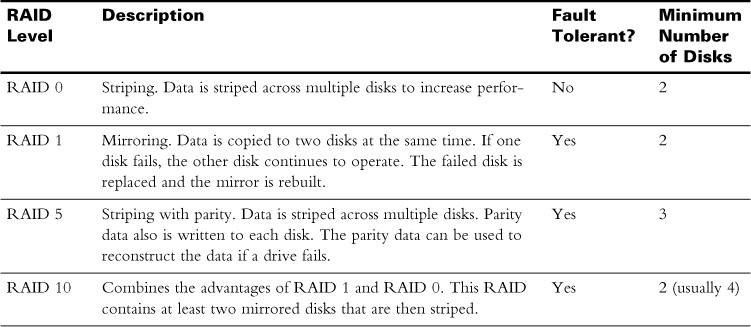
Table 29-4 RAID Levels
Tape Drive
A tape drive can be used to back up, or archive, data. A tape drive can be connected by USB, FireWire, SATA, or other connection. The drive can either be installed in the case or connected externally. A single tape may hold up to 800 GB or, if the data is compressed, may hold as much as 1600 GB. With the popularity and availability of cloud storage, tape drives are not very common any more.
 Activity 29-1: Order the Steps of PC Component Installation
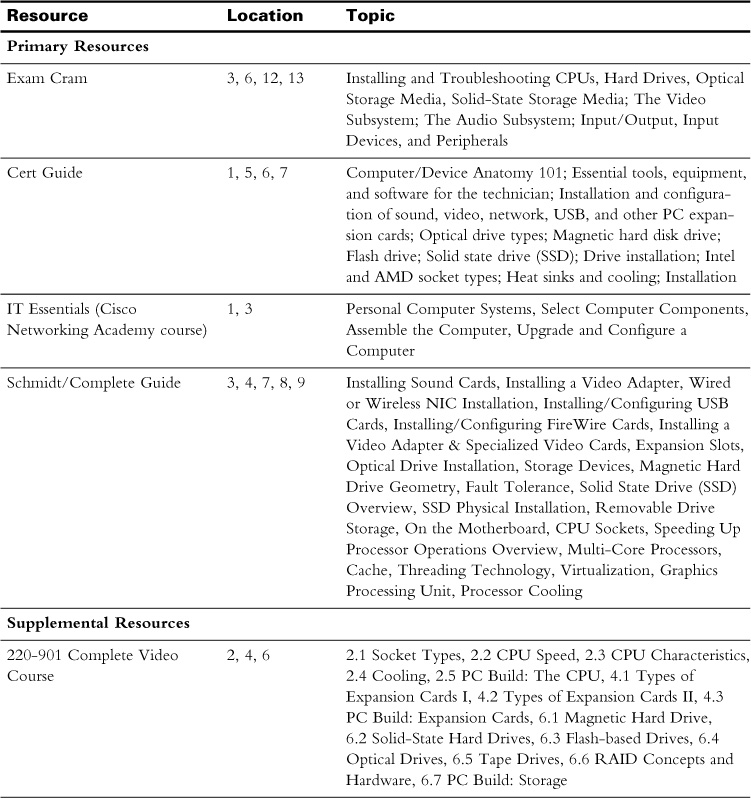
Study Resources
For today’s exam topics, refer to the following resources for more study.
 Check Your Understanding