
This hour focuses on getting you ready to rock and roll in the Unity environment. We start by looking at the different Unity licenses, choosing one, and then installing it. Once that is installed, you learn how to create new projects as well as open existing ones. You open the powerful Unity editor, and we examine its various components. Finally, you learn to navigate a scene using mouse controls and keyboard commands. This chapter is meant to be hands-on, so download Unity while reading and follow along.
Note: Supported Operating Systems and Hardware
To use Unity, you must be using a Windows PC or a Macintosh computer. Although it is possible to build your projects to run on a Linux machine, the Unity editor itself will not. Your computer must also meet the minimum requirements outlined here (taken from the Unity website at the time of writing):
Note that these are minimum requirements.
To begin using Unity, you first need to download and install it. Software installation is a pretty simple and straightforward process these days, and Unity is no exception. Before we can install anything, though, we need to look at the two available Unity licenses: Unity Personal and Unity Professional. Unity Personal is free and more than sufficient to complete all the examples and projects in this book. In fact, Unity Personal contains everything you need to make games commercially, up to an annual revenue of $100,000! If you’re lucky enough to start earning more than this, or you want access to Unity Pro’s advanced features (mainly aimed at teams), then you can always upgrade in the future.
For the purposes of this chapter, we will assume you are sticking with the Unity Personal license. If you went with the Professional version, the process will be very similar, only deviating when it comes to time to choose the license. When you are ready to begin downloading and installing Unity, follow these steps:
1. Download the Unity installer from the Unity download page at http://unity3d.com/get-unity/download.
2. Run the installer and follow the prompts as you would with any other piece of software.
3. When prompted, be sure to leave the Unity 5, Web Player, and Standard Assets check boxes checked (see Figure 1.1). It is OK to install the Example Project if you have space; it won’t affect your experience of the book.
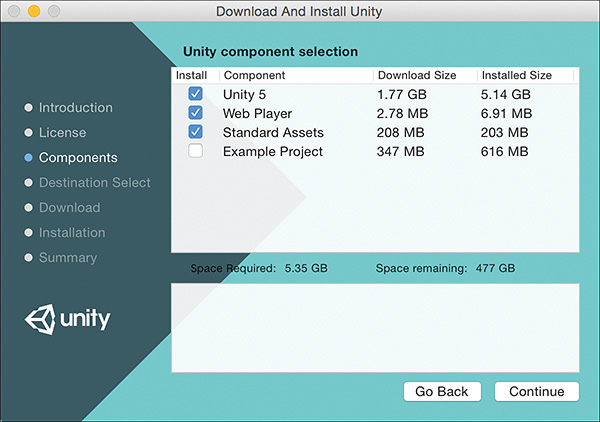
FIGURE 1.1 Prompt to choose the installed components.
4. Choose an install location for Unity. It is recommended that you leave the default unless you know what you are doing.
5. Unity 5 will take some time to download, during which time you’ll see a download screen (see Figure 1.2).
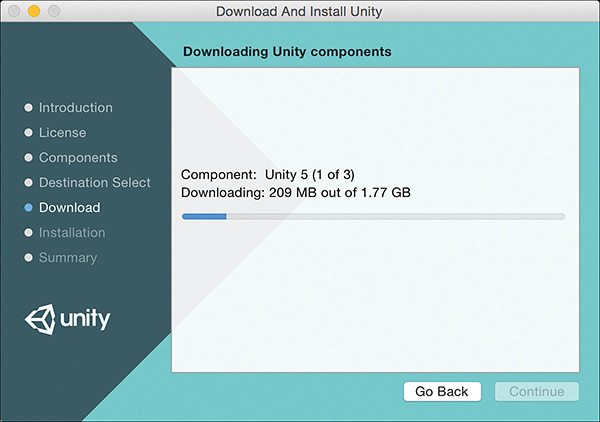
FIGURE 1.2 Be patient while Unity 5 downloads.
Caution: Internet Links
All Internet links are current as of the time of this writing. Web locations do change sometimes, though. If the material you are looking for is no longer provided at the links we give you, a good Internet search should turn up what you are looking for.
Tip: Opening the Project Dialog
When you run Unity, the Project dialog will show each time. If you want last project to open automatically instead, you can set this in Edit > Preferences (Unity > Preferences on a Mac) and check the box Load Previous Project on Startup.
6. If you already have a Unity account, you may be asked to login with it. If you don’t yet have a Unity account, follow the instructions to create one. You will need access to your email to verify your address.
7. That’s it! Unity installation is now complete.
Now that you have Unity installed, you can begin exploring the Unity editor. The Unity editor is the visual component that enables you to build your games in a “what you see is what you get” fashion. Because most interaction we have is actually with the editor, we often just refer to it as Unity. The next portion of this chapter examines all the different elements of the Unity editor and how they fit together to make games.
When opening Unity for the first time, you will see the Project dialog (see Figure 1.3). This window is what we use to open recent projects, browse for projects that have already been created, or start new projects.
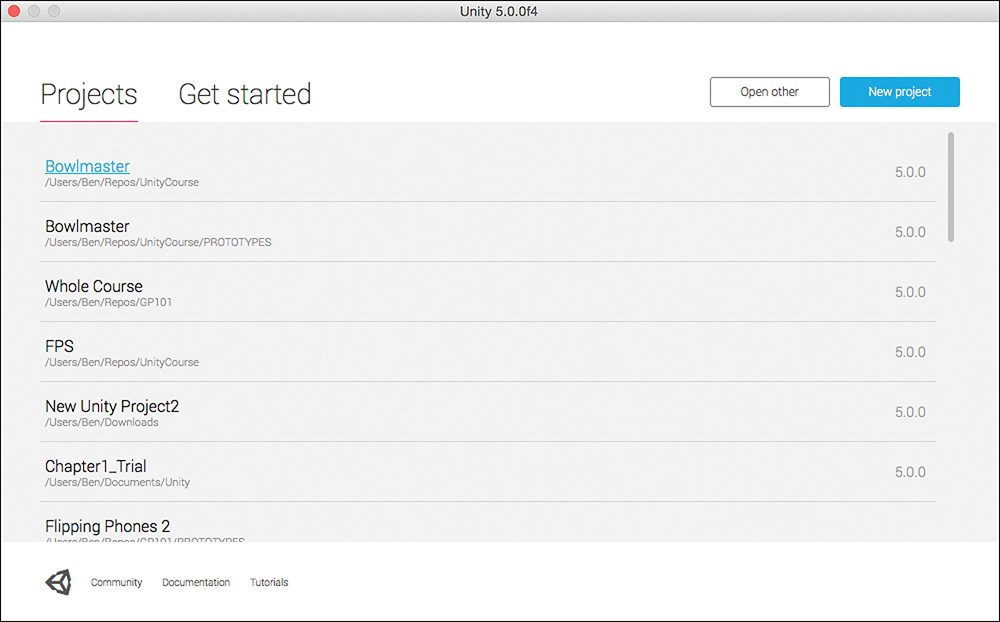
FIGURE 1.3 The Project dialog (Mac version shown, the Windows version is similar).
If you have created a project in Unity already, whenever you open Unity, it will go directly into that project. To get back to the Project dialog, you go (from inside Unity) to File > New Project to get to the Create New Project dialog, or you go to File > Open Project to get to the Open Project dialog.
Caution: Projects and Packages
At first, you might be tempted to select a bunch of “Asset packages” in the Create New Project dialog. We want to caution you against frivolously adding packages to your project, however, because unneeded items can add size and lag. Unused packages just take up space and provide no real benefit. With that in mind, it is better to wait until you actually need a package to import it. Even then, only import the parts of the package that you intend to use.
So far, we have installed Unity and looked at the Project dialog. Now it is time to dig in and start playing around. When you open a new Unity project for the first time, you will see a collection of gray windows (called views), and everything will be rather empty (see Figure 1.5). Never fear, we will quickly get this place hopping. In the following sections, we look at each of the unique views one by one. First, though, we want to talk about the layout as a whole.
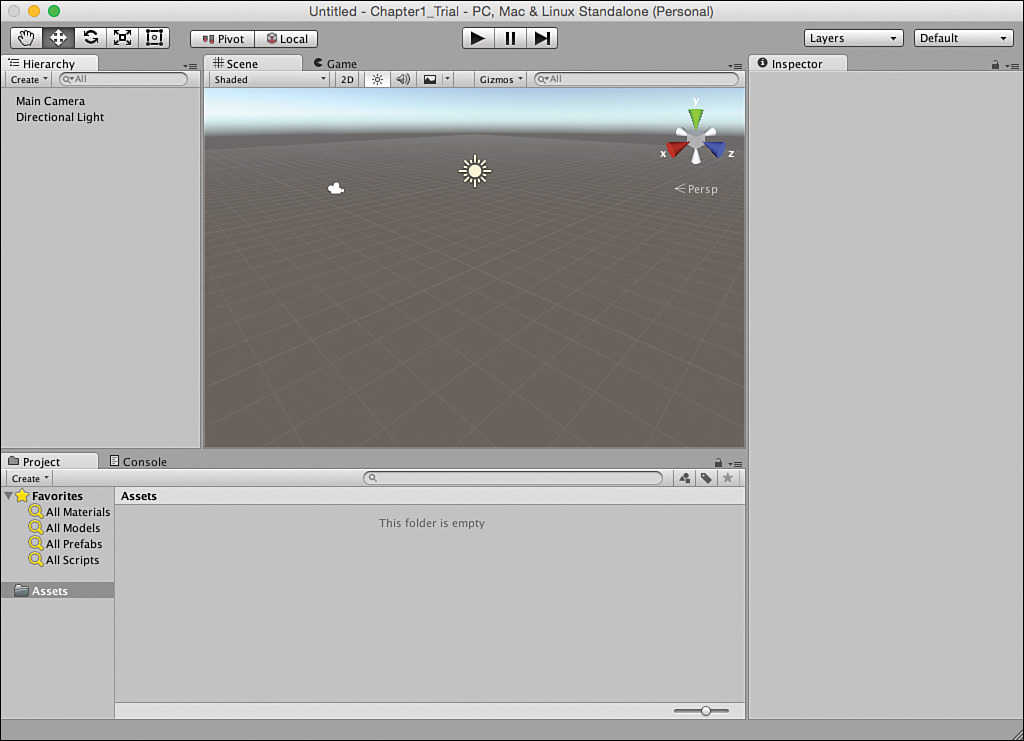
FIGURE 1.5 The Unity interface.
Note: Finding the Right Layout
No two people are alike, and likewise, no two ideal layouts are alike. A good layout will help you work on your projects and make things much easier for you. Be sure to take the time to fiddle around with the layout to find the one that works best for you. You will be working a lot with Unity. It pays to set your environment up in a way that is comfortable.
For starters, Unity allows the user to determine exactly how they want to work. This means that any of the views can be moved, docked, duplicated, or changed. For instance, if you click the word Hierarchy (on the left) to select the Hierarchy view and drag it over to the Inspector (on the right), you can tab the two views together. You can also place your cursor on any line between views and resize the windows. In fact, why don’t you take a moment to play around and move things so that they are to your liking. If you end up with a layout that you don’t much care for, never fear. You can quickly and easily switch back to the built-in default view by going to Window > Layouts > Default Layout. While we are on the topic of built-in layouts, go ahead and try out a few of the other layouts (we’re a fan of the Wide layout). If you create a custom layout you like, you can always save it by going to Window > Layouts > Save Layout. Now if you accidentally change your layout, you can always get it back.
If you would like to duplicate a view, it is a fairly straightforward process as well. You can simply right-click any view tab (the tab is the part sticking up with the views name on it), hover the mouse cursor over Add Tab, and a list of views will pop up for you to choose from (see Figure 1.6). You may wonder why you would want to duplicate a view. It is possible that in your view-moving frenzy, you accidentally closed the view. Re-adding the tab will give it back to you. Also, consider the capability to create multiple Scene views. Each Scene view could align with a specific element or axis within your project. If you want to see this in action, check out the four Split built-in layout by going to Window > Layouts > 4 Split. (If you created a layout that you like, be sure to save it first.)
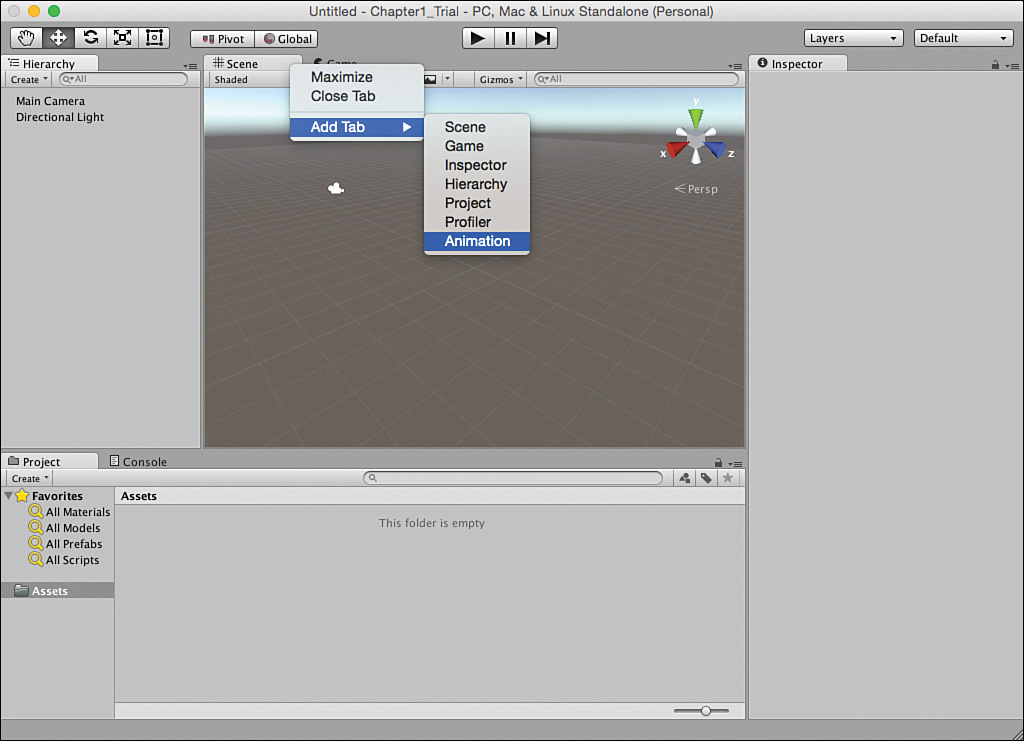
FIGURE 1.6 Adding a new tab.
Note: Assets and Objects
An asset is any item that exists as a file in your assets folder. All textures, meshes, sound files, scripts, and so on are considered assets. In contrast, if you create a game object, but it doesn’t create a corresponding file, it is not an asset.
Now, without further ado, let’s look at the specific views themselves.
Everything that has been created for a project (files, scripts, textures, models, and so on) can be found in the Project view (see Figure 1.7). This is the window into which all the assets and organization of our project go. When you create a new project, you will notice a single folder item called Assets. If you go to the folder on your hard drive where you save the project, you will also find an Assets folder. This is because Unity mirrors the Project view with the folders on the hard drive. If you create a file or folder in Unity, the corresponding one appears in the explorer (and vice versa). You can move items in the Project view simply by dragging and dropping. This enables you to place items inside folders or reorganize your project on the fly.
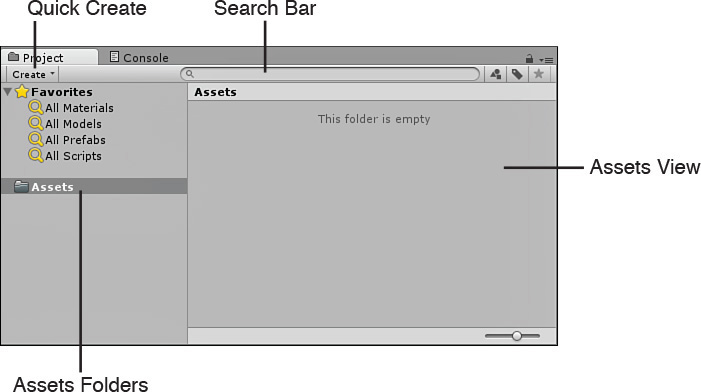
FIGURE 1.7 The Project view.
Caution: Moving Assets
Unity maintains links between the various assets associated with projects. As a result, moving or deleting items outside of Unity could cause potential problems. As a general rule, it is a good idea to do all of your asset management inside Unity.
Whenever you click a folder in the Project view, the contents of the folder will be displayed under the Assets section on the right. As you can see in Figure 1.7, the Assets folder is currently empty, and therefore nothing is appearing on the right. If you would like to create assets, you can do so easily by clicking the Create drop-down menu. This menu enables you to add all manner of assets and folders to your project.
Favorites buttons enable you to quickly select all assets of a certain type. This makes it possible for you to get an “at a glance” view of your assets quickly. When you click one of the Favorites buttons (All Models, for instance) or perform a search with the built-in search bar, you will see that you can narrow down the results between Assets and Asset Store. If you click Asset Store, you will be able to browse the assets that fit your search criteria from the Unity Asset Store (see Figure 1.8). You can further narrow your results down by free and paid assets. This is a fantastic addition because it enables you to go and grab assets that you need for your project without ever leaving the Unity interface.
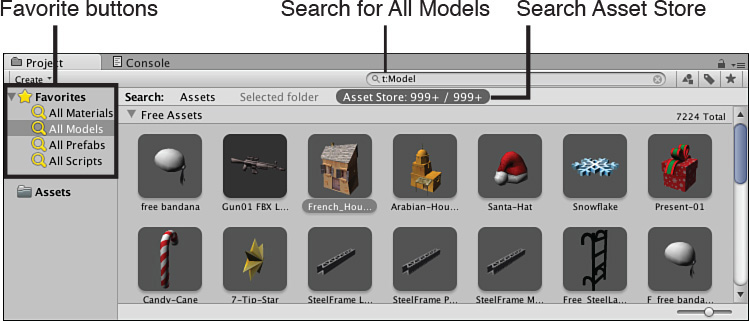
FIGURE 1.8 Searching the Unity Asset Store.
Tip: Project Organization
Organization is extremely important for project management. As your projects get bigger, the number of assets will start to grow until finding anything can be a chore. You can help prevent a lot of frustration by employing some simple organization rules:
Following these few, simple rules will really make a difference.
In many ways, the Hierarchy view (see Figure 1.9) is a lot like the Project view. The difference is that the Hierarchy view shows all the items in the current scene instead of the entire project. When you first create a project with Unity, you get the default scene, which has just two items in it, the Main Camera and a Directional Light. As you add items to your scene, they will appear in the Hierarchy view. Just like with the Project view, you can use the Create menu to quickly add items to your scene, search using the built-in search bar, and click and drag items to organize and “nest” them.
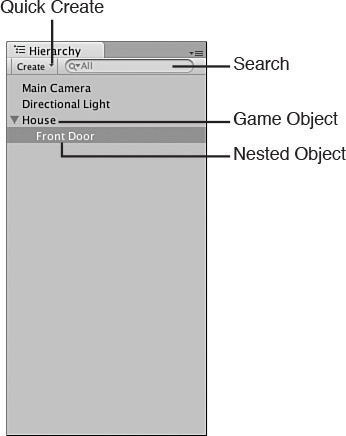
FIGURE 1.9 The Hierarchy view.
Tip: Nesting
Nesting is the term for establishing a relationship between two or more items. In the Hierarchy view, clicking and dragging an item onto another item will nest the dragged item under the other. This is commonly known as a parent–child relationship. In this case, the object on top is the parent, and any objects below it are children. You will know when an object is nested because it will become indented. As you will see later, nesting objects in the Hierarchy view can affect how they behave.
Tip: Scenes
A scene is the term Unity uses to describe what you might already know as a level. As you develop a Unity project, each collection of objects and behaviors should be its own scene. Therefore, if you were building a game with a snow level and a jungle level, those would be separate scenes. You will see the words scene and level used interchangeably as you look for answers on the Internet.
Tip: Scene Organization
The first thing you should do when working with a new Unity project is create a Scenes folder under Assets in the Project view. This way, all your scenes (or levels) will be stored in the same place. Be sure to give your scenes a descriptive name. Scene1 may sound like a great name now, but when you have 30 scenes, it can get confusing.
The Inspector view enables you to see all of the properties of a currently selected item. Simply click any asset or object from the Project or Hierarchy view, and the Inspector view automatically propagates with information.
In Figure 1.10, we can see the Inspector view after the Main Camera object was selected from the Hierarchy view.
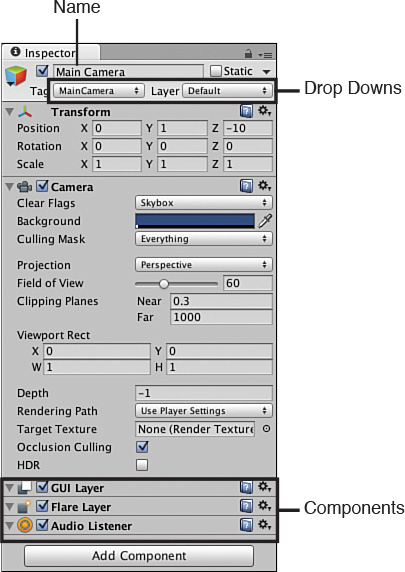
FIGURE 1.10 The Inspector view.
Let’s break down some of this functionality:
Caution: Changing Properties While Running a Scene
The capability to change the properties of an object and seeing those changes reflected immediately in a running scene is very powerful. It enables you to tweak things like movement speed, jumping height, collision power, and so on, all onthefly without stopping and starting the game. Be wary, though. Any changes you make to the properties of an object while the scene is running will be changed back when the scene finishes. If you make a change and like the result, be sure to remember what it was so that you can set it again when the scene is stopped.
The Scene view is the most important view you work with because it enables you to see your game visually as it is being built (see Figure 1.11). Using the mouse controls and a few hotkeys, you can move around inside your scene and place objects where you want them. This gives you an immense level of control.
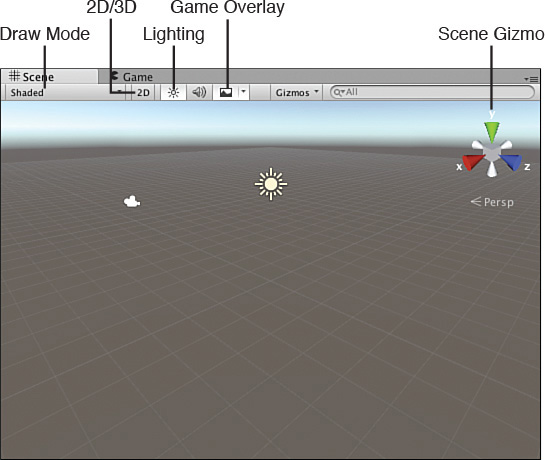
FIGURE 1.11 The Scene view.
Note: The Scene Gizmo
The scene gizmo gives you a lot of power over the Scene view. As you can see, the control has an X, Y, and Z indicator that aligns with the three axes. This makes it easy to tell exactly which way you are looking in the scene. We discuss axes and 3D space more in a later chapter. The gizmo also gives you active control over the scene alignment. If you click one of the gizmo’s axes, you will notice that the Scene view immediately snaps to that axis and gets set to a direction like top or left. Clicking the box in the center of the gizmo toggles you between Iso and Persp modes.
Iso stands for Isometric and is the 3D view with no perspective applied. Inversely, Persp stands for Perspective and is the 3D view with perspective applied. Try it out for yourself and see how it affects the Scene view. You’ll notice the icon before the word change from parallel lines for isometric and diverging lines like crow’s feet for perspective.
In a little bit, we will talk about moving around within a scene, but, first, let’s focus on the controls that are a part of the Scene view:
The last view to go over is the Game view. Essentially, the Game view allows you to “play” the game inside the editor by giving you a full simulation of the current scene. All elements of a game will function in the Game view just as they would if the project were fully built. Figure 1.12 shows you what a Game view looks like. Note that although the Play, Pause, and Step buttons are not technically a part of the Game view, they control the Game view and therefore are included in the image.
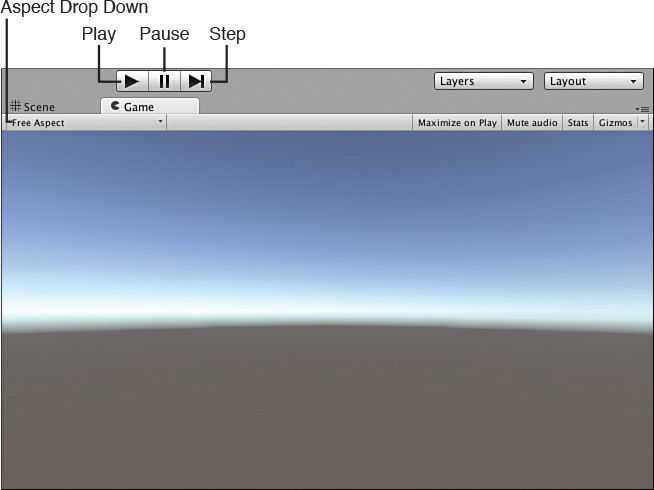
FIGURE 1.12 The Game view.
Tip: Missing Game View
If you find that the Game view is hidden behind the Scene view, or that the Game view tab is missing entirely, don’t worry. As soon as you click the Play button, a Game view tab will appear in the editor and begin displaying the game.
Note: Running, Paused, and Off
It can be difficult at first to determine what is meant by the terms running, paused, and off. When the game is not executing in the Game view, the game is said to be off. When a game is off, the game controls do not work and the game cannot be played. When the Play button is pressed and the game begins executing, the game is said to be running. Playing, executing, and running all mean the same thing. If the game is running and the Pause button is pressed, the game stops running but still maintains its state. At this point, the game is paused. The difference between a paused game and an off game is that a paused game will resume execution at the point it was paused, while an off game will begin executing at the beginning.
The Game view comes with some controls that assist us with testing our games:
Although not a view, the toolbar is an essential part of the Unity editor. Figure 1.13 shows the toolbar components:

FIGURE 1.13 The toolbar.
Caution: Different Cameras
When working in Unity, you will be dealing with two types of cameras. The first is the standard game object camera. You can see that you already have one in your scene (by default). The second type is more of an imaginary camera. It is not a camera in the traditional sense. Instead, it is what determines what we can see in the Scene view. In this chapter, when the camera is mentioned, it is the second type that is being referred to. You will not actually be manipulating the game object camera.
The Scene view gives you a lot of control over the construction of your game. The ability to place and modify items visually is very powerful. None of this is very useful though if you cannot move around inside the scene. This section covers a couple of different ways to change your position and navigate the Scene view.
The Hand tool (hotkey: Q) provides you a simple mechanic to move about the Scene view with the mouse (see Figure 1.14). This tool proves especially useful if you are using a mouse with only a single button (because other methods require a two-button mouse). Table 1.1 briefly explains each of the Hand tool controls.

FIGURE 1.14 The Hand tool.

TABLE 1.1 The Hand Tool Controls
Tip: Zoom
Regardless of what method you are using for navigation, scrolling the mouse wheel will always zoom the view within a scene. By default, the scene zooms in and out of the center of the Scene view. If you hold Alt while scrolling, however, you zoom in and out of wherever the mouse is currently pointing. Go ahead and give it a try!
You can find all the Unity hotkeys here:
http://docs.unity3d.com/Manual/UnityHotkeys.html
Flythrough mode enables you to move about the scene using a tradition first-person control scheme. This mode will feel right at home for anyone who plays first-person 3D games (such as the first-person shooter genre). If you don’t play those games, this mode might take a little getting used to. Once you become familiar with it, though, it will be second nature.
Holding down the right mouse button will put you into Flythrough mode. All the actions laid out for you in Table 1.2 require that the right mouse button be held down.
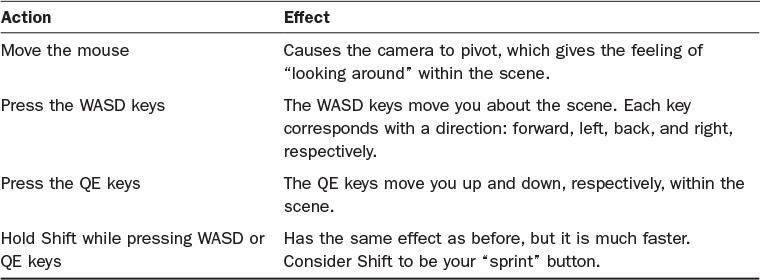
TABLE 1.2 Flythrough Mode Controls
Tip: Snap Controls
You have many ways to attain precious control over the scene navigation. Sometimes, you just want to quickly get around the scene though. For times like these, it is good to use what we call snap controls. If you want to quickly navigate to, and zoom in on, a game object in your scene, you can do so by highlighting the object in the Hierarchy view and pressing F. You will notice that the scene “snaps” to that game object. Another snap control is one you have seen already. The scene gizmo allows you to quickly snap the camera to any axis. This way, you can see an object from any angle without have to manually move the scene camera around. Be sure to learn the snap controls and navigating your scene quickly with snap!
In this hour, you took our first look at the Unity game engine. You started off by downloading and installing Unity. From there, you learned how to open and create projects. Then you learned about all the different views that make up the Unity editor. You also learned how to navigate around the Scene view.
Q. Are assets and game objects the same?
A. Not exactly. Basically the big difference is that assets have a corresponding file or group of files on the hard drive, whereas a game object does not. An asset may or may not contain a game object.
Q. There are a lot of different controls and options. Will I need to memorize them all right away?
A. Not at all. Most controls and options will already be set to a default state that covers most situations. As your knowledge of Unity grows, you can continue to learn more about the different controls that you have available to you. This chapter is just meant to show you what’s there and to give you some level of familiarity.
Take a moment and practice the concepts studied in this chapter. It is important to have a strong foundational understanding of the Unity editor because everything you will learn from here on out will utilize it in some way. To complete this exercise, do the following:
1. Create a new scene by going to File > New Scene or by pressing Ctrl+N (Command+N on a Mac).
2. Create a Scene folder under Assets in the Project view.
3. Save your scene by going to File > Save Scene or by pressing Ctrl+S (Command+S on a Mac). Be sure to save the scene in the Scenes folder you created and name it something descriptive.
4. Add a cube to your scene. To do this, click the GameObject menu at the top, place your mouse over Create Other, and select Cube from the pop-up menu.
5. Select the newly added cube in the Hierarchy view and experiment with its properties in the Inspector view.
6. Practice navigating around the Scene view using Flythrough mode, the Hand tool, and snap controls. Use the cube as a point of reference to help you navigate.