
The MongoDB shell is an interactive JavaScript shell. As such, it provides the capability to use JavaScript code directly in the shell or executed as a standalone JavaScript file. Subsequent hours that deal with using the shell to access the database and create and manipulate collections and documents provide examples that are written in JavaScript. To follow those examples, you need to understand at least some of the fundamental aspects of the JavaScript language.
The purpose of this hour is to familiarize you with some of the language basics of JavaScript, such as variables, functions, and objects. It is intended not as a full language guide, but rather as a synopsis of important syntax and idioms. If you are not familiar with JavaScript, it should give you enough background to understand the examples throughout the rest of the book. If you already know JavaScript well, you have the option of skipping this hour or reviewing it as a refresher.
The first place to begin within JavaScript is defining variables. Variables are a means to name data so that you can use that name to temporarily store and access data from your JavaScript files. Variables can point to simple data types such as numbers or strings, or they can point to more complex data types such as objects.
To define a variable in JavaScript, you use the var keyword and then give the variable a name, as in this example:
var myData;
You can also assign a value to the variable in the same line. For example, the following line of code creates a variable named myString and assigns it the value of "Some Text":
var myString = "Some Text";
It works as well as this code:
var myString;

myString = "Some Text";
After you have declared the variable, you can use the name to assign the variable a value and access the value of the variable. For example, the following code stores a string into the myString variable and then uses it when assigning the value to the newString variable:
var myString = "Some Text";

var newString = myString + " Some More Text";
Your variable names should describe the data stored in them so that you can easily use them later in your program. The only rules for creating variable names is that they must begin with a letter, $, or _ and they cannot contain spaces. Also remember that variable names are case sensitive, so myString is different from MyString.
JavaScript uses data types to determine how to handle data that is assigned to a variable. The variable type determines what operations you can perform on the variable, such as looping or executing. The following list describes the most common types of variables you will be working with through the book:
var myString = 'Some Text';

var anotherString = 'Some More Text';
var myInteger = 1;

var cost = 1.33;
true or false. Booleans are often used for flags. For example, you might set a variable to false at the beginning of some code and then check it upon completion to see if the code execution hit a certain spot. The following shows an example of defining a true variable and a false variable:var yes = true;
var no = false;
array[index]. The following is an example of creating a simple array and then accessing the first element, which is at index 0.var arr = ["one", "two", "three"];
var first = arr[0];
object.property syntax. The following example shows how to create and access properties with an object literal:var obj = {"name":"Brad", "occupation":"Hacker", "age", "Unknown"};
var name = obj.name;
null. Using null is better than assigning the variable a value of 0 or an empty string "" because those might be valid values for the variable. Assigning the variable null lets you assign no value and check against null inside your code.var newVar = null;
By the Way
JavaScript is a typeless language. You do not need to specify in the script what data type the variable is—the interpreter automatically figures out the correct data type for the variable. Additionally, you can assign a variable of one type to a value of a different type. For example, the following code defines a string variable and then assigns it to an integer value type:
var id = "testID";

id = 1;
This book uses three methods to output data from the MongoDB shell script:
print(data, ...);

printjson(object);

print(JSON.stringify(object));
The print() method simply prints the data arguments that are passed into it. For example, the statement
print("Hello From Mongo");
results in this output:
Hello From Mongo
If multiple data items are provided, they are printed together. For example, the statement
print("Hello", "From", "Mongo");
also outputs this:
Hello from Mongo
The printjson() method prints a pretty form of the JavaScript object. The print(JSON.stringify(object)) method also prints a tightly compact string form of a JavaScript object.
By the Way
You can also use the + operator to add strings or strings and numbers. This means you can quickly concatenate strings, as well as add numerical data to output strings. Table 3.1 shows that, when adding a numerical value and a string value, the numerical value is converted to a string and then the two strings are concatenated.
JavaScript operators enable you to alter the value of a variable. You are already familiar with the = operator used to assign values to variables. JavaScript provides several different operators that can be grouped into two types, arithmetic and assignment.
Arithmetic operators are used to perform operations between variable and direct values. Table 3.1 lists the arithmetic operations, along with the results that get applied.
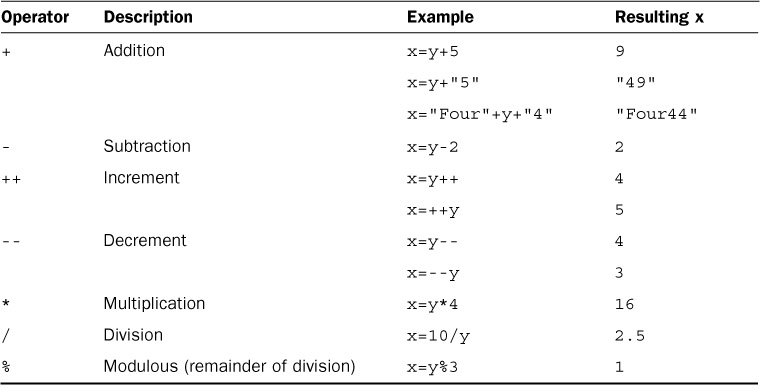
TABLE 3.1 JavaScript’s Arithmetic Operators—Results Based on y=4 Initially
Assignment operators assign a value to a variable. In addition to the = operator, several forms enable you to manipulate the data as you assign the value. Table 3.2 lists the assignment operations, along with the results that get applied.
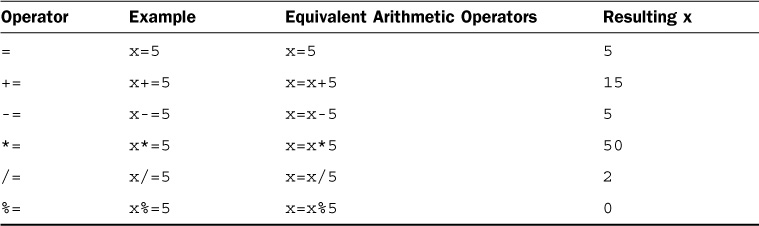
TABLE 3.2 JavaScript’s Assignment Operators—Results Based on x=10 Initially
Conditionals offer a way to apply logic to your applications so that certain code is executed only under the correct conditions. This is done by applying comparison logic to variable values. The following sections describe the comparisons available in JavaScript and tell how to apply them in conditional statements.
A comparison operator evaluates two pieces of data and returns either true if the evaluation is correct or false if the evaluation is not correct. Comparison operators compare the value on the left of the operator against the value on the right.
The simplest way to help you understand JavaScript comparison syntax is to provide a list with some examples. Table 3.3 lists the comparison operators, along with some examples.
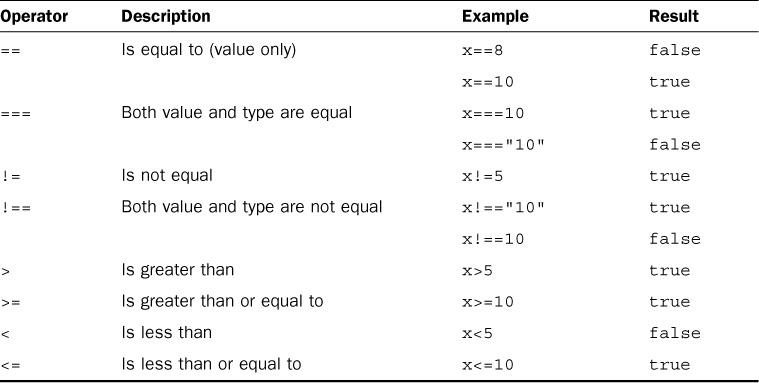
TABLE 3.3 JavaScript’s Comparison Operators—Results Based on x=10 Initially
You can chain multiple comparisons using logical operators and standard parenthesis. Table 3.4 lists the logical operators and tells how to use them to chain comparisons.
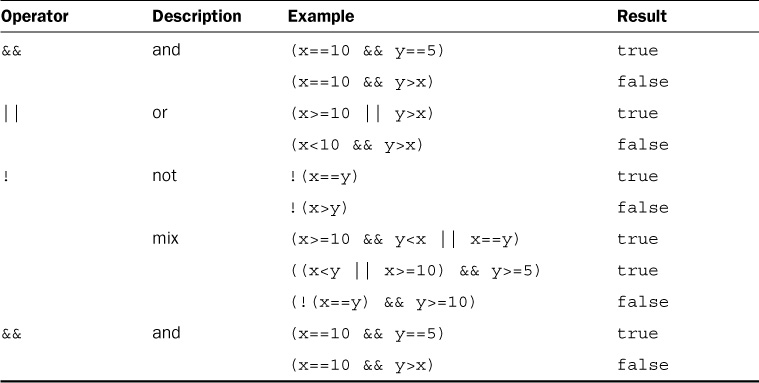
TABLE 3.4 JavaScript’s Comparison Operators—Results Based on x=10 and y=5 Initially
An if statement enables you to separate code execution based on the evaluation of a comparison. The following lines of code show the syntax. The conditional operators are in parentheses, and the code to execute if the conditional evaluates to true is in the brackets ({}):
if(x==5){

  do_something();

}
In addition to executing code only within the if statement block, you can specify an else block that gets executed only if the condition is false. For example:
if(x==5){

  do_something();

} else {

  do_something_else();

}
You can also chain if statements. To do this, add a conditional statement along with an else statement. For example:
if(x<5){

  do_something();

} else if(x<10) {

  do_something_else();

} else {

  do_nothing();

}
Another type of conditional logic is the switch statement. The switch statement enables you to evaluate an expression once and then, based on the value, execute one of many different sections of code.
The syntax for the switch statement follows:
switch(expression){

  case value1:

    <code to execute>

    break;

  case value2:

    <code to execute>

    break;

  default:

    <code to execute if not value1 or value2>

}
The switch statement evaluates the expression entirely and gets a value. That value might be a string, a number, a Boolean, or even an object. The switch expression is then compared to each value specified by the case statement. If the value matches, the code in the case statement is executed. If no values match, the default code is executed.
By the Way
Typically, each case statement includes a break command at the end to signal a break out of the switch statement. If no break is found, code execution continues with the next case statement.
Looping is a means of executing the same segment of code multiple times. This is extremely useful when you need to perform the same tasks on an array or set of objects.
JavaScript provides functionality to perform for and while loops. The following sections describe how to implement loops in your JavaScript.
The most basic type of looping in JavaScript is the while loop. A while loop tests an expression and continues to execute the code contained in its {} brackets until the expression evaluates to false.
For example, the following while loop executes until the value of i is equal to 5:
var i = 1;

while (i<5){

  print("Iteration " + i + "\n");

  i++;

}
The resulting output to the console is:
Iteration 1

Iteration 2

Iteration 3

Iteration 4
Another type of while loop is the do/while loop. This is useful if you always want to execute the code in the loop at least once and the expression cannot be tested until the code has executed at least once.
For example, the following do/while loop executes until the value of day is equal to Wednesday:
var days = ["Monday", "Tuesday", "Wednesday", "Thursday", "Friday"];

var i=0;

do{

  var day=days[i++];

  print("It's " + day + "\n");

} while (day != "Wednesday");
The resulting output to the console is
It's Monday

It's Tuesday

It's Wednesday
The JavaScript for loop enables you to execute code a specific number of times by using a for statement that combines three statements into a single block of execution using the following syntax:
for (assignment; condition; update;){

  code to be executed;

}
The for statement uses those three statements as follows when executing the loop:
assignment: Executed before the loop begins and not again. This is used to initialize variables used in the loop as conditionals.condition: Evaluated before each iteration of the loop. If the expression evaluates to true, the loop is executed; otherwise, the for loop execution ends.update: Executed each iteration after the code in the loop has executed. This is typically used to increment a counter used in statement 2.To illustrate a for loop, check out the following example. The example not only illustrates a basic for loop, but also illustrates the capability to nest one loop inside another:
for (var x=1; x<=3; x++){

  for (var y=1; y<=3; y++){

    print(x + " X " + y + " = " + (x*y) + "\n");

  }

}
The resulting output to the web console is:
1 X 1 = 1

1 X 2 = 2

1 X 3 = 3

2 X 1 = 2

2 X 2 = 4

2 X 3 = 6

3 X 1 = 3

3 X 2 = 6

3 X 3 = 9
Another type of for loop is the for/in loop. The for/in loop executes on any data type that can be iterated on. For the most part, you use the for/in loop on arrays and objects. The following example illustrates the syntax and behavior of the for/in loop on a simple array:
var days = ["Monday", "Tuesday", "Wednesday", "Thursday", "Friday"];

for (var idx in days){

  print("It's " + days[idx] + "\n");

}
Notice that the variable idx is adjusted each iteration through the loop from the beginning array index to the last. The resulting output is
It's Monday

It's Tuesday

It's Wednesday

It's Thursday

It's Friday
When working with loops, sometimes you need to interrupt the execution of code inside the code itself without waiting for the next iteration. You can do this in two different ways, using the break and continue keywords.
The break keyword completely stops execution of the for or while loop. The continue keyword, on the other hand, stops execution of the code inside the loop and continues with the next iteration. Consider the following examples.
Using a break if the day is Wednesday:
var days = ["Monday", "Tuesday", "Wednesday", "Thursday", "Friday"];

for (var idx in days){

  if (days[idx] == "Wednesday")

    break;

  print("It's " + days[idx] + "\n");

}
When the value is Wednesday, loop execution stops completely:
It's Monday

It's Tuesday
Using a continue if the day is Wednesday:
var days = ["Monday", "Tuesday", "Wednesday", "Thursday", "Friday"];

for (var idx in days){

  if (days[idx] == "Wednesday")

    continue;

  print("It's " + days[idx] + "\n");

}
Notice that the write is not executed for Wednesday because of the continue statement; however, loop execution did complete:
It's Monday

It's Tuesday

It's Thursday

It's Friday
One of the most important parts of JavaScript is making code that other code can reuse. To do this, you organize your code into functions that perform specific tasks. A function is a series of code statements combined into a single block and given a name. The code in the block can then be executed by referencing that name.
Functions are defined using the function keyword followed by a name that describes the use of the function, a list of zero or more arguments in parentheses, and a block of one or more code statements in {} brackets. For example, the following is a function definition that writes “Hello World” to the console.
function myFunction(){

  print("Hello World");

}
To execute the code in myFunction(), all you need to do is add the following line to the main JavaScript or inside another function:
myFunction();
Frequently, you need to pass specific values to functions that they will use when executing their code. Values are passed in comma-delimited form to the function. The function definition needs a list of variable names in the () parentheses that match the number being passed in. For example, the following function accepts two arguments, a name and city, and uses them to build the output string:
function greeting(name, city){

  print("Hello " + name);

  print(". How is the weather in " + city);

}
To call the greeting() function, you need to pass in a name value and a city value. The value can be a direct value or a previously defined variable. To illustrate this, the following code executes the greeting() function with a name variable and a direct string for the city:
var name = "Brad";

greeting(name, "Florence");
Functions often need to return a value to the calling code. Adding a return keyword followed by a variable or value returns that value from the function. For example, the following code calls a function to format a string, assigns the value returned from the function to a variable, and then writes the value to the console:
function formatGreeting(name, city){

  var retStr = "";

  retStr += "Hello " + name + "\n";

  retStr += "Welcome to " + city + "!";

 return retStr;

}

var greeting = formatGreeting("Brad", "Rome");

print(greeting);
You can include more than one return statement in the function. When the function encounters a return statement, code execution of the function stops immediately. If the return statement contains a value to return, that value is returned. The following example shows a function that tests the input and returns immediately if it is zero.
function myFunc(value){

  if (value == 0)

    return value;

  <code_to_execute_if_value_nonzero>

  return value;

}
So far, all the examples you have seen are named functions. JavaScript also provides the capability to create anonymous functions. These functions have the advantage of being defined directly in the parameter sets when calling other functions. Thus, you do not need a formal definition.
For example, the following code defines a function named doCalc() that accepts three parameters. The first two should be numbers; the third is a function that is called and passed the two numbers as arguments:
function doCalc(num1, num2, calcFunction){

    return calcFunction(num1, num2);

}
You could define a function and then pass the function name without parameters to doCalc(). For example:
function addFunc(n1, n2){

    return n1 + n2;

}

doCalc(5, 10, addFunc);
However, you also have the option to use an anonymous function directly in the call to doCalc(), as in these two statements:
print( doCalc(5, 10, function(n1, n2){ return n1 + n2; }) );

print( doCalc(5, 10, function(n1, n2){ return n1 * n2; }) );
You can see the advantage of using anonymous functions: You do not need a formal definition that will not be used anywhere else in your code. This has the advantage of making JavaScript code more concise and readable.
When you start adding conditions, functions, and loops to your JavaScript applications, you need to understand variable scoping. Variable scope is simply this: What is the value of a specific variable name at the current line of code being executed?
JavaScript enables you to define both a global version and a local version of the variable. The main JavaScript defines the global version; local versions are defined inside functions. When you define a local version in a function, a new variable is created in memory. Within that function, you reference the local version. Outside that function, you reference the global version.
To better understand variable scoping, consider the following code:
01 var myVar = 1;

02 function writeIt(){

03   var myVar = 2;

04   print("Variable = " + myVar);

05   writeMore();

06 }

07 function writeMore(){

08   print("Variable = " + myVar);

09 }

10 writeIt();
The global variable myVar is defined on line 1; then on line 3, a local version is defined within the writeIt() function. So line 4 writes “Variable = 2” to the console. Then on line 5, writeMore() is called. Because no local version of myVar is defined in writeMore(), the value of the global myVar is written in line 10.
JavaScript has several built-in objects, such as Number, Array, String, Date, and Math. Each built-in object has member properties and methods. In addition to the JavaScript objects, the MongoDB shell provides built-in objects that you will learn about in the following hours.
JavaScript provides a fairly nice object-oriented programming structure for you to create your own custom objects as well. Using objects instead of just a collection of functions is key to writing clean, efficient, and reusable JavaScript code.
To use objects in JavaScript effectively, you need to understand their structure and syntax. An object is really just a container to group multiple values and, in some instances, functions. The values of an object are called properties, and functions are called methods.
To use a JavaScript object, you must first create an instance of the object. Object instances are created using the new keyword with the object constructor name. For example, to create a Number object, you use the following line of code:
var x = new Number("5");
Object syntax is straightforward. You use the object name, then a dot, and then the property or method name. For example, the following lines of code get and set the name property of an object named myObj:
var s = myObj.name;

myObj.name = "New Name";
You can also get and set object methods of an object in the same manner. For example, the following lines of code call the getName() method and then change the method function on an object named myObj:
var name = myObj.getName();

myObj.getName = function() { return this.name; };
You can also create objects and assign variables and functions directly using {} syntax. For example, the following code defines a new object and assigns values and a method function:
var obj = {

    name: "My Object",

    value: 7,

    getValue: function() { return this.value; }

};
You can also access members of a JavaScript object using the object[propertyName] syntax. This is useful when you are using dynamic property names or if the property name must include characters that JavaScript does not support. For example, the following examples access the "User Name" and "Other Name" properties of an object named myObj:
var propName = "User Name";

var val1 = myObj[propName];

var val2 = myObj["Other Name"];
As you have seen so far, using the built-in JavaScript objects has several advantages. As you begin to write code that uses more data, you will find yourself wanting to build your own custom objects with specific properties and methods.
JavaScript object can be defined in a couple different ways. The simplest is the on-the-fly method, meaning that you create a generic object and then add properties to it as you need it.
For example, you would use the following code to create a user object, assign a first and last name, and define a function to return the full name:
var user = new Object();

user.first="Brad";

user.last="Dayley";

user.getName = function( ) { return this.first + " " + this.last; }
You could accomplish the same effect through a direct assignment using the following syntax. The object is enclosed in {} brackets, and the properties are defined using the property:value syntax:
var user = {

  first: 'Brad',

  last: 'Dayley',

  getName: function( ) { return this.first + " " + this.last; }};
These first two options work well for simple objects that you do not need to reuse later. A better method for reusable objects is to actually enclose the object inside its own function block. This has the advantage of enabling you to keep all the code pertaining to the object local to the object itself. For example:
function User(first, last){

  this.first = first;

  this.last = last;

  this.getName = function( ) { return this.first + " " + this.last; }};

var user = new User("Brad", "Dayley");
The end result of these methods is essentially the same. You have an object with properties that that can be referenced using dot syntax:
print(user.getName());
A more advanced method of creating objects is to use a prototyping pattern. The prototyping pattern is implemented by defining the functions inside the prototype attribute of the object instead of the object itself. Prototyping works better because the functions defined in the prototype are created only once when the JavaScript is loaded instead of each time a new object is created.
The following example shows the code necessary to implement the prototyping pattern. Notice that you define the object UserP and then set UserP.prototype to include the getFullName() function. The prototype property is built into all JavaScript objects, enabling you to define functionality that will be included each time you create a new instance of the object. You can include as many functions in the prototype as you like. Each time a new object is created, those functions will be available.
function UserP(first, last){

  this.first = first;

  this.last = last;

}

UserP.prototype = {

  getFullName: function(){

      return this.first + " " + this.last;

    }

};
The String object is by far the most commonly used object in JavaScript. JavaScript automatically creates a String object for you anytime you define a variable that has a string data type. For example:
var myStr = "Teach Yourself NoSQL with MongoDB in 24 Hours";
When creating a string, keep in mind that several special characters can’t be directly added to the string. For these characters, JavaScript provides a set of escape codes (see Table 3.5).
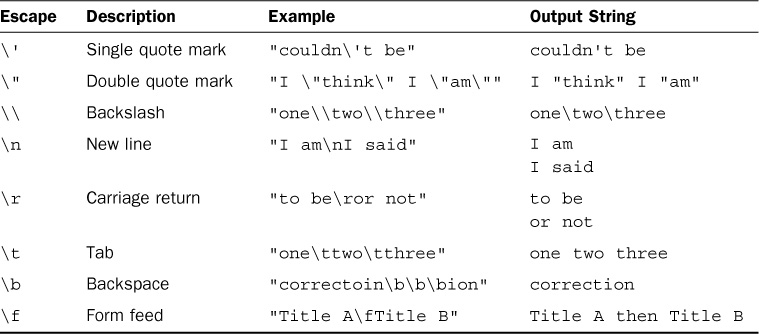
TABLE 3.5 String Object Escape Codes
To get the length of the string, you can use the length property of the String object. For example:
var numOfChars = myStr.length;
The String object has several functions that enable you to access and manipulate the string in various ways. Table 3.6 describes the methods of string manipulation.
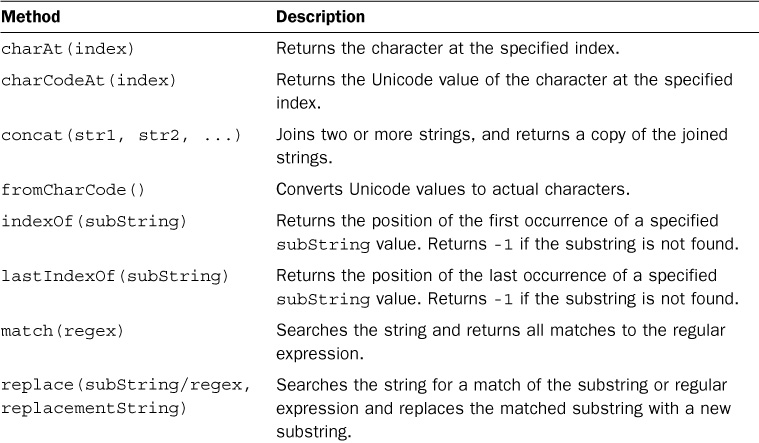
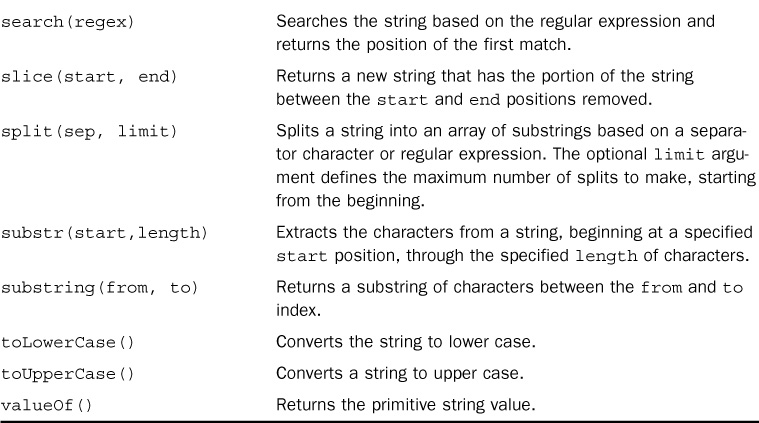
TABLE 3.6 Methods to Manipulate String Objects
To get you started using the functionality provided in the String object, the following sections describe some of the common tasks that can be done using String object methods.
Multiple strings can be combined either by using a + operation or by using the concat() function on the first string. For example, in the following code, sentence1 and sentence2 will be the same:
var word1 = "Today ";

var word2 = "is ";

var word3 = "tomorrows\' ";

var word4 = "yesterday.";

var sentence1 = word1 + word2 + word3 + word4;

var sentence2 = word1.concat(word2, word3, word4);
To tell whether a string is a substring of another, you can use the indexOf() method. As an example, the following code writes the string to the console only if it contains the word think:
var myStr = "I think, therefore I am.";

if (myStr.indexOf("think") != -1){

  print(myStr);

}
Another common String object task is replacing one substring with another. To replace a word/phrase in a string, use the replace() method. The following code replaces the text "<username>" with the value of the variable username:
var username = "Brad";

var output = "<username> please enter your password: ";

output.replace("<username>", username);
A common task with strings is to split them into arrays using a separator character. For example, the following code splits a time string into an array of its basic parts using the split() method on the ":" separator:
var t = "12:10:36";

var tArr = t.split(":");

var hour = tArr[0];

var minute = tArr[1];

var second = tArr[2];
The Array object provides a means of storing and handling a set of other objects. Arrays can store numbers, strings, or other JavaScript objects. You can use a couple different methods to create JavaScript arrays. For example, the following statements create three identical versions of the same array:
var arr = ["one", "two", "three"];

var arr2 = new Array();

arr2[0] = "one";

arr2[1] = "two";

arr3[2] = "three";

var arr3 = new Array();

arr3.push("one");

arr3.push("two");

arr3.push("three");
The first method defines arr and sets the contents in a single statement using []. The second method creates the arr2 object and then adds items to it using direct index assignment. The third method creates the arr3 object and then uses the best option for extending arrays—it uses the push() method to push items onto the array.
To get the number of elements in the array, you use the length property of the Array object. For example:
var numOfItems = arr.length;
Arrays are a zero-based index, meaning that the first item is at index 0, and so on. For example, in the following code, the value of variable first is Monday and the value of variable last is Friday:
var week = ["Monday", "Tuesday", "Wednesday", "Thursday", "Friday"];

var first = w [0];

var last = week[week.length-1];
The Array object has several built-in functions that enable you to access and manipulate the array in various ways. Table 3.7 describes the methods attached to the Array object that enable you to manipulate the array contents.
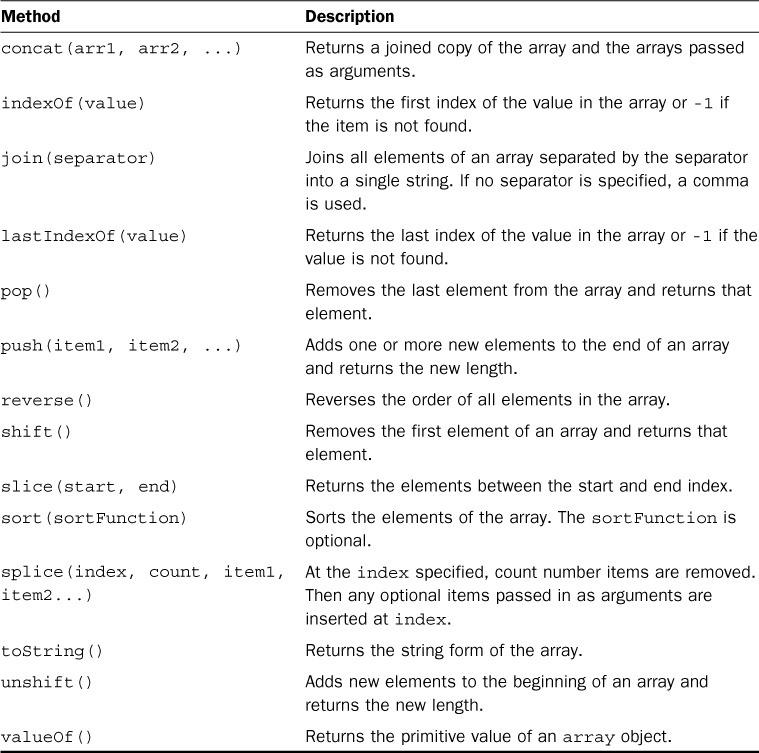
TABLE 3.7 Methods to Manipulate Array Objects
To get you started using the functionality in the Array object, the following sections describe some common tasks using Array object methods.
You can combine arrays the same way that you combine String objects, using + statements or the concat() method. In the following code, arr3 ends up being the same as arr4:
var arr1 = [1,2,3];

var arr2 = ["three", "four", "five"]

var arr3 = arr1 + arr2;

var arr4 = arr1.concat(arr2);
By the Way
You can combine an array of numbers and an array of strings. Each item in the array keeps its own object type. However, as you use the items in the array, you need to keep track of arrays that have more than one data type so that you do not run into problems.
You can iterate through an array using a for or a for/in loop. The following code illustrates iterating through each item in the array using each method:
var week = ["Monday", "Tuesday", "Wednesday", "Thursday", "Friday"];

for (var i=0; i<week.length; i++){

  print(week[i] + "\n");

}

for (dayIndex in week){

  print(week[dayIndex] + "\n");

}
A useful feature of Array objects is the capability to combine the elements of a string to make a string object separated by a specific separator using the join() method. For example, the following code results in the time components being joined back together into the format 12:10:36:
var timeArr = [12,10,36];

var timeStr = timeArr.join(":");
Often you need to check to see whether an array contains a certain item. You can do this by using the indexOf() method. If the item is not found in the list, a -1 returns. The following function writes a message to the console if an item is in the week array:
function message(day){

  var week = ["Monday", "Tuesday", "Wednesday", "Thursday", "Friday"];

  if (week.indexOf(day) == -1){

    print("Happy " + day);

  }

}
You can add and remove items from Array objects in several ways using the various built-in methods. Table 3.8 gives you some ideas of the various methods in this book.
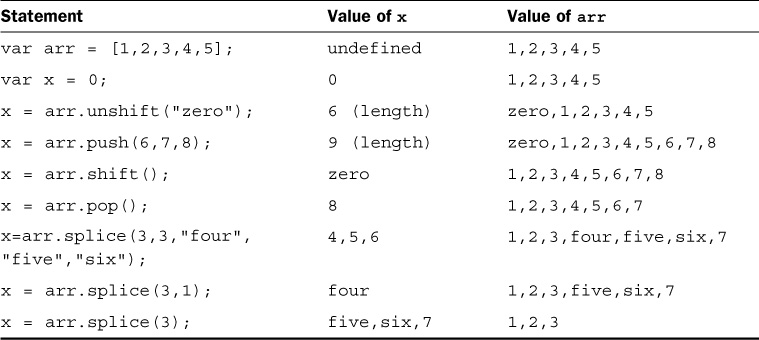
TABLE 3.8 Array Object Methods Used to Add and Remove Elements from Arrays
An important part of JavaScript coding is adding error handling for possible problems. By default, if a code exception occurs because of a problem in your JavaScript, the script fails and does not finish loading. This is not usually the desired behavior—in fact, it is often catastrophic behavior. To prevent these types of catastrophic problems, wrap your code in a try/catch block.
To prevent your code from totally bombing, use try/catch blocks that can handle problems inside your code. If JavaScript encounters an error when executing code in a try block, it jumps down and executes the catch portion instead of stopping the entire script. If no error occurs, all the try block is executed and none of the catch block is.
For example, the following try/catch block tries to assign variable x to a value of an undefined variable named badVarName.
try{

    var x = badVarName;

} catch (err){

    print(err.name + ': "' + err.message +  '" occurred when assigning x.');

}
Notice that the catch statement accepts an err parameter, which is an Error object. The Error object provides the message property that provides a description of the error. The Error object also provides a name property that is the name of the error type that was thrown.
The previous code results in an exception and writes the following message:
ReferenceError: "badVarName is not defined" occurred when assigning x."
You can also throw your own errors using a throw statement. The following code illustrates how to add throw statements to a function to throw an error even if a script error does not occur. The function sqrRoot() accepts a single argument x. It then tests x to verify that it is a positive number and returns a string with the square root of x. If x is not a positive number, the appropriate error is thrown and the catch block returns the error:
function sqrRoot(x) {

    try {

        if(x=="")    throw {message:"Can't Square Root Nothing"};

        if(isNaN(x)) throw {message:"Can't Square Root Strings"};

        if(x<0)      throw {message:"Sorry No Imagination"};

        return "sqrt("+x+") = " + Math.sqrt(x);

    } catch(err){

        return err.message;

    }

}

function writeIt(){

    print(sqrRoot("four"));

    print(sqrRoot(""));

    print(sqrRoot("4"));

    print(sqrRoot("-4"));

}

writeIt();
The following is the console output showing the different errors thrown based on input to the sqrRoot() function:
Can't Square Root Strings

Can't Square Root Nothing

sqrt(4) = 2

Sorry No Imagination
Another valuable tool in exception handling is the finally keyword. A finally keyword can be added to the end of a try/catch block. After the try/catch blocks are executed, the finally block is always executed, even if an error occurs and is caught or if the try block is fully executed.
Consider this example of using a finally block inside a web page:
function testTryCatch(value){

  try {

    if (value < 0){

      throw "too small";

    } else if (value > 10){

      throw "too big";

    }

    your_code_here

  } catch (err) {

    print("The number was " + err.message);

  } finally {

    print("This is always written.");

  }

}
Understanding JavaScript is critical to being able to work in the MongoDB shell and shell scripts. This hour discussed enough of the basic JavaScript language syntax for you to grasp the concepts in the rest of the book. The hour discussed creating objects and functions, as well as working with strings and arrays. You also learned how to apply error handling to your scripts, which is critical in the MongoDB shell environment.
Q. What JavaScript engine do the MongoDB shell and MongoDB server use?
A. Since MongoDB 2.4, they both use Google’s V8 JavaScript engine. The V8 JavaScript engine powers Chrome and other server-side components such as Node.js.
Q. Can I use MongoDB shell commands such as show dbs or use database in a standalone JavaScript file that is executed on the mongo command line?
A. No, these commands are not available in JavaScript, even though they are available in the MongoDB shell.
user with name, password, id, and email properties. Then use printjson() and print(JSON.stringify()) to display the object.try/catch block, try to access user.noArray[0] to force an exception and verify that your error handling works properly.