
This hour focuses on getting you up-to-speed with MongoDB. The last hour focused more on the MongoDB theory side; this one is all about practical application. You learn what it takes to install MongoDB, start and stop the engine, and access the MongoDB shell. The MongoDB shell enables you to administrate the MongoDB server, as well as perform every necessary function on the databases. You will find that using the MongoDB shell is a vital aspect of the development process and, later, database administration.
The sections in this hour cover installing, configuring, starting, and stopping the MongoDB database. This hour also introduces you to the MongoDB shell that provides administrative access to the database, enabling you to do everything from creating user accounts and databases to implementing replication and sharding.
To get started with MongoDB, the first task is to install it on your development system. You can then play around with the functionality and learn the MongoDB shell.
The following sections cover installing MongoDB, starting and stopping the database engine, and accessing the shell client. When you can perform those functions, you are ready to begin using MongoDB in your environment.
The first step in implementing a MongoDB database is installing the MongoDB server. A version of MongoDB exists for each major platform: Linux, Windows, Solaris, and OS X. An enterprise version is also available for the Red Hat, SuSE, Ubuntu, and Amazon Linux distributions. The enterprise version of MongoDB is subscription based and provides enhanced security, management, and integration support.
For the purposes of this book and for learning MongoDB, the standard edition of MongoDB is perfect. The following website provides installation instructions on downloading and installing MongoDB in your environment: http://docs.mongodb.org/manual/installation/.
The installation and setup process performs steps similar to the following. The Try It Yourself at the end of this section guides you through the installation and configuration process:
1. Download and extract the MongoDB files.
2. Add <mongo_install_location>/bin to your system path.
3. Create a data files directory: <mongo_data_location>/data/db.
4. Start MongoDB using the following from the console prompt:
mongod –dbpath <mongo_data_location>/data/db
After you have installed MongoDB, you need to be able to start and stop the database engine. The database engine starts by executing the mongod (mongod.exe on Windows) executable in the <mondo_install_location>/bin location. This executable starts the MongoDB server and begins listening for database requests on the configured port.
The mongod executable accepts several parameters that provide methods of controlling its behavior. For example, you can configure the IP address and port MongoDB listens on in addition to configuring logging and authentication. Table 2.1 lists the most commonly used parameters.
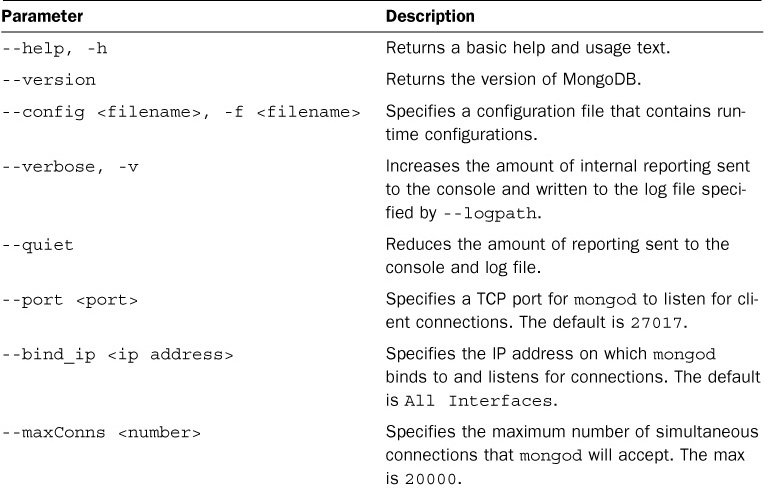

TABLE 2.1 mongod Command-Line Parameters
Consider this example of starting MongoDB with port and dbpath parameters:
mongod –port 28008 –dbpath <mongo_data_location>/data/db
In addition to specifying command-line parameters, the mongod executable can accept a configuration file that specifies configuration options that control the behavior of the MongoDB server. Using a configuration file enables you to more easily manage the MongoDB configuration settings. Additionally, you can create multiple configuration files for various database roles, such as development, testing, and production.
These configuration options are specified using the following format. The <setting> option is the configuration setting, and <value> specifies the setting value:
<setting> = <value>
As an example, the following code provides a simple example of a basic configuration file:
verbose = true

port = 27017

dbpath = /data/db

noauth = true
Table 2.2 lists some common configuration options specified in the configuration file, to give you an idea of what is available.
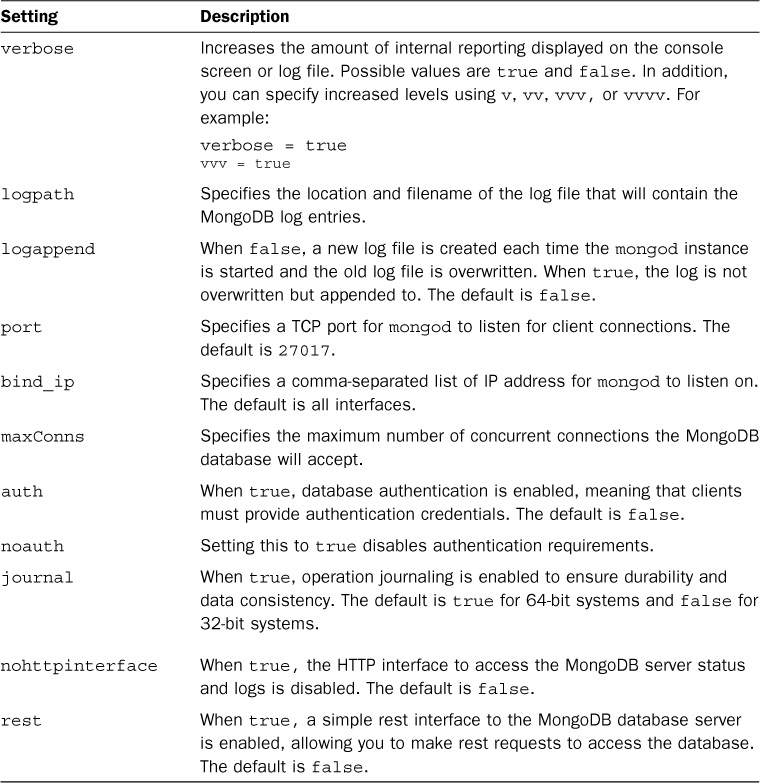
TABLE 2.2 mongod Configuration File Settings
Each platform has different methods of stopping the mongod executable after it has started. However, one of the best methods is to do it from the shell client because that cleanly shuts down the current operations and forces mongod to exit.
To stop the MongoDB database from the shell client, use the following commands to switch to the admin database and then shut down the database engine:
use admin

db.shutdownServer()
MongoDB comes with a built-in HTTP interface that provides you with information about the MongoDB server. The HTTP interface provides useful status information about the server, as well as a REST interface that enables you to make REST calls to access the database.
For the most part, you want to use drivers specific to your programming language to access the MongoDB database from your application. However, using the HTTP interface is often helpful in getting information such as the following:
To access the MongoDB HTTP interface, you can access the interface port, which is 28017. For example, with MongoDB running, the following URL on the local machine brings up the MongoDB HTTP interface shown in Figure 2.1: http://localhost:28017/.
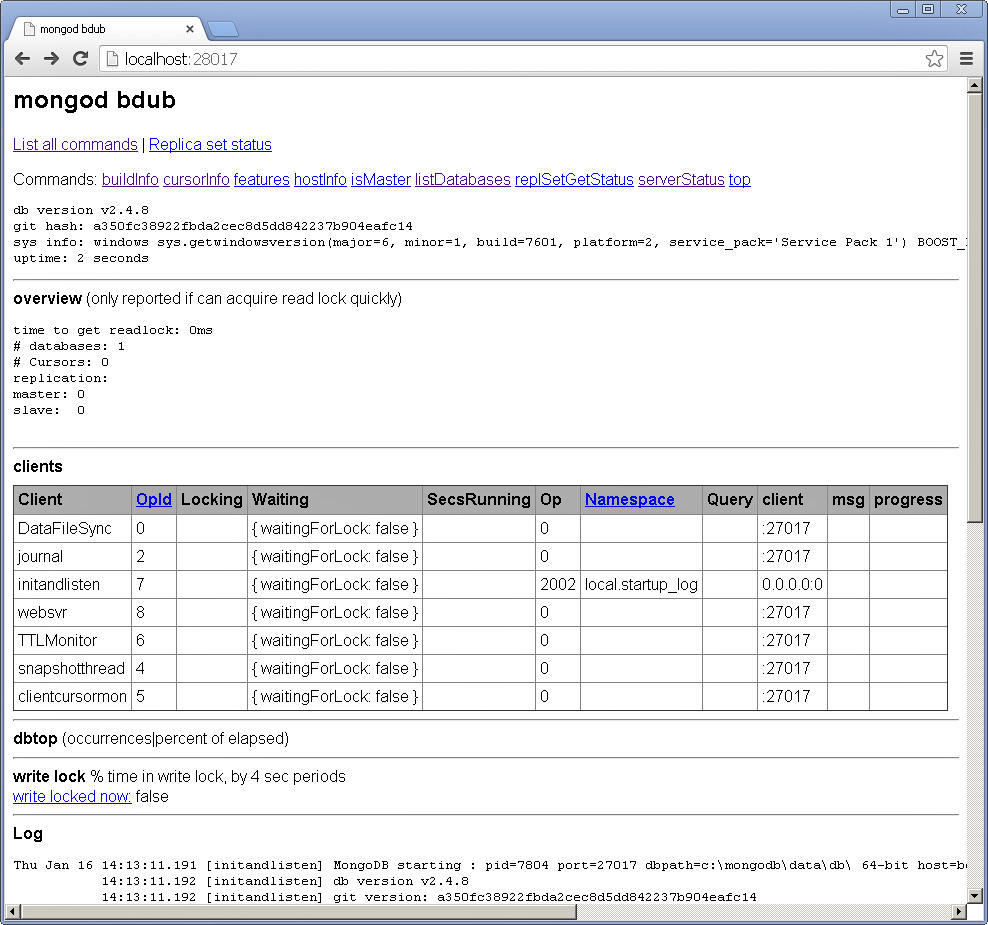
FIGURE 2.1 Viewing MongoDB database information in a browser using the MongoDB HTTP interface.
After you have installed, configured, and started MongoDB, you can access it through the MongoDB shell. The MongoDB shell is an interactive JavaScript shell provided with MongoDB that enables you to access, configure, and administrate MongoDB databases, users, and much more. You use the shell for everything from setting up user accounts, to creating databases, to querying the contents of the database.
The following sections take you through some of the most common administration tasks you will be performing in the MongoDB shell. Specifically, you need to be able to create user accounts, databases, and collections so that you can follow the examples in the rest of the book. You also should be able to perform at least rudimentary queries on documents to help you troubleshoot any problems with accessing data.
The MongoDB shell is an executable file located in the /bin folder in the MongoDB install location. To start the MongoDB shell, execute the mongo command. The console prompt shell should start up (see Figure 2.2).
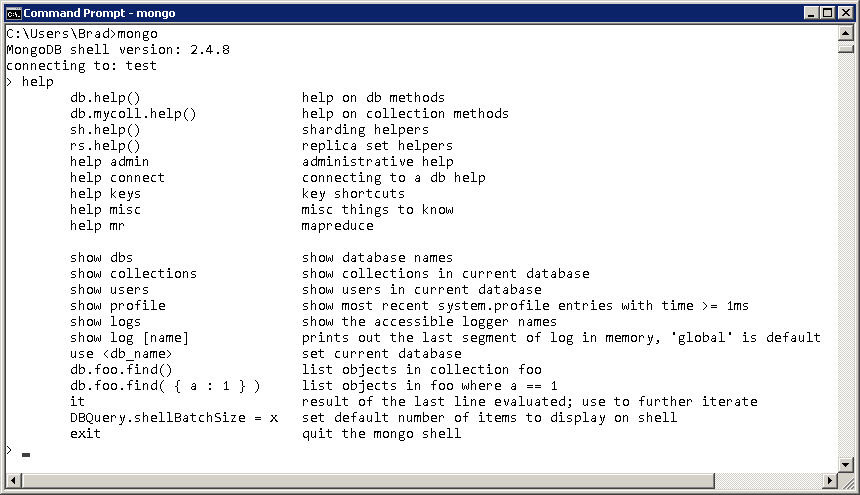
FIGURE 2.2 Starting the MongoDB console shell.
After you have accessed the MongoDB shell, you will be able to administrate all aspects of MongoDB. When using the MongoDB shell, keep in mind that the shell is based on JavaScript. That means that you can use most of the JavaScript language syntax, including loops and functions, to interact with the database.
The MongoDB shell provides several commands that you can execute from the shell prompt. You need to be familiar with these commands because you will be using them a lot. Table 2.3 lists several of the MongoDB Shell commands and their purpose.
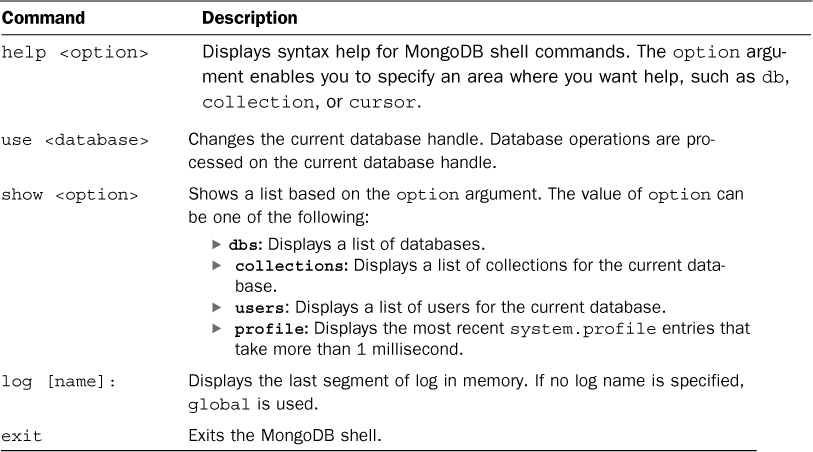
TABLE 2.3 MongoDB Shell Commands
The MongoDB shell provides native methods to perform administrative functions. You call these methods directly from the MongoDB shell or from a script that is executed in the MongoDB shell.
JavaScript objects also provide administrative methods; these include the DB, Collection, and Cursor objects. Later hours cover those methods.
Table 2.4 lists the most common native methods for making connections, creating objects, loading scripts, and providing additional functionality.
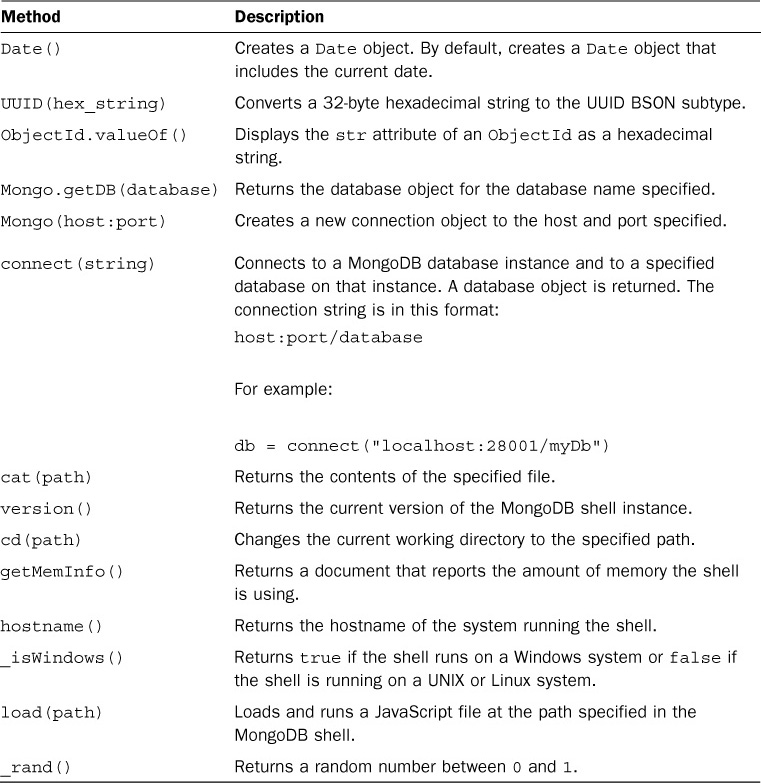
TABLE 2.4 MongoDB Shell Native Methods and Constructors
The MongoDB shell is an interactive JavaScript shell that is tightly coupled with the MongoDB data structure. That means that much of the data interaction from parameters passed to methods to data being returned from methods will be standard MongoDB documents—in most respects, those are JavaScript objects.
For example, when creating a user, you pass in a document similar to the following to define the user:
db.addUser( { user: "testUser",

              userSource: "test",

              roles: [ "read" ],

              otherDBRoles: { testDB2: [ "readWrite" ] } } )
When listing the users for a database to the shell, the users are shown as a list of documents similar to this:
> db.system.users.find()

{ "_id" : ObjectId("529e71927c798d1dd56a63d9"),

  "user" : "dbadmin",

  "pwd" : "78384f4d73368bd2d3a3e1da926dd269",

  "roles" : [  "readWriteAnyDatabase",  "dbAdminAnyDatabase",  "clusterAdmin" ]

}

{ "_id" : ObjectId("52a098861db41f82f6e3d489"),

  "user" : "useradmin",

  "pwd" : "0b4568ab22a52a6b494fd54e64fcee9f",

  "roles" : [  "userAdminAnyDatabase" ]

}
As you have seen, the commands, methods, and data structure of the MongoDB shell are based on interactive JavaScript. A great method of administrating MongoDB is creating scripts that can be run multiple times or that are ready to run at a specific times, such as an upgrade.
The script file can contain any number of MongoDB commands using JavaScript syntax, such as conditional statements and loops. Scripting the MongoDB shell is done with three main methods:
--eval <expression> parameter on the command line and specifying shell JavaScript expressions as the valueload(script_path) method after the shell has already been loaded and passing the path to a JavaScript fileThe following sections take you through each of these methods.
A useful method of scripting MongoDB shell commands involves using --eval command-line option. The --eval parameter accepts a JavaScript string or a JavaScript file, launches the MongoDB shell, and immediately executes the JavaScript. You can use other command-line parameters in addition to --eval to specify a configuration file, database, port, authentication information, and more.
For example, the following command starts the MongoDB shell connection to the test database, executes db.getCollections() on the test database, and outputs this JSON string:
mongo test --eval "printjson(db.getCollectionNames())"
The following shows example output for the previous command:
C:\Users\Brad>mongo words --eval "printjson(db.getCollectionNames())"

MongoDB shell version: 2.4.8

connecting to: words

[

        "system.indexes",

        "word_stats",

        "word_stats2",

        "word_stats_new",

        "words"

]
You can also execute a JavaScript from the MondoDB shell prompt using the load(script_path) method. This method loads a JavaScript file and immediately executes it. For example, the following shell command loads and executes the db_update.js script file:
load("/data/db/get_collections.js")
The most popular method for scripting MongoDB is to create a JavaScript file and execute it directly using the MongoDB shell command. The MongoDB shell reads the JavaScript file, executes it line by line, and then exits when complete.
To output data to the console while executing the JavaScript, you can use the print() function. You can use the MongoDB shell-specific printjson() function, which automatically formats JSON objects. However, the format of printjson() takes up too much room, so it is better to use a JavaScript method such as JSON.stringify() to format the JSON objects for output.
For example, imagine that you added the following JavaScript in a file named get_collections.js:
db = connect("localhost/words");

printjson(db.getCollectionNames())
You could then execute the script directly from the console using the following mongo command:
mongo get_collections.js
The output would be similar to the following as the script is loaded, connects to the words database, and then prints the collections:
MongoDB shell version: 2.4.8

connecting to: test

type "help" for help

connecting to: localhost/words

[

       "system.indexes",

       "word_stats",

       "word_stats2",

       "word_stats_new",

       "words"

]
You can also execute multiple JavaScript files from the mongo command line by separating them by a space. For example:
mongo get_ collections.js load_data.js get_data.js
This hour has focused on getting you up-to-speed using the MongoDB server and shell client. You got a chance to download and install MongoDB. You learned how to set configuration options that control the behavior of the server.
You also learned how to access the MongoDB shell client. The MongoDB shell is an interactive JavaScript interface to MongoDB. You can execute methods in the shell to access the server, view collections and databases, and perform administrative tasks.
You also learned how to write JavaScript files and execute them using the MongoDB shell to script database operations.
Q. Are there other methods of starting and stopping the MongoDB server?
A. Yes. Each distribution has its own methods of starting and stopping it. For example, you could set up the MongoDB server as a service on the Windows, Linux, and Mac platforms. Then you could use the methods on those various platforms to start and stop the MongoDB server.
Q. Is there a way to scroll through the previous commands executed in the MongoDB shell?
A. Yes. You can use the up and down arrows to scroll through previous commands.
code/hour02 folder named test.js. Then add the following commands to it and execute it from the command line using mongo test.js.print(hostname());
print(Date());
load("./test.js") method to execute the same file inside the shell.