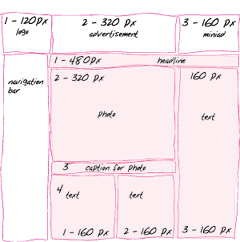
Before you create a complicated table, it’s really important to have a vision of what you’re about to construct. You need to know how many rows and columns you need, how big these should be, and where each of the items on your page should go.
To map out your page:
- Design your page on a piece of paper—with a pen!
- Figure out how many rows and columns you will need. Identify any rows or columns that will span more than one space.
- If necessary, you can nest one table inside another. However, you should keep this nesting to a minimum as it tends to slow browsers down—and sometimes cause them to break down altogether.
- Measure how wide your table should be (the standard is around 600 pixels) and then decide how many pixels wide each column should be.
- Create the skeleton of your page with just the table tags but little or no content.
- Finally, create or insert the content.
Tip
- One good way to get ideas for table structure is to look at how others do it (see page 310). However, there are some very complicated setups out there. One way to get a handle on what’s going on in someone else’s page is to download the source code and then change the BGCOLOR of each nested table (see page 158) so you can better see which parts of the layout belong to which table.
