
In the first hour, we walked through setting up the Xcode and Swift Read-Eval-Print-Loop (REPL) environment and exposed the Xcode layout to you. We also examined some brief examples of Swift code to show how these environments can be used to help you code and even test your code. We briefly used the Swift keyword let, when declaring constants in code and assigned different types of data to them (such as the number 42 or the string "Hello, playground"). During this hour, we take a closer look at how Swift uses the var and let keywords (called introducers) and also how Swift knows how to handle different types of data.
There are two fundamental ways in Swift that we declare data types, and they are constants and variables. Let’s take a look at that now.
Constants are a way of telling Swift that a particular value should not and will not change, hence the term constant. This is also called immutable, since something that is constant cannot mutate. Swift’s compiler optimizes memory used for constants to make code perform better because if Swift knows that the size and/or contents of that memory will not change, it can eliminate a lot of potential mutability aspects it may normally have to check for when working with these values. Constants also provide you, the programmer, with a safety net by providing protection from accidentally overwriting the contents of a constant value.
Note: When to Use Constants
Because Swift is a safe language, it is a suggested best practice to use constants with the let introducer as often as necessary. This greatly improves safety by preventing accidental data manipulation and even helps Swift’s compiler improve performance. Only use constants, however, when you know the value of your constant will never change.
Think of some times when constants may be necessary. For example, say you’re writing an app that calculates distances, and you know that there are 5,280 feet in a mile. You could set a constant called feetPerMile and set its value to 5280. That way, whenever you need to reference that value in your code, you can use feetPerMile in your calculations.
You can only assign a value to a constant once. Value assignment does not need to happen at the time you define the constant, but after it has been given a value it cannot change. Because of the immutability of constants, if you try to change the value of a constant, Xcode provides a compiler error, stating that you cannot assign to a let value. Now, let’s take a look at variables.
As you can see, with as dynamic as apps are and have to be, we wouldn’t get far by working with only constants. Swift provides an equally simple way to declare variables as it does constants, and that is with the var introducer. Variables, as the name implies, can be variable and are mutable by nature. This means that the value of the variable can change whenever you use the = operator, called the assignment operator (we discuss operators in Hour 3, “Using Operators in Swift”).
Variables are particularly useful for when you know that data could or will change. For instance, if you are building a pedometer app, you know that with every step you or the user of your app takes (assuming the user has a device with the M-series motion coprocessor), the number of steps will increase. That variable will continue to be updated with the number of steps taken up to that very moment.
In the last experiment, you noticed that you can declare a constant, feetPerMile, and give it an initial value (of 5280) with no problem. You also declared a variable, totalFeet, with an initial value (of zero), equally as easily. Then, you changed the value of the variable, and Swift was okay with that. Now, when you tried to change the value of feetPerMile, you received an error that you were trying to change a constant let value. This is an example of how Swift’s compiler helps keep your code safe from mutation issues.
Keep a few things in mind when naming your constants and variables. You can use any Unicode character in the name of your constants and variables, except that they cannot begin with a number and must begin with a letter. This is an excellent feature if you need to express something in a different language that would not so easily be done with an English keyboard. Names also cannot have punctuation or special characters, as those are often reserved for keywords or operators. You can also now use Emoji for names of constants or variables, such as setting the chicken face character to the string “chicken,” and Swift infers the chicken face Unicode character to be of type String. As cute as that may seem, a lot of programmers tend to shy away from using Emoji or other special characters for names as it makes referencing those variables and constants difficult while typing, and you have to pause your train of thought to hunt down a particular Unicode character or key combination.
Now that we’ve discussed constants and variables, let’s learn about Swift’s data types.
Note: Other Data Types
Many other data types in Swift are available for use to further refine the scope of the data you need to manage. When possible, we outline the data types to know about with relation to the current data type.
Caution: Data Types Cannot Be Changed Once Assigned
Once you declare a variable or constant to be of a particular data type, it cannot be changed. Also, you cannot declare a new variable or constant with the same name as an existing variable or constant within the same scope or context.
One of Swift’s primary safety features is related to handling data types. In this section, we cover four basic data types, their composition, and how Swift infers data types when they aren’t explicitly stated.
So far we have not explicitly stated the types of data we want Swift to use for our constants and variables, and we haven’t needed to. Swift uses something called type inference when a data type is not explicitly declared. Swift does this by analyzing the value that is set to the constant or variable we are declaring and setting the type accordingly. Let’s take a quick look at our example from the last hour, where we added 40 and 2:
let myNewValue = 40 + 2
42 is obviously an integer, so Swift inferred it to be of type Int. The way we explicitly declare the type of a constant or variable in Swift is by appending a colon (:) and then the type (such as Int) to the constant or variable name. This is called type annotation. Here is what the code now looks like with type annotation:
let myNewValue: Int = 40 + 2
Because of type inference, we haven’t needed to explicitly state a type, but our examples have been small. In real apps, you may have situations where you need to declare the type for many reasons: so that the compiler can help you for safety reasons, as self-documentation to clearly see what value a constant or variable should hold, or even in stating the return types of values in functions (we explore functions in Hour 8, “Using Functions to Perform Actions”).
Tip: Use Int When Possible
Although all these types are available for you to use, Apple strongly suggests using Int whenever possible, even if you may only need an 8-bit integer, only positive integers (unsigned), and so on. This keeps code consistent, and ensures better interoperability with functions and methods with Int return types, preventing you from needing to cast return types to their proper annotation.
Quite a few data types in Swift can be useful in your apps. The most common ones we talk about here are the following:
Int for integers, which are whole numbers without a fractional componentDouble and Float for floating-point numbers (those with a decimal component)String for working with a collection of characters, words, and so onBool for working with true and false valuesIntegers are a common data type to use in Swift. Integers are used for things like counting or enumerating through an ordered list or array, counting iterations over a section of code a particular amount of times, and many other practical uses. As you’ve seen already, the keyword for defining an integer is simply Int. On a 32-bit platform, Int is a 32-bit integer (or Int32), and on 64-bit platforms, Int is a 64-bit integer (or Int64). This is yet another example of how safe Swift is with its data types.
Another way of using integers is to use an unsigned integer, or UInt. Unsigned integers are just integers with no negative numerical range, meaning they go from 0 to whatever the upper bound is of the integer you choose. The max upper bound of an Int is nine quintillion and change, and its minimum bound is negative nine quintillion and change, so chances are you may never need a number bigger than that. A better illustration is UInt8, which is an 8-bit integer. Swift provides 8-, 16-, 32-, and 64-bit versions of UInt. Go ahead and see for yourself in this Try It Yourself section.
The completed Try It Yourself section should look like that in Figure 2.1.
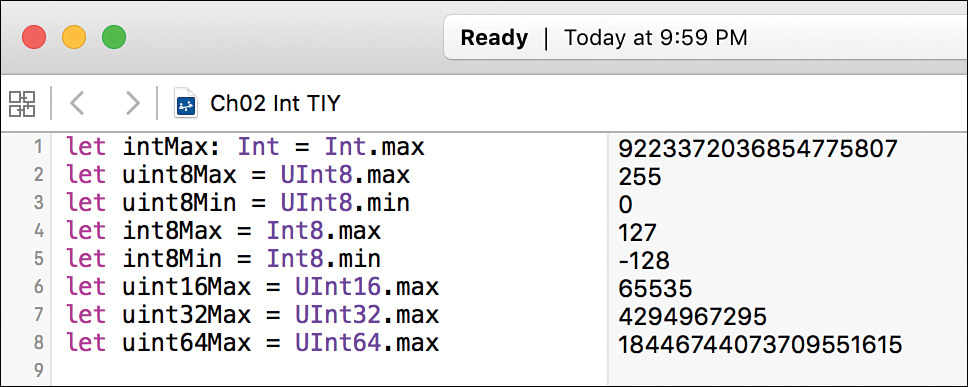
FIGURE 2.1 The completed Try It Yourself example finding upper and lower bounds.
Doubles are also a common data type to use in Swift. Doubles are used when a floating point or decimal value is needed. Akin to Doubles are Floats, which are similar but with a few differences to note:
Double represents a 64-bit floating-point value, and Float represents a 32-bit floating-point value.Double has at least 15 decimal digit precision, and Float has at least 6 decimal digit precision.Note: When Swift Infers Double
Swift always infers Double over Float when using type inference with floating-point numbers. Because of this, it is suggested to always use Double when you need a floating-point number, unless you are working with something designated as a Float in another framework. It is also worth noting that if you have a statement in code that involves using an arithmetic operator on integer and floating-point literals, a Double return type is inferred. A literal is a value that is literally typed into your code as a fixed value, such as 42, -3.14, or “foo”.
Boolean data types are simple because they can only hold the logical values true or false. Boolean types are annotated by the Bool keyword. Boolean types are ideal for controlling the flow of app execution, covered in Hour 5, “Controlling Program Flow with Conditionals,” and to verify whether a certain condition is true or false, which then executes a particular block of code. The following is a clear example of how Bool values are assigned:
let swiftIsCool = true
let objectiveCIsDead = false
The preceding example assigns true to swiftIsCool, and assigns false to objectiveCIsDead. As there are only true or false values in Boolean logic, these are the only values that can be assigned.
The next data type to cover is the widely used String data type. A String is a logical grouping of characters, and those are, you guessed it, Character data types. Strings are most often what we output to consoles, use as input to text fields, or use as output to screens in labels, text fields, or extended text views.
A String, like every type we’ve talked about thus far, is actually something called a struct. A struct is a value type and is a structure that adds functionality to an entity by adding properties and methods. You briefly saw this by getting the maximum value of the Int type by calling Int.max. An Int data type doesn’t just hold a number; it also has properties such as min and max and methods such as distanceTo(other: Int).
Note: Converting Between Integers and Floating-Point Numbers
There will be times when you need to convert a typed value from one type to another. This is sometimes referred to as casting, in that you are casting a variable to behave like another compatible type. For instance, say you have an Int with a value of 5, and you need to work with that value as if it were a Double. Since a variable cannot change its type once it has been assigned, you must declare a new variable or constant to equal the casted value of the source variable or constant. Consider the following example:
let myInt = 5  //this is inferred to be of type Int
let myDouble = Double(myInt)  //myDouble is a Double with the value of 5
You can cast a variable or constant by typing the type name and surrounding the variable or constant in parentheses. You can also use casting of variables or constants while adding that value to a value of a different type, so that Swift creates a new variable or constant with the agreed type from the return value, such as the following example:
let myNewDouble = Double(myInt) + 1.5
Since both Double(myInt) and 1.5 are of type Double, myNewDouble is inferred to be of type Double. You can do the same with numeric literals, but since literals don’t have a type until they are assigned, you do not need to cast them. Take this example, with an integer and a floating-point number:
let gravity = 9 + 0.8
In this case, gravity is inferred to be of type Double, since Swift operates on the values first (to get 9.8) and then assigns it to gravity.
Strings are a mechanism for storing a sequence of values of the Character data type. Characters are just that, one single character stored in its memory space. This allows us to do many things easily in Swift with regard to strings; we can easily count the number of characters in a String instance by using an instance method someStringValue.characters.count, and it returns however many Unicode characters represent that String called someStringValue. We can also quickly iterate over strings to get each character value at a time with fast enumeration in a for-in loop (we cover loops in Hour 7, “Iterating Code with Loops”). The following example shows a string and how its data is stored:
let myStr = "Hi!"
//myStr contains the following: "H", "i", "!"
Strings also can easily be concatenated, or joined together, much like adding numbers with the + operator. You already saw an example of this in Hour 1, “Introducing the Swift Development Environment,” but it deserves mention here with the String discussion. This is a powerful feature and allows for concise but readable code. To concatenate two strings, simply add them when you are assigning them to a new value or using them together for output to the user:
let firstString = "Four score"
let secondString = "and seven years ago"
let newString = firstString + secondString
The newString constant now contains “Four score and seven years ago”.
Because strings are so fundamental to Swift, it is now incredibly easy to insert string values, as well as other non-string values, into strings when creating some text to display to the user or to the output console, with something called string interpolation. String interpolation allows you to insert the values directly inline in a string literal, by typing the \ (backslash) key, and then surrounding the value with parentheses. Here is an example:
let year = 2015
let currentYearText = "The current year is \(year)"
The output of the preceding code is a string that contains “The current year is 2015”, and sets it to the constant currentYearText. Compared to Objective-C, Apple’s language of choice for Mac and iOS apps that has been around for almost 30 years, Swift’s String implementation is a dream. Take a quick look at how the year example looked in Objective-C:
NSInteger year = 2015;
NSString *currentYearText = [NSString stringWithFormat:@"The current year is %d", year];
Note: Differences Between Swift and Objective-C
Notice that each statement in Objective-C ends with a semicolon (;). This was to indicate to the compiler that it had reached the end of the statement. Swift infers the end of each statement when you press Return, so you do not need to explicitly type a semicolon, although you can.
Also, Objective-C relied on you, the programmer, to utilize the asterisk (*) character when using pointers. All Objective-C objects were pointers to memory in the heap. Swift does not require you to use the pointer indicator, and in fact, you don’t use it. We discuss instances in Swift further in Hour 10, “Learning About Structs and Classes.”
Before you go off on your own to explore more of these types and how you can work with them, there are a few other smaller things to mention. Swift allows string mutability, simply by declaring a String with the var introducer instead of the let introducer. That way, you can change the contents of a String variable simply by setting it to another String literal, concatenating one or more strings to it, or setting it to another string variable’s value. Mutability with the var introducer is not just limited to String; I merely wanted to use it as an example.
Swift’s String struct also provides a property that returns a Bool value called isEmpty. This is convenient if you need to check whether a String instance has any characters in it, such as in an if-else block.
Swift requires that constants and variables be declared before they are used. That means that you use the let or var introducer to declare a constant or variable with a name and a type (optionally, unless it can’t be inferred or you specifically use type annotation). You also can immediately initialize your constants and variables, which is common. You can do this in two ways. First, you can directly assign a literal value to the new constant or variable. Second, you can use that structure’s or class’s initializer. We cover initializers in more depth in Hour 13, “Customizing Initializers of Classes, Structs, and Enums.” Here’s a brief example of some sample initializers:
let wheelsOnABicycle = 2 // assigns the numeric literal 2
let wheelsOnATricycle = Int(3)  // uses Int's initializer, with the parameter of 3
let emptyString = String() // the empty parentheses indicate an empty String
let piVal = Double(3.14)  // uses Double's initializer, with the parameter of 3.14
These seem a little redundant, since you could just as easily type let piVal = 3.14 instead of using Double’s initializer, but you need to get used to this syntax for future lessons, so it is worth explaining now.
One last item to mention for the String data type is that since we discovered how to use string interpolation to use non-string values inside strings, you can convert strings with only integers in them to actual Int types by using the toInt() method on an instance of a String. For example:
let degreesOutsideString = "80"
  //inferred to be a String because of the double-quotes
let degreesOutsideInt = Int(degreesOutsideString)!
  //returns 80 to degreesOutsideInt as an Int
Note: Unwrapping Optional Values
Swift has a concept called optionals, where a variable may have a value, or it may not. In that case, to remain safe from runtime errors, Swift introduced optionals as a way to wrap values, or lack of values, in a wrapper to be safely passed around and used. The exclamation point (!) in the preceding example tells Swift to explicitly unwrap what is returned from converting the string to an integer because theoretically degreesOutsideString could have a value with any character, such as the degree symbol, or “eighty,” which is not convertible to an integer. We discuss optionals more in Hour 6, “Understanding Optional Values.”
In this hour, we covered a lot of material regarding the basic data types in Swift, including Int, Double, Bool, and String. We learned what types of data each one stores, how to initialize them with proper data, and even how to investigate the full list of data type properties and methods by command-clicking the data type’s keyword in Xcode. We even covered some more in-depth topics such as type conversion and string interpolation.
We also really learned how Swift can derive types by using type inference based on the value or values given to a constant or variable, and what it means to have a constant or variable in your code.
In the next hour, we discuss operators, such as +, -, =, ==, and more, and how to work with operators with the data types discussed in this hour. It will be beneficial to jump to operators first before diving into more advanced data types like arrays, dictionaries, and sets, which are discussed in Hour 4, “Working with Collection Types.”
Q. Will I harm anything by trying out data types with different values?
A. Absolutely not. Playgrounds offer a great way to test your code while providing immediate feedback. Have fun!
Q. Should I always explicitly declare a data type?
A. Not necessarily. There may be situations where it is best to declare a data type, but in simple applications, it is not always necessary to do so. Generally you decide this on a case-by-case basis.
Q. Do all variables have to contain values?
A. No. Swift allows us to use optionals, where a variable can either have a value or not. Optional variables are declared with a question mark: var myOptInt : Int?. We learn more about optionals in Hour 6.
Create a new playground. Create two constants to hold your first and last name. Create another constant to hold your favorite quote. Join and display the variables by using concatenation and string interpolation. Next, try to get the count of how many characters are in your joined string.