
Since the introduction of the iPhone in 2007, Apple seems to have lit a fire in the industry for not only consumer-based electronics but also the opportunity for most anyone to be able to write apps for their platform, be it Mac or iOS. This has had a dramatic effect on culture, as you cannot go to a coffee shop or to any business now and not see a slew of MacBook Airs, MacBook Pros, iPhones, iPads, and now Apple Watches. Chances are, if you’re reading this book, you are wondering how you can write an app that could appear on the screens of the very people you see at those coffee shops and businesses.
This book is about the Swift programming language, the new programming language announced by Apple at the 2014 World Wide Developer Conference (WWDC). Prior to Swift’s introduction, Mac and iOS apps were mainly written in a language called Objective-C, which is a strict superset of the C programming language, meaning that you could write apps in both languages, and sometimes had to. In this book, we explore the Swift programming language and learn its fundamentals, structure, and syntax, which gives you a foundation to write great Mac and iOS apps.
Swift is a programming language customized by Apple and introduced as Objective-C without the C. Indeed, this is somewhat true. Not only has Swift taken cues from other languages such as Haskell, Ruby, Python, C#, and several others, it has also matured over the last year with its own style and methodologies. Swift is tuned to work with the existing Cocoa and Cocoa Touch frameworks, which contain all the familiar classes used in modern Mac and iOS apps, to support their interoperability.
Note: Download Xcode
Xcode 7 is a free download from the Mac App Store. You must have Mac OS X 10.10.4 or later. Although you can write Swift code in Xcode 6.x, this book will encompass Swift version 2.0, which requires Xcode 7.
Swift is built on three pillars: being safe, powerful, and modern. Swift provides a lot of safety in terms of type checking, constants for immutability, requiring values to be initialized before use, built-in overflow handling, and automatic memory management. With respect to power, Swift was built using the highly optimized LLVM compiler, includes many low-level C-like functions such as primitive types and flow control, and of course was built with Apple’s hardware in mind for optimal performance. Swift is also modern in that it adopted many features from other languages to make the language more concise, yet expressive, such as closures, generics, tuples, functional programming patterns, and more that we cover in later hours.
The biggest assumption at this point is that you have a Mac computer already, as without that, you cannot install Xcode, Apple’s Mac and iOS Integrated Development Environment (IDE).
Launch the App Store app on your Mac, search for Xcode, and click to install the software. Once the installation is complete, Xcode is listed in your /Applications directory.
Video 1.1—Get Started with Xcode
When you open Xcode, you may be greeted with prompts asking whether you want to install extra tools; go ahead and install them. This should only happen the first time you launch Xcode. Once Xcode is open, you see a standard menu window with options to create a playground, create a new project, or open an existing project, and on the right side is a list of recent projects and playgrounds you’ve opened (if you’ve opened any). The window should look like Figure 1.1.
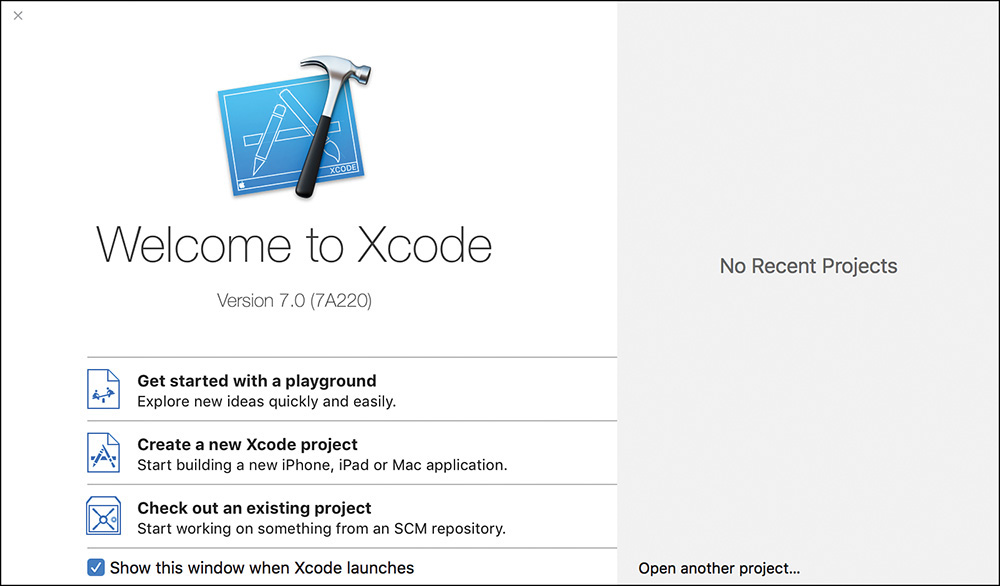
FIGURE 1.1 The Welcome to Xcode screen, where you can choose to create or edit projects and playgrounds.
Although in this book we predominantly work in playgrounds, it is good to become familiar with the IDE, so let’s do that quickly. Click Create a New Xcode Project to create a new Xcode project. The next screen asks you what type of project you want to create, and for this experiment, just use Single View Application, as seen in Figure 1.2, and click Next.
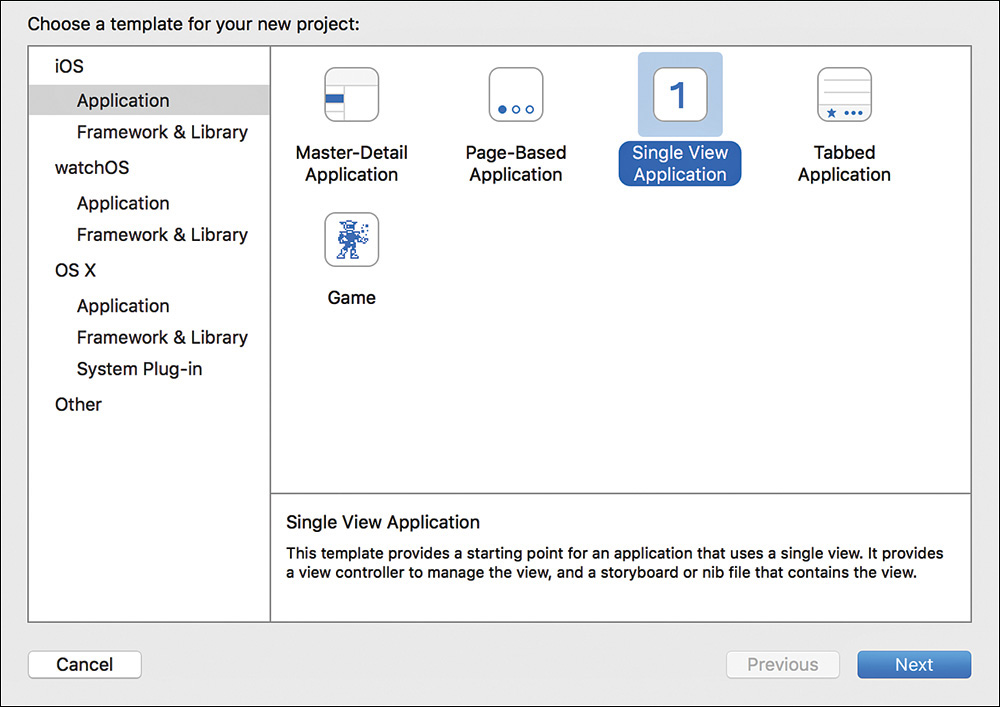
FIGURE 1.2 The project template chooser screen.
Next, you are asked to name your project. Choose an Organization Name, Identifier, Language (Swift or Objective-C), and Device(s) to run on. Here you can also indicate whether you want to use Core Data or include Unit Tests and UI Tests, as shown in Figure 1.3. All this information is useful for future projects you will create, but for our testing purposes, we don’t need to worry about them yet, and you can leave the checkboxes as they are. The Organization Identifier is usually a reverse-DNS name of your personal or company URL to ensure uniqueness at an organizational level, and the Bundle Identifier tacks on the Project Name to the end of the Organization Identifier to ensure uniqueness per app bundle. Once you submit an app to either the Mac App Store or the iOS App Store, your bundle identifier needs to be unique.
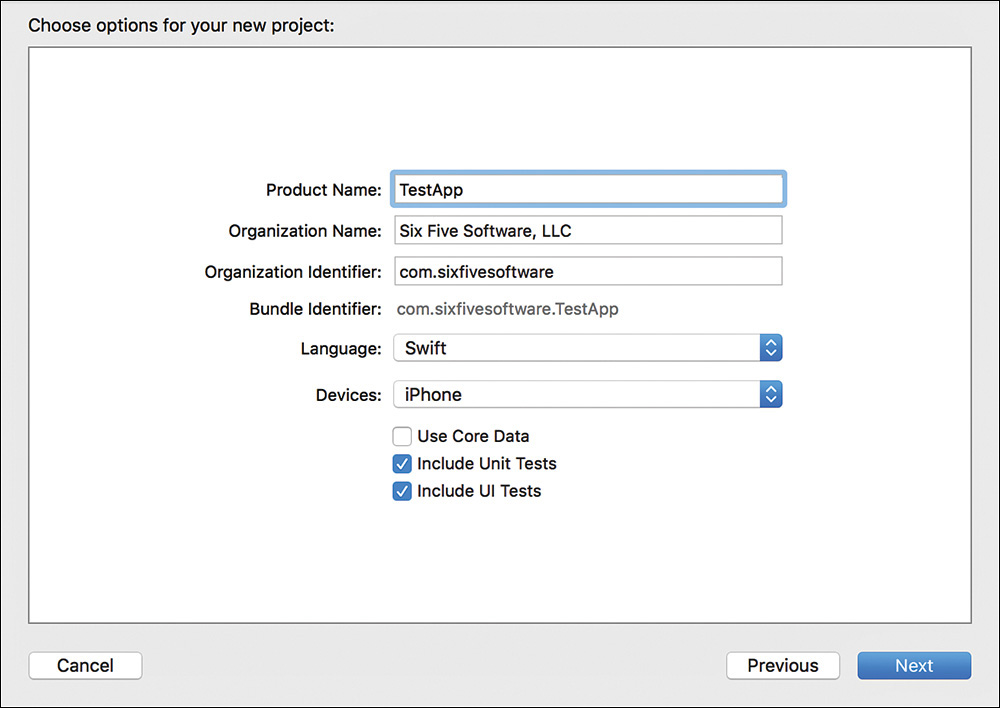
FIGURE 1.3 Enter your project-related information.
Here you also have the choice for device type, such as iPhone or iPad, and that is so that Xcode can properly create the Storyboard files needed for the device or devices you plan to write your app to be used on. This way you can target different interfaces on different devices, but still use the same code to manage them both, such as with Universal apps.
Name your project TestApp, since we just want to get to Xcode to get acclimated (you can remove this project later). As a general rule, you may experience fewer headaches down the road if you choose project names with no spaces. Choose Swift for the language, and click Next. Xcode opens, and you see the new project you created. It should look something like Figure 1.4.
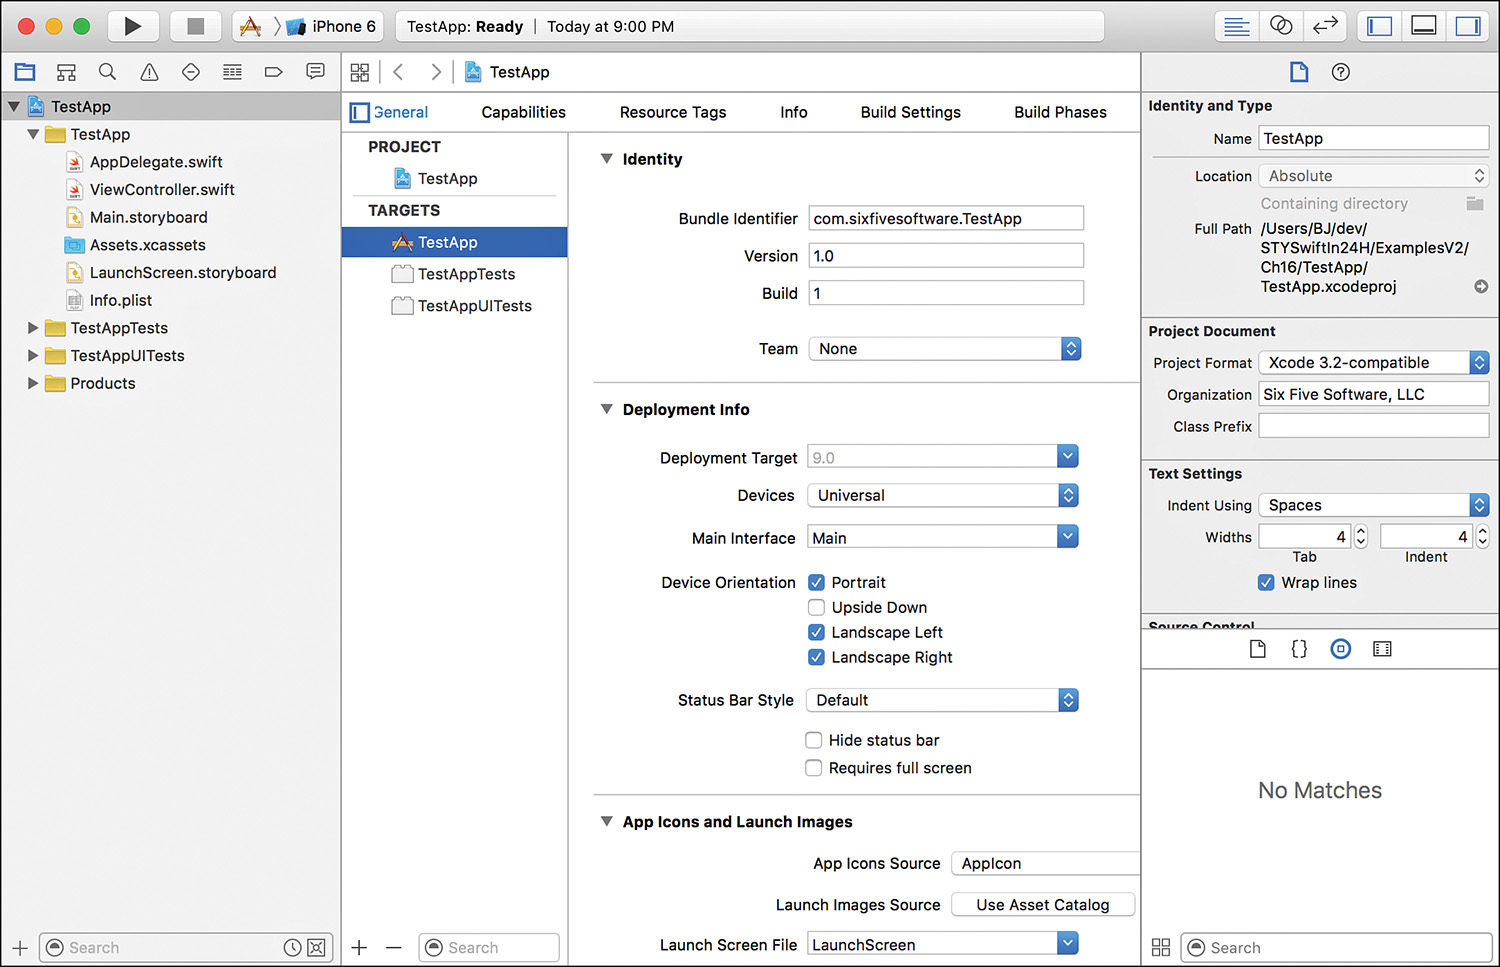
FIGURE 1.4 The initial Xcode IDE layout. The Navigation Pane is on the left, Inspector Pane is on the right, and main content area is in the center. In the top toolbar are buttons to run or stop a build, see error and warning info, and show or hide views.
Note: Viewing Two Files
The Assistant Editor splits the content area in half so you can view two files at the same time. This is helpful, for instance, when you might be writing Unit Tests and also the code to make the Unit Tests pass, or if you are creating a user interface in a Storyboard and have the corresponding View Controller open to connect Actions and Outlets. For more on developing apps with custom interfaces, I recommend reading John Ray’s book Sams Teach Yourself iOS Application Development in 24 Hours, Sams Publishing.
Xcode is nicely partitioned off into logical sections, as you may be accustomed to from other IDEs; however, it also has some nice features to note. The pane on the left-hand side is called the Navigator Pane. Here, you can choose between different Navigators to view files in your project, warnings and errors, breakpoints, Unit Tests, and more. The pane on the right-hand side is called the Inspector Pane. This dynamic pane changes depending on what element is clicked, such as editing a selected button’s text property, or adjusting a control’s position in a window.
The main content area in the center is where you’ll spend most of your time when working on an actual Mac/iOS project. The content area is where you can change project settings, and most importantly create your app by either writing code or designing the interface in a Storyboard.
The bar along the top left has several useful functions available. Toward the left, you have your standard Mac Red/Yellow/Green buttons for window management. Next, the play and stop buttons are actually Build and Run and Stop when referring to compiling, building, and running your apps on the Simulator or devices. To the right of that is where Xcode notifies you of current information, such as how many warnings or errors are in your project, and build status.
Finally, the upper right-hand set of buttons can adjust the views you see to show or hide the Navigator Pane, Inspector Pane, Debug Pane, or Assistant Editor, as well as view code comparisons, source code “blame” views, and logs.
One of the excellent main features of Xcode is something called playgrounds. A playground is a scratch pad, if you will, for testing out code to ensure you receive proper results from code segments, before adding the code to your app. It is because of this functionality that playgrounds are so powerful; you can get immediate feedback if your code is going to give you the results you expect without having to compile your code and run it on the Simulator or a device.
Note: Mac or iOS Playgrounds
There is a difference in file structure when creating a playground from the Mac section or iOS section. Creating a Mac playground adds the import Cocoa statement at the top of the file, and makes Mac frameworks and modules available to you. Creating an iOS playground adds the import UIKit statement at the top of the file, and makes iOS frameworks and modules available to you. There is nothing visually different about either playground at first. If you create an iOS playground, but instead want to test Mac app code, or vice-versa, simply create a new playground of the desired type.
You can create a new playground at any time, and you can choose to have it be a part of your project or just as an independent playground file. Since we’re already in an open project, click File > New > File, and then in the Source set of files (for either iOS or Mac), choose playground, then click Next. In the Save As dialog, name your playground file (the name MyPlayground is fine for our purposes), and then click Create. Don’t worry about the Group or the Targets for now; we aren’t building an app yet, so we don’t care about that.
Notice that your new playground comes equipped with a few lines of Swift code for your learning convenience. Let’s touch on a few of these basics first before moving on. Your playground should look something like this:
//: Playground - noun: a place where people can play
import UIKit
var str = "Hello, playground"
The first line in the preceding code is a comment and is ignored by the compiler. You can use comments to annotate certain parts of code to be human readable, perhaps explaining for other coworkers (or even yourself) what this particular section of code is for. The // (double forward slash) signifies that the remainder of the line is to be treated as a comment. You can also comment entire sections of code or paragraphs of text, either on the same line or on multiple consecutive lines by enclosing them in /* and */. Swift even allows you to nest comment blocks inside comment blocks, such as /* ... /* ... */... */.
The remainder of the preceding code performs a simple task in that it assigns the string “Hello, playground” to a variable str. Even though the code doesn’t directly print any output to the console, the playground by default displays “Hello, playground” in the playground’s results pane to show the contents of the variable and any subsequent variables or constants you create. This comes in handy when you want to test logic, math, and other operations.
It is also worth noting that the variable str is prefaced with the keyword var. The var keyword lets Swift know that str is a variable, and can change its contents. To create a constant, or an immutable variable, use the keyword let instead of var.
In the preceding Try It Yourself example, you assigned a value of 42 to myNewValue in step 1. Then, in step 2, you inserted the value inside a sentence, using something called string interpolation, which is a convenient way to interpolate variables or constants inside output. The next hour discusses string interpolation in more detail. The print() statement prints output to the console, which is handy for quick debugging or viewing contents of data.
Note: Removing Xcode Projects
If you would like to remove this Xcode project (or any Xcode project you may not want any longer), you can simply remove the containing folder on the file system. Say you saved this project in ~/Documents/TestApp. Simply delete the TestApp folder from your Documents directory.
Swift also comes packaged with a nice feature called a Read-Eval-Print-Loop, or a REPL for short. The REPL is an interactive command-line–based version of what we just experienced with playgrounds. Using the REPL is nice for quick tests to make sure code works the way you expect, similar to what you get with a playground, but rather than creating a new file in your project, you can just use this ephemeral REPL to get in, test your code, and get out. Whether to use a playground or the REPL is largely a matter of preference of what you feel comfortable with. If you are already using Terminal.app, or some other command-line utility, it may be easier for you to just open the REPL. On the other hand, if you’re already in Xcode, it may be quicker for you to just create a playground and go from there.
To access the REPL, you simply type the following:
$> xcrun swift
xcrun is a command-line tool provided by Xcode for running or locating development tools or properties. So in the preceding line, we’re telling xcrun to run the Swift REPL. When you press the Return key, you see something like the following (your version numbers might look different):
Welcome to Apple Swift version 2.0 (700.0.57 700.0.72). Type :help for assistance.
  1>
The 1> is the Swift REPL prompt where you can start typing Swift code, one instruction per line, and it interprets your code for you, much like the playground did. Let’s try another example of writing code, this time in the Swift REPL.
You’re doing great! The Swift REPL keeps constants and variables in memory for the duration of your REPL session. This means that you can reference variables and constants several lines later, which helps you work on tackling problems quickly and easily before you write the code in your actual app. The completed Try It Yourself example should look like Figure 1.5.
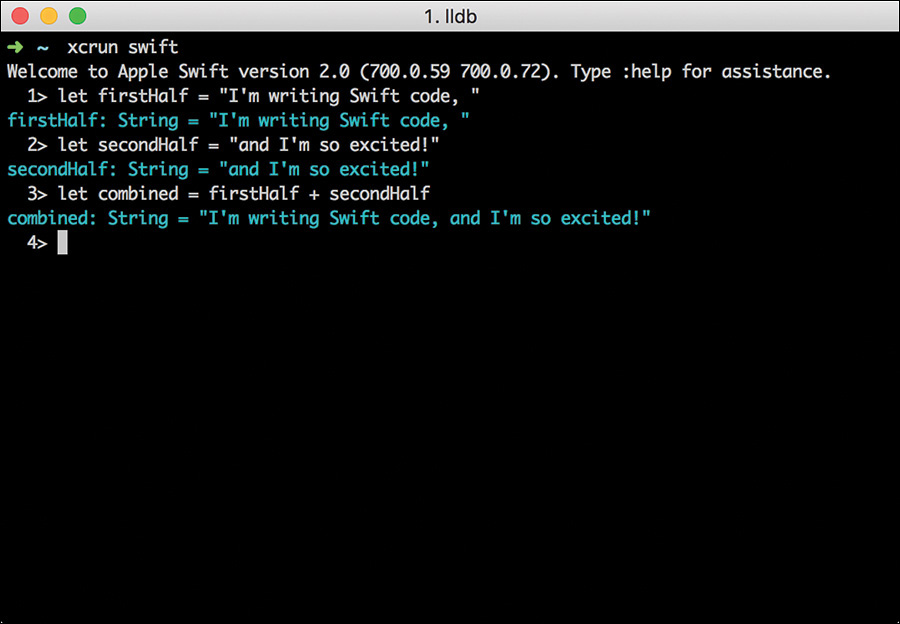
FIGURE 1.5 The completed Try It Yourself example using the Swift REPL.
To quit the Swift REPL, type a colon (:) to invoke command mode; then type q for quit and press Return. You are returned to your regular Unix shell prompt.
In this first hour, you learned a brief background on the Swift programming language and what it is built upon. We walked through opening the Xcode environment for the first time and explored some of Xcode’s layout, as well as the Swift REPL. You also created your first lines of Swift code and saw how Xcode and the REPL give you instant feedback on what your code is doing.
In the next hour, we cover the difference between variables and constants and explore some of Swift’s native data types, such as String, Int, Bool, Character, Double, and Float.
Q. Can I have a playground without having to create a full Xcode project?
A. Absolutely. Xcode treats playgrounds as interpretable files, independent of any project.
Q. I am still running OS X Mountain Lion. Can I still use Xcode?
A. OS X Mountain Lion (v. 10.8) can run Xcode, but the latest version of Xcode that can run on Mountain Lion is Xcode 5.x. OS X Mavericks 10.9.3 is the earliest version that can support Xcode 6, and OS X Yosemite 10.10.4 is the minimum required OS for Xcode 7. Xcode 7 is required for Swift 2.0.
Q. I just started learning iOS development, and it seems that Swift is very popular. But, should I still learn Objective-C?
A. Objective-C is still heavily used in many Mac and iOS apps and will still be used for some time to come. This book predominantly teaches the Swift programming language, but if you want to be a developer full-time or in some sort of capacity, you may encounter Objective-C code from an existing code base, so you may benefit from learning some Objective-C. There are plenty of good resources available for learning Objective-C, as it is a seasoned and solid language.
Try creating a playground in which you combine two strings together, and then use the lowercaseString method on your combined string to convert the string to all lowercase letters. (HINT: In a playground, press the period key (.) immediately after typing the combined variable name to get a list of actions you can take on that string.)