
In this hour, you learn all about models and how they are used in Unity. You start by looking at the fundamental principles of meshes and 3D objects. From there, you learn how to import your own models or use ones acquired from the Asset Store. You finish this hour by examining Unity’s material and shader functionality.
Note: Why Triangles?
You might be asking yourself why 3D objects are made up entirely of triangles. The answer is simple. Computers process graphics as a series of points, otherwise known as vertices. The fewer vertices an object has, the faster it can be drawn. Triangles have two properties that make them desirable. The first is that whenever you have a single triangle, you need only one more vertex to make another. To make one triangle, you need three vertices, two triangles take only four, and three triangles require only five. This makes them very efficient. The second is that by using this practice of making strips of triangles, you can model any 3D object. No other shape affords you that level of flexibility and performance.
Video games wouldn’t be very video without the graphical components. In 2D games, the graphics consist of flat images called sprites. All you needed to do was change the x and y positions of these sprites and flip several of them in sequence and the viewer’s eye was fooled into believing that it saw true motion and animation. In 3D games, however, things aren’t so simple. In worlds with a third axis, objects need to have volume to fool the eye. Because games use a large number of objects, the need to process things quickly was very important. Enter the mesh. A mesh, at its most simple, is a series of interconnected triangles. These triangles build off of each other in strips to form basic to very complex objects. These strips provide the 3D definitions of a model and can be processed very quickly. Don’t worry, though; Unity handles all of this for you so that you don’t have to manage it yourself. Later in this hour, you’ll see just how triangles can make up various shapes in the Unity Scene view.
Note: Model or Mesh?
The terms model and mesh are similar, and you can often use them interchangeably. There is a difference, however. A mesh contains all the points and lines that defines the 3D shape of an object. When you refer to the shape or form of a model, you are really referring to a mesh. A model, therefore, is an object that contains a mesh.
A model has a mesh to define its dimensions, but it can also contain animations, textures, materials, shaders, and other meshes. A good general rule is this: If the item in question contains anything other than vertex information, it is a model; otherwise, it is a mesh.
Unity comes with a few basic built-in meshes (or primitives) for you to work with. These tend to be simple shapes that serve simple utilities or can be combined to make more complex objects. Figure 3.1 shows the available built-in meshes. (You worked with the cube and sphere in the previous hours.)
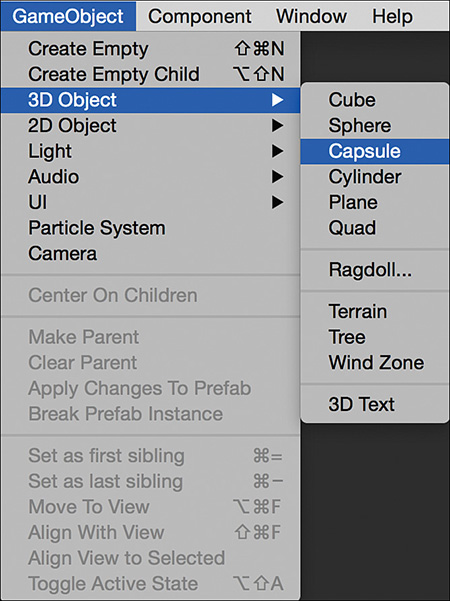
FIGURE 3.1 The built-in meshes in Unity.
Having built-in models is nice, but most of the time your games will require art assets that are a little more complex. Thankfully, Unity makes it rather easy to bring your own 3D models into your projects. Just placing the file containing the 3D model in your Assets folder is enough to bring it into the project. From there, dragging it into the scene or hierarchy builds a game object around it. Natively, Unity supports .fbx, .dae, .3ds, .dxf, and .obj files. This enables you to work with just about any 3D modeling tool.
Video 3.1—Importing Your Own 3D Model
Tip: Modeling with Simple Meshes
Do you need a complex object in your game but you can’t find the right type of model to use? Nesting objects in Unity enables you to easily make simple models using the built-in meshes. Just place the meshes near each other so that they form the rough look you want. Then nest all the objects under one central object. This way, when you move the parent, all the children move, too. This might not be the prettiest way to make models for your game, but it will do in a pinch!
1. Create a new Unity project or scene.
2. In the Project view, create a new folder named Models under the Assets folder. (Right-click the Assets folder and select Create > Folder.)
3. Locate the Torus.fbx file provided for you in the Hour 3 folder of the book files.
4. With both the operating system’s file browser and the Unity editor open and side by side, click and drag the Torus.fbx file from the file browser into the Models folder that you created in step 2. In Unity, click the Models folder to see the new Torus file. If done correctly, your Project view will resemble Figure 3.2. Notice the Materials folder that was added for you. You will learn more about this later.
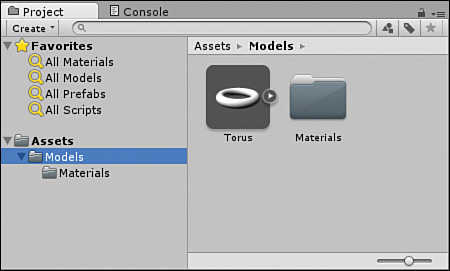
FIGURE 3.2 The Project view after the Torus model was added.
5. Click the Torus asset in the Models folder and look at the Inspector view. Change the value of the scale factor from 1 to 100. Now click the Apply button at the bottomright of the inspector.
6. Drag the Torus asset from the Models folder onto the Scene view. Notice how a Torus game object was added to the scene containing a mesh filter and mesh renderer. These allow the Torus to be drawn to the screen. If you click the Torus object, you see how it is made up of many connected triangles.
You don’t have to be an expert modeler to make games with Unity. The Asset Store provides a simple and effective way to find premade models and import them into your project. Generally speaking, models on the Asset Store are either free or paid and come alone or in a collection of similar models. Some of the models come with their own textures, and some of them are simply the mesh data.
Video 3.2—Downloading Models from the Asset Store
1. Create a new scene (click File > New Scene). In the Project view, type Robot Kylet: Model into the search bar (see Figure 3.3).
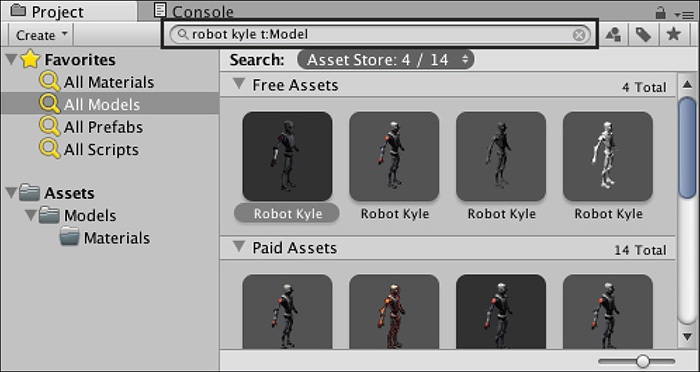
FIGURE 3.3 Steps to locate a model asset.
Caution: Default Scaling of Meshes
Most of the Inspector view options for meshes are advanced and are not covered right now. The property you are interested in is the scale factor. By default, Unity imports meshes scaled down. By changing the value of the scale factor from .01 to 1, you are telling Unity to allow the model to enter the scene as the same size as it was created.
2. In the search filter section, click the Asset Store button (see Figure 3.3). If these words aren’t visible, you may need to resize your editor window or Project view window. You will also need to be connected to the Internet.
3. Locate Robot Kyle and select any one of the three free assets.
4. In the Inspector view, click Import Package. At this point, you may be prompted to provide your Unity account credentials. If you have any trouble, we have also provided the file in this hour’s book files as a Unity package; simply double-click this to import.
5. When the Importing Package dialog opens, leave everything checked and select Import.
6. There will now be a new asset folder called Robot Kyle. Locate the robot model under Assets > Robot Kyle > Model and drag it into the Scene view (see Figure 3.4). Note that the model will be fairly small in the Scene view; you might need to move closer to see it.
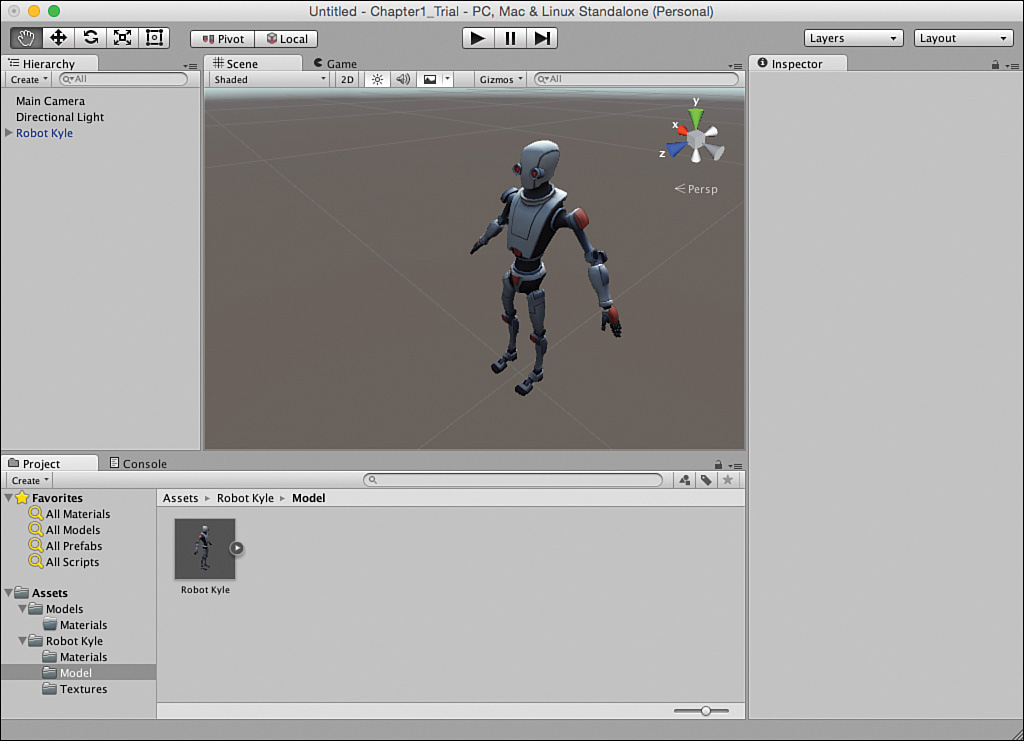
FIGURE 3.4 The Unity project with Robot Kyle added.
Applying graphical assets to 3D models can be daunting for beginners, if you are not familiar with it. Unity uses a simple and specific workflow that gives you a lot of power when determining exactly how you want things to look. Graphical assets are broken down into textures, shaders, and materials. Each of these is covered individually in its own section, but Figure 3.5 shows you how they fit together. Notice that textures are not applied directly to models. Instead, textures and shaders are applied to materials. Those materials are in turn applied to the models. This way, the look of a model can be swapped or modified quickly and cleanly without a lot of work.
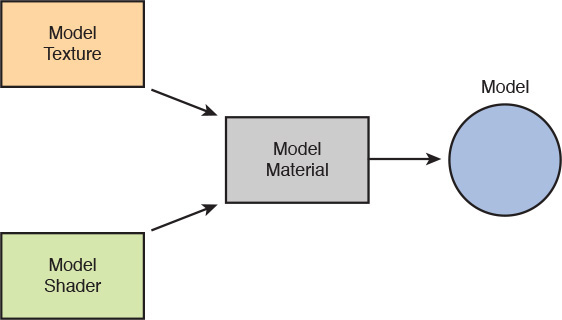
FIGURE 3.5 The model asset workflow.
Note: That’s an Unwrap!
Imagining how textures wrap around cans is fine, but what about more complex objects? When creating an intricate model, it is common to generate something called an unwrap. The unwrap is somewhat akin to a map that shows you exactly how a flat texture will wrap back around a model. If you look in the Robot Kyle > Textures folder from earlier this hour, you notice the Robot_Color texture. It looks strange, but that is the unwrapped texture for the model. The generation of unwraps, models, and textures is an art form to itself and is not covered in this text. A preliminary knowledge of how it works should suffice at this level.
Caution: Weird Textures
Later in this hour, you will apply some textures to models. You might notice that the textures warp a bit or get flipped in the wrong direction. Just know that this is not a mistake or an error. This problem occurs when you take a basic rectangular 2D texture and apply it to a model. The model has no idea which way is correct, so it applies the texture however it can. If you want to avoid this issue, use textures specifically designed for (unwrapped for) the model that you are using.
Textures are flat images that get applied to 3D objects. They are responsible for models being colorful and interesting instead of blank and boring. It can be strange to think that a 2D image can be applied to a 3D model, but it is a fairly straightforward process once you are familiar with it. Think about a soup can for a moment. If you were to take the label off of the can, you would see that it is a flat piece of paper. That label is like a texture. After the label was printed, it was then wrapped around the 3D can to provide a more pleasing look.
Just like all other assets, adding textures to a Unity project is easy. Start by creating a folder for your textures; a good name would be Textures. Then drag any textures you want in your project into the Textures folder you just created. That’s it!
If the texture of a model determines what is drawn on its surface, the shader is what determines how it is drawn. Here’s another way to look at this: A material contains properties and textures, and shaders dictate what properties and textures a material can have. This might seem nonsensical right now, but later when we create materials you will begin to understand how they work. Much of the information about shaders is covered later this hour, because you cannot create a shader without a material. In fact, much of the information to be learned about materials is actually about the material’s shader.
As mentioned earlier, materials are not much more than containers for shaders and textures that can be applied to models. Most of the customization of materials depends on which shader is chosen for it, although all shaders have some common functionality.
To create a new material, start by making a Materials folder. Then right-click the folder and select Create > Material. Give your material some descriptive name and you are done. Figure 3.6 shows two materials with different shader settings. Notice how they both use the same Standard shader. Each has a base Albedo color of white. A Smoothness setting of zero is a rough surface, and the lighting looks very flat as the light bounces in a lot of directions. A higher setting leads to a shinier look. There is also a preview of the material (blank now because there is no texture).
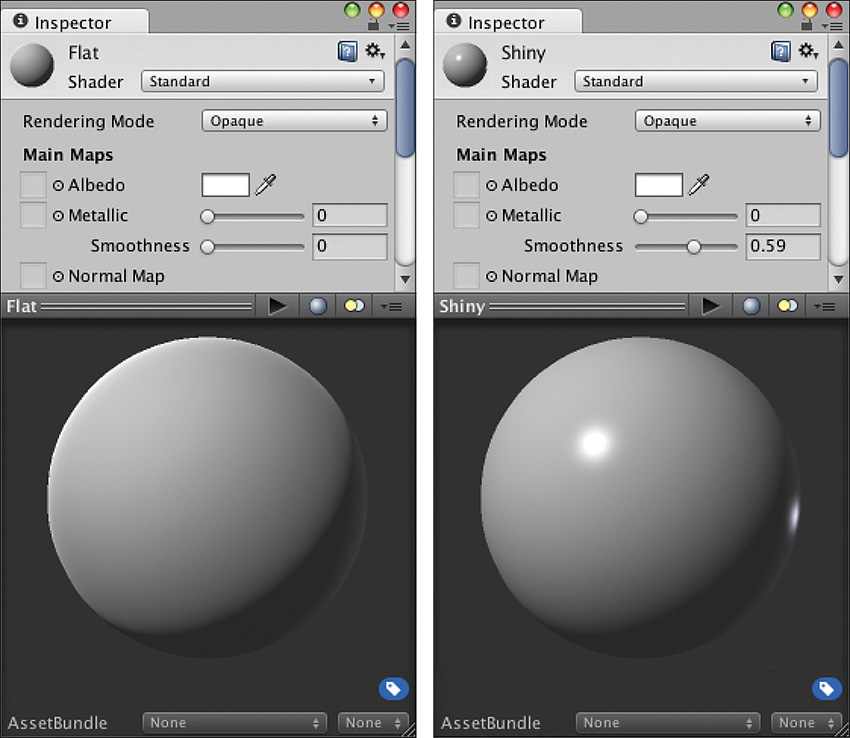
FIGURE 3.6 Two materials with different shader settings.
Now that you understand textures, models, and shaders, it is time to look at how it all comes together. Unity 5 has a very powerful Standard shader, which we will be focusing on in this book. Table 3.1 describes the common shader properties.

TABLE 3.1 Common Shader Properties
This might seem like a lot of information to take in, but once you become more familiar with the few basics of textures, shaders, and materials, you’ll find this a smooth process.
Unity has several other shaders which we won’t cover in this book. The Standard Shader is very flexible, and will cover most of your basic needs.
Video 3.3—Applying Textures, Shaders, and Materials to Models
1. Start a new project or scene. Note that creating a new project will close and reopen the editor.
2. Create a Textures and a Materials folder.
3. Locate the Brick_Texture.png file in the book files and drag it into the Textures folder created in step 2.
4. Add a cube to the scene. Position it at (0, 1, –5). Give it a scale of (5, 2, 1). See Figure 3.7 for the cube properties.
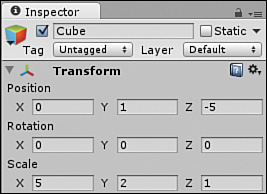
FIGURE 3.7 The properties of the cube.
5. Create a new material (right-click the Materials folder and select Create > Material) and name it BrickWall.
6. Leave the shader as Standard, and under Main Maps click the little circle to the left of the word Albedo. Select Brick_Texture from the pop-up window.
7. Click and drag the brick wall material from the Project view onto the cube in the Scene view.
8. Notice how the texture is stretched across the wall a little too much. With the material selected, change the value of the x tiling to be 3. Make sure you do this in the Main Maps section, not the Secondary Maps. Now the wall looks much better.
9. You now have a textured brick wall in your scene. Figure 3.8 contains the final product.
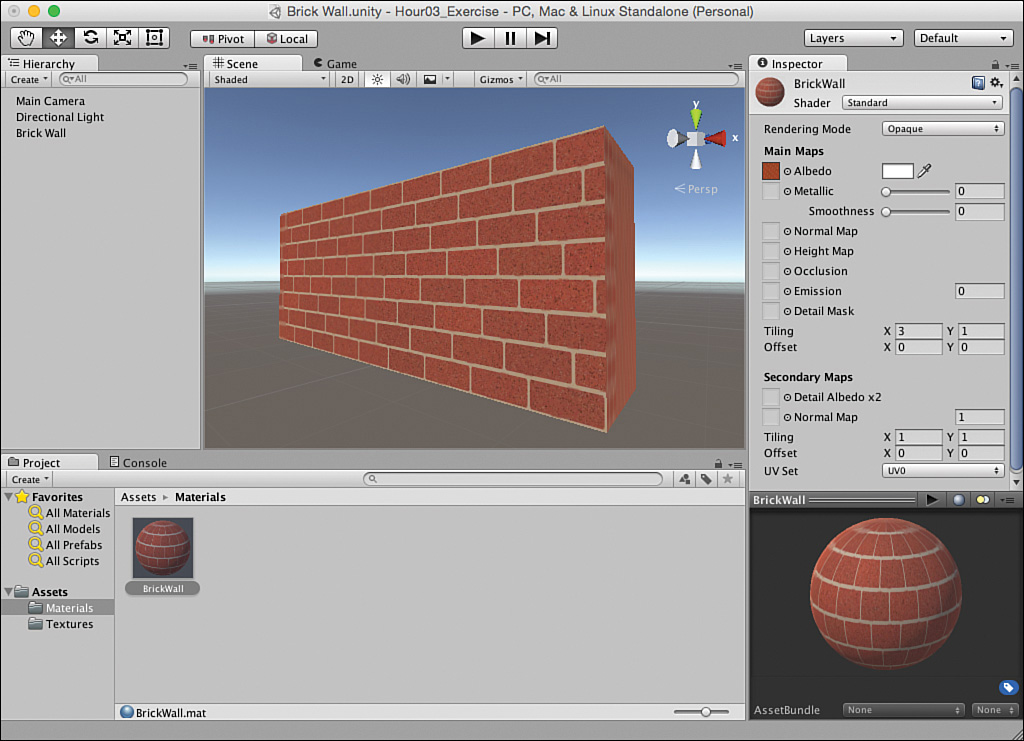
FIGURE 3.8 The final product of this Try it Yourself.
In this hour, you learned all about models in Unity. You started by learning about how models are built with collections of vertices called meshes. Then, you discovered how to use the built-in models, import your own models, and download models from the Asset Store. You then learned about the model art workflow in Unity. You experimented with textures, shaders, and materials. You finished by creating a textured brick wall.
Q. Will I still be able to make games if I’m not an artist?
A. Absolutely. Using free online resources and the Unity Asset Store, you can find various art assets to put in your games.
Q. Will I need to know how to use all the built-in shaders?
A. Not necessarily. Many shaders are very situational. Start with the shader covered in this chapter and learn more if a game project requires it.
Q. If there are paid art assets in the Unity Asset Store, does that mean I can sell my own art assets?
A. Yes, it does. In fact, it is not limited to only art assets. If you can create high-quality assets, you can certainly sell them in the store.
Let’s experiment with the effects shaders have on the way models look. You will use the same mesh and texture for each model; only the shaders will be different. The project created in this exercise is named Hour 3_Exercise and is available in the Hour 3 book files.
1. Create a new scene or project.
2. Add a Materials and a Textures folder to your project. Locate the files Brick_Normal.png and Brick_Texture.png in the Hour 3 book files and drag them into the Textures folder.
3. In the Project view, select Brick_Texture. In the Inspector view, change the aniso level to 3 to increase the texture quality for curves. Click Apply.
4. In the Project view, select Brick_Normal. In the Inspector view, change the texture type to Normal Map. Click Apply.
5. Select the Directional Light in your Hierarchy, and give it a position of (0, 10, –10) with a rotation of (30, –180, 0).
6. Add four spheres to your project. Scale them each to (2, 2, 2). Spread them out by giving them positions of (1, 2, –5), (–1, 0, –5), (1, 0, –5), and (–1, 2, –5).
7. Create four new materials in the Materials folder. Name them DiffuseBrick, SpecularBrick, BumpedBrick, and BumpedSpecularBrick. Figure 3.9 contains all the properties of the four materials. Go ahead and set their values.
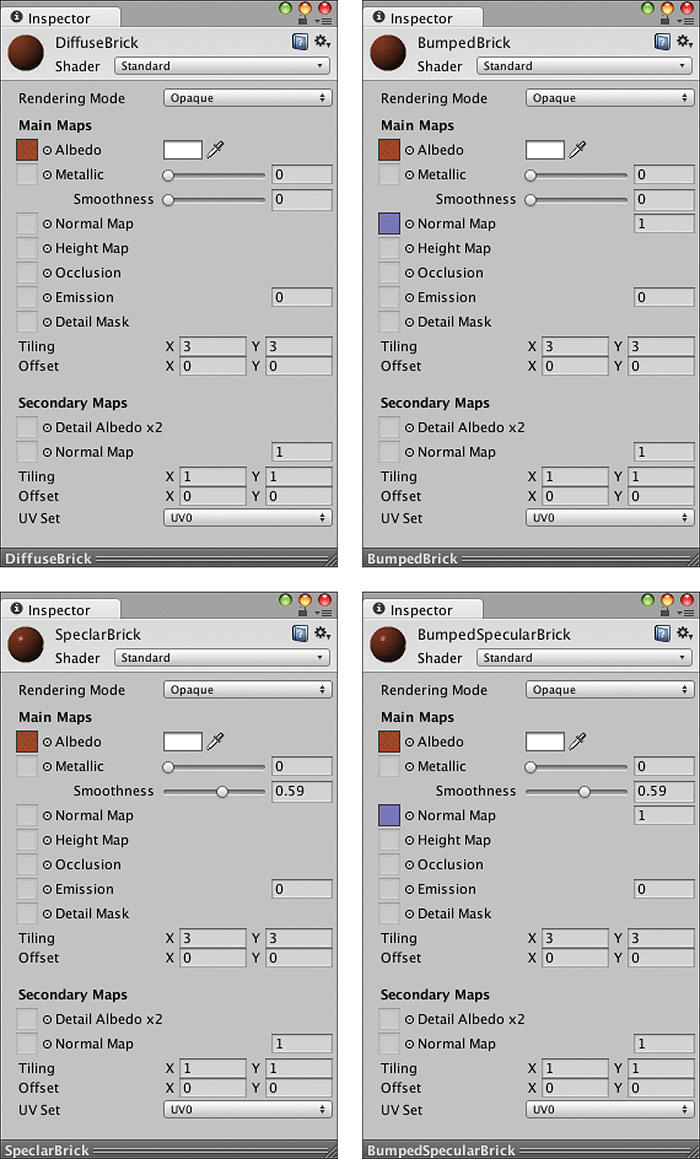
FIGURE 3.9 Material properties.
8. Click and drag each of the materials onto one of the four spheres. Notice how the light and the curvature of the spheres interact with the different shaders. Remember that you can move about the Scene view to see the spheres at different angles.