
This hour’s lesson marks the midpoint in our exploration of the Apple iOS development platform. It will give us a chance to sit back, catch our breath, and get a better idea of what it means to “code” for iOS. Both OS X and iOS share a common development environment and a common development language: Swift.
Swift provides the syntax and structure for creating applications on Apple platforms. Swift is a brand-new language developed internally in Apple that still has that “new language smell,” but also a few disconcerting knocks under the hood. It can seem a bit daunting at first, but after a few hours of practice, you’ll begin to feel right at home. This hour takes you through the steps you need to know to be comfortable with Swift and starts you down the path to mastering this unique and powerful language.
To better understand the scope of this hour, take a few minutes to search for Swift or object-oriented programming in your favorite online bookstore. You will find quite a few books—lengthy books—on these topics. In this book, roughly 30 pages cover what other books teach in hundreds of pages. Although it’s not possible to fully cover Swift and object-oriented development in this single hour, we can make sure that you understand enough to develop fairly complex apps.
To provide you with the information you need to be successful in iOS development, this hour concentrates on fundamentals—the core concepts that are used repeatedly throughout the examples and tutorials in this book. The approach in this hour is to introduce you to a programming topic in general terms, and then look at how it will be performed when you sit down to write your application. Before we begin, let’s look a bit closer at Swift and object-oriented programming.
Most people have an idea of what programming is and have even written a simple program. Everything from setting your DVR to record a show to configuring a cooking cycle for your microwave is a type of programming. You use data (such as times) and instructions (like “record”) to tell your devices to complete a specific task. This certainly is a long way from developing for iOS, but in a way the biggest difference is in the amount of data you can provide and manipulate and the number of different instructions available to you.
There are two primary development paradigms: imperative programming and object-oriented programming. First, imperative programming (a subset of which is called procedural programming) implements a sequence of commands that should be performed. The application follows the sequence and carries out activities as directed. Although there might be branches in the sequence or movement back and forth between some of the steps, the flow is from a starting condition to an ending condition, with all the logic to make things work sitting in the middle.
The problem with imperative programming is that it lends itself to growing, without structure, into an amorphous blob. Applications gain features when developers tack on bits of code here and there. Often, instructions that implement a piece of functionality are repeated over and over wherever something needs to take place. Procedural programming refers to an imperative programming structure that attempts to avoid repetition by creating functions (or procedures) that can be reused. This works to some extent, but long-term still often results in code bloat. The benefit of this approach, however, is that it is quite easy to pick up and learn: You create a series of instructions, and the computer follows them.
The other development approach, and what we use in this book, is object-oriented programming (OOP). OOP uses the same types of instructions as imperative development but structures them in a way that makes your applications easy to maintain and promotes code reuse whenever possible. In OOP, you create objects that hold the data that describes something along with the instructions to manipulate that data. Perhaps an example is in order.
Consider a program that enables you to track reminders. With each reminder, you want to store information about the event that will be taking place—a name, a time to sound an alarm, a location, and any additional miscellaneous notes that you may want to store. In addition, you need to be able to reschedule a reminder’s alarm time or completely cancel an alarm.
In the imperative approach, you have to write the steps necessary to track all the reminders, all the data in the reminders, check every reminder to see whether an alarm should sound, and so on. It’s certainly possible, but just trying to wrap your mind around everything that the application needs to do could cause some serious headaches. An object-oriented approach brings some sanity to the situation.
In an object-oriented model, you could implement a reminder as a single object. The reminder object would know how to store the properties such as the name, location, and so on. It would implement just enough functionality to sound its own alarm and reschedule or cancel its alarm. Writing the code, in fact, would be very similar to writing an imperative program that only has to manage a single reminder. By encapsulating this functionality into an object, however, we can then create multiple copies of the object within an application and have them each fully capable of handling separate reminders. No fuss and no messy code!
Most of the tutorials in this book make use of one or two objects, so don’t worry about being overwhelmed with OOP. You’ll see enough to get accustomed to the idea, but we’re not going to go overboard.
Another important facet of OOP is inheritance. Suppose that you want to create a special type of reminder for birthdays that includes a list of birthday presents that a person has requested. Instead of tacking this onto the reminder object, you could create an entirely new “birthday reminder” that inherits all the features and properties of a reminder and then adds in the list of presents and anything else specific to birthdays.
OOP brings with it a whole range of terminology that you need to get accustomed to seeing in this book (and in Apple’s documentation). The more familiar you are with these terms, the easier it will be to look for solutions to problems and interact with other developers. Let’s establish some basic vocabulary now:
setAlarm to set the alarm for a given reminder. Methods are, by default, available within the class they are defined and within other classes defined in the same project.countReminders that provides a count of all the reminder objects that have been created. If you’re familiar with other OO languages, you may recognize this as a static method or a class method.setAlarm method, you would presumably need to include the time to set. The time, in this case, would be a parameter.self to refer to the object. In Swift, self is usually implied and only needs to be used explicitly in very specific circumstances.It’s important to know that when you develop for iOS you’re going to be taking advantage of hundreds of classes that Apple has already written for you. Everything from creating onscreen buttons to manipulating dates and writing files is covered by prebuilt classes. You’ll occasionally want to customize some of the functionality in those classes, but you’ll be starting out with a toolbar already overflowing with functionality.
Confused? Don’t worry! This book introduces these concepts slowly, and you’ll quickly get a feel for how they apply to your projects as you work through several tutorials in the upcoming hours.
For years, Apple development has centered on a decades-old language called Objective-C. Objective-C, while appealing to some, was about as far from a “modern” language as you could get. Languages like Python and Ruby have sprung up and attracted legions of followers with their simple syntax and focus on results, rather then esoteric concepts like memory management. Swift is Apple’s answer to the call for a modern iOS and OS X development language.
Released in 2014, Swift carries with it many of the niceties of Objective-C, but loses much of the baggage. The biggest issue with Swift is that it is still evolving, and developers (including yours truly) are still trying to figure out the best way to use it. It will be several years before this churn settles down—but, in the meantime, the core of Swift is fast, flexible, and easy to learn.
Swift statements are easier to read than other programming languages and can often be deciphered just by looking at them. For example, code that checks to see if two dates are equal might be written like this:
if myBirthday.isEqualToDate(yourBirthday) {
    // We're the same age!
}
It doesn’t take a very large mental leap to see what is going on in the code snippet. Throughout the book, I will try to explain what each line of code is doing—but chances are you can pick up on the intention just by reading the lines.
Caution: Case Counts
Swift is case sensitive. If a program is failing, make sure that you aren’t mixing case somewhere in the code.
Now that you have an idea of what OOP and Swift are, let’s take a look at how you’ll be using them over the course of this book.
In the preceding hour, you learned how to use Xcode to create projects and navigate their files. As mentioned then, the vast majority of your time will be spent in the project group of Xcode, which is shown for the MyNewApp project in Figure 3.1. You’ll be adding methods to class files that Xcode creates for you when you start a project or, occasionally, creating your own class files to implement entirely new functionality in your application.
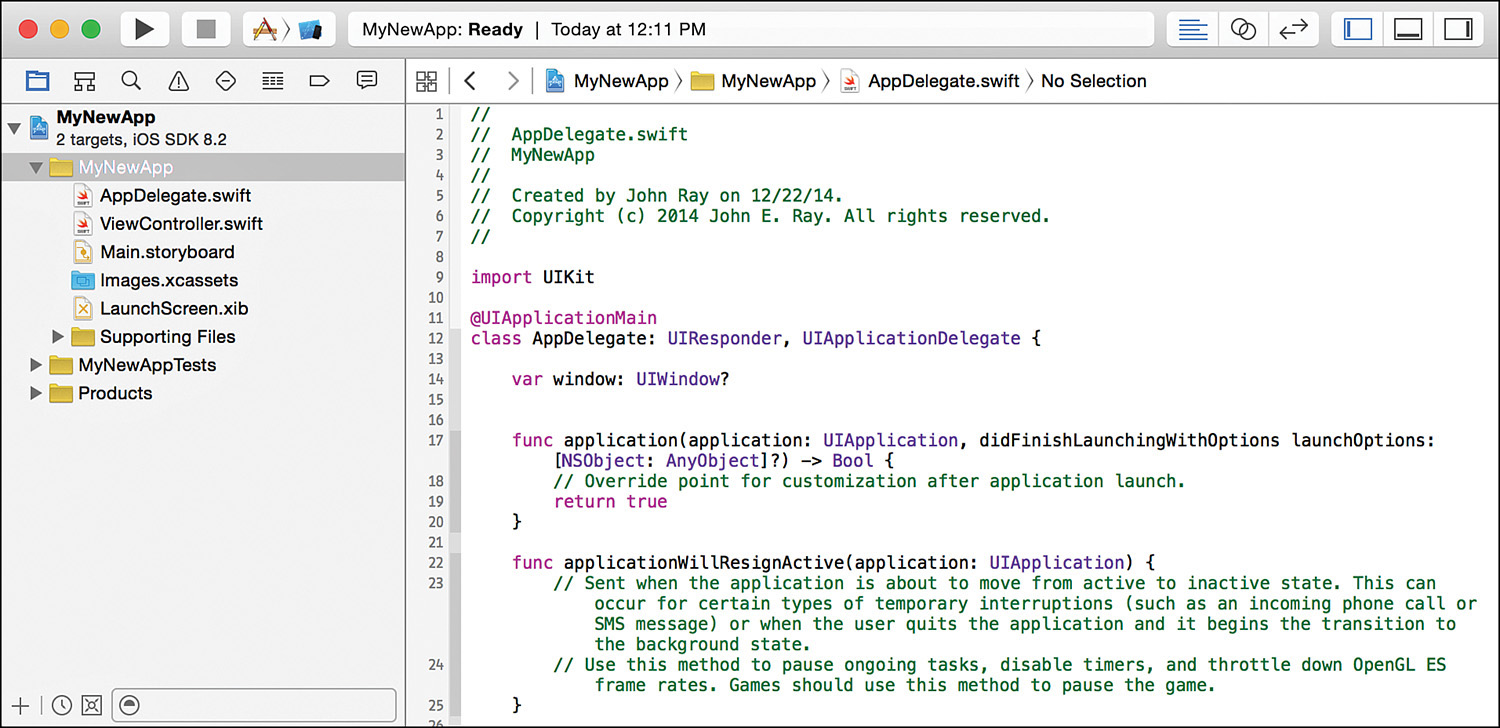
FIGURE 3.1 Most of your coding will occur within the files in your project group.
Caution: Line Numbers Are for Reference Only!
In each hour, I present code samples like this one. Often, they include line numbers so that I can easily reference the code and explain how it works. Swift does not require line numbers, nor will the code work if you leave them in your application. If you see a line prefixed with a number and a colon (#:), don’t type the line number prefix!
Okay, sounds simple enough, but where will the coding take place? If you create a new project look, you’ll see quite a few different files staring back at you.
In Swift, a class is implemented within a single file with the .swift extension. This file contains all of the variable/constant definitions, and all of the methods containing the application logic. Other classes in your project will automatically be able to access the methods in this file, if needed.
Let’s review the structure of an entirely made-up class file in Listing 3.1.
LISTING 3.1 A Sample Interface File
 1: import UIKit
 2:
 3: class myClass: myParent, myProtocol {
 4:
 5:     var myString: String = ""
 6:     var myOtherString: String?
 7:     var yetAnotherVariable: Float!
 8:     let myAge: Int = 29
 9:
10:     @IBOutlet weak var userOutput: UILabel!
11:     @IBOutlet var anotherUserOutput: UILabel!
12:
13:     class func myTypeMethod(aString: String) -> String {
14:         // Implement a Type method here
15:     }
16:
17:     func myInstanceMethod(myString: String, myURL: NSURL) -> NSDate? {
18:         // Implement the Instance method here
19:     }
20:
21:     override func myOverriddenInstanceMethod() {
22:         // Override the parent's method here
23:     }
24:
25:     @IBAction func myActionMethod(sender: AnyObject) {
26:         // React to an action in the user interface
27:     }
28:
29: }
Note
Wait a sec, what’s a declaration? Declarations are commands that are added to your files that introduce a new object or feature within the application. They don’t implement the logic that makes your app work, but they are necessary for providing information on how your applications are structured so that Xcode knows how to deal with them.
Note
Protocol? What’s a protocol? Protocols are a feature of Swift that sound complicated but really aren’t. Sometimes you will come across features that require you to write methods to support their use, such as providing a list of items to be displayed in a table. The methods that you need to write are grouped together under a common name; this is known as a protocol.
Some protocol methods are required, and others are optional; it just depends on the features you need. A class that implements a protocol is said to conform to that protocol.
1: import UIKit
First, in line 1, the interface file uses the import declaration to include any other files that our application will need to access. The string UIKit designates a system framework that gives us access to a vast majority of the classes.
Whenever we need to import something, I explain how and why in the text. The UIKit example is included by default when Xcode sets up your classes and covers most of what you need for this book’s examples.
The class declaration, shown in line 3, tells Xcode what class the file is going to be implementing. In this case, the file should contain the code to implement myClass:
3: class myClass: myParent, myProtocol {
Notice that line 3 includes a few additional items as well: that is, myParent, myProtocol. The class name (myClass) is always followed by a colon (:) and a list of the classes that this class is inheriting from (that is, the parent classes) and any protocols it will be implementing. In this example, myClass is going to by inheriting from myParent and will be implementing the myProtocol protocol.
The class line ends with an opening curly brace {. All blocks of code are contained in curly braces. The rest of the class code will follow this brace and eventually by terminated with a closing brace } (line 29).
Lines 5–6 declare three different variable properties. A variable property is just a variable that can be accessed from any method in the class, or from code within other classes.
5:     var myString: String = ""
6:     var myOtherString: String?
7:     var yetAnotherVariable: Float!
In this example, a variable named myString that contains a String is declared and initialized with an empty string (""). A second String (myOtherString) is also declared, but designated as “optional” with the ? modifier. A third variable property, yetAnotherVariable, is declared as a floating-point number and set to be “implicitly unwrapped” by including the ! modifier. We’ll get to the point of these modifiers in a little bit. (They look confusing, but they have an important role to play.)
Note
To retrieve a variable property from an object, you write <objectname>.<variable property> to access it. That means that if there is a property myProperty in an object myAmazingObject, you type myAmazingObject.myProperty. This is known as dot notation.
What if you want to access the variable property from inside the class where it is defined? Simple. You just refer to it by name (for example, myProperty). If you want to be overly pendantic, you can also use self to refer to the current object, as in self.<variable property>.
This will all be obvious once you start coding.
Just below the variable properties is a constant declaration:
8: let myAge: Int = 29
This creates a constant (myAge) and sets it to the integer value 29. Constants declared alongside variable properties (that is, outside of a method) are nearly identical to variable properties in how they are used—but with one important difference—they can’t be changed or reassigned. In other words, I’m 29 forever.
Lines 9–10 are, yet again, variable property declarations, but they include the keyword IBOutlet at the start. This indicates that they are going to be connected to objects defined within an application’s user interface:
10:     @IBOutlet weak var userOutput: UILabel!
11:     @IBOutlet var anotherUserOutput: UILabel!
You learn more about IBOutlet in Hour 5, “Exploring Interface Builder.”
Tip
The attribute weak that is provided with the variable declaration tells Xcode how to treat the object when it isn’t in use. The weak attribute informs the system that the object it is referring to can be cleaned up from memory when it isn’t being used anymore. It also avoids what is called a circular reference, where an object can’t be removed from memory, because it points to another object that, in turn, points back to it. In general, try to declare your variables with the weak attribute.
Unfortunately, sometimes the system may be a bit overzealous in its desire to keep things clean for us, and we need to leave weak out of the picture—thus creating a strong reference. (Lines 5–7, 8, and 11 all declare strong references.) A strong reference means that the object will be kept in memory unless we explicitly tell the system to remove it or the object that contains it is removed from memory. It’s pretty rare that we need to worry about these, but I’ll point it out when it’s a concern.
The final pieces of the class file are the method declarations. Lines 13, 17, 21, and 25 declare four methods that will be implemented in the class:
Tip
You will often see methods that accept or return objects of the type AnyObject. This is a special type in Swift that can reference any kind of object and proves useful if you don’t know exactly what you’ll be passing to a method or if you want to be able to return different types of objects from a single method.
13:     class func myTypeMethod(aString: String) -> String {
14:         // Implement a Type method here
15:     }
16:
17:     func myInstanceMethod(myString: String, myURL: NSURL) -> NSDate? {
18:         // Implement the Instance method here
19:     }
20:
21:     override func myOverriddenInstanceMethod() {
22:         // Override the parent's method here
23:     }
24:
25:     @IBAction func myActionMethod(sender: AnyObject) {
26:         // React to an action in the user interface
27:     }
Method declarations follow a simple structure. They begin with the word func, but can include the prefix modifiers class and override. A method that begins with class func is a Type method (often also referred to as a Class method). A method starting with override func is one that is redefining a method already provided in a parent class. This indicates that rather than inheriting functionality from a higher class, we’re going to write our own logic.
In the example file, line 13 defines a Type method named myTypeMethod that returns a String and accepts a String as a parameter. The input parameter is made available in a variable called aString.
Line 14 defines an instance method named myInstanceMethod that returns an optional NSDate object, taking a String and an NSURL as parameters. These are made available to the code in the method via the variables myString and myURL. I’ll rant about what optional values are and how to deal with them later in the hour. For the moment, just understand that by saying this method has an optional return type, it may return an NSDate object, or nothing (nil).
Line 21 declares an instance method, myOverriddenInstanceMethod, that takes no parameters and returns no results. What makes this interesting is that it uses the keyword override to indicate that it will be replacing a method provided by the parent class (myParent). When you start defining methods in your classes, Xcode knows what methods are inherited, so the moment you go to define a method provided by a parent class, it will automatically add the override keyword for you.
The fourth instance method, myActionMethod, declared in line 25 differs from the others because it defines an action, as indicated by the @IBAction keyword. Methods that begin with @IBAction are called when the user touches a button, presses a switch, or otherwise interacts with your application’s user interface (UI). These methods take a single parameter, usually denoted as sender that is set to whatever object the user interacted with. Just as with the @IBOutlet mentioned earlier, you’ll be learning much more about IBAction in Hour 5.
To end the class file, you just need a closing brace: }. You can see this on line 29 of the example file:
29: }
Although this might seem like quite a bit to digest, it covers almost everything you’ll see in a Swift class file.
Even though we’ve just spent quite a bit of time going through the structure of a Swift class file, you’re rarely (if ever) going to need to type it all out by hand. Whenever you add a new class to your Xcode project, the structure of the file will be set up for you. What’s more, much of the work of declaring variable properties and methods can be done visually. Of course, you still need to know how to write code manually, but Xcode goes a long way toward making sure that you don’t have to sweat the details.
Tip
You can add a text comment on any line within your class files by prefixing the line with two forward slash characters: //. If you want to create a comment that spans multiple lines, you can begin the comment with the characters /* and end with */.
We’ve explored the notion of classes, methods, and instance variables, but you probably still don’t have a real idea of how to go about making a program do something. So, this section reviews several key programming tasks that you’ll be using to implement your methods:
Earlier we documented what variable properties will look like in your Swift files, but we didn’t really get into the process of how you declare them (or use them). Nor did we talk about variables within methods!
Whatever the purpose, you declare your variables using this syntax:
var <Variable Name>[: Variable Type][Optional modifier][ = Initialization]
Holy cow—that looks complicated! In practice, nearly everything but the var keyword and the variable name are optional. I make a point of always trying to provide the variable type, but if you don’t, Swift will try to figure it out for you. The type is either a Swift data type or the name of a class that you want to instantiate and use.
Let’s begin by taking a look at a few Swift data types and how they are declared and used.
Swift includes a number of data types that enable you to work with common types of information. Most basic logic that we implement in this book will take advantage of one of these data types:
true or false), often used to evaluate conditions within your code.Let’s start with something easy: integers (Int) and floating-point numbers (Float or Double). To declare an integer variable that will hold a user’s age, you might enter the following:
var userAge: Int
If you wanted, you could even initialize it with a value, all in the same line:
var userAge: Int = 30
After a variable is declared, it can be used for assignments and mathematical operations. The following code, for example, declares two variables, userAge and userAgeInDays, and uses the first (an age in years) to calculate the second (the age in days):
var userAge: Int = 30
var userAgeInDays: Int
userAgeInDays = userAge * 365
Notice that for the userAgeInDays, I declare it, then use it later. You’re welcome to do this, or declare and initialize the variables on the exact same line.
Floating-point numbers work the same way—you declare them, then use them. A simple example to calculate the circumference of a circle (circumference = diameter * 3.141), for example, could be written like this:
var diameter: Float = 2.5
var circumference: Float = diameter * 3.141
Pretty easy, don’t you think? Swift data types have much more to offer as well. Let’s see what else they can do!
Note
As I said earlier, everything but the var keyword and the variable name is optional in a variable declaration. For example, the age calculation code could be written to leave out the variable type entirely:
var userAge = 30
var userAgeInDays = userAge * 365
Swift will automatically figure out what the variable is based on the initialization. Personally, I prefer including the variable type so that I can quickly see what each variable represents in my code.
Strings are one of the most frequently used Swift types in this book. You’ll be using strings for user input and output, data manipulation, and so on. As with every other variable, the life of a string begins with a declaration and an initialization:
var myName: String = "John"
Here, a string (myName) is initialized to the value "John". Once initialized, the string can be manipulated using a number of techniques. String concatenation (adding two or more strings together) is performed with the addition (+) operator. To change myName to include my last name, I’d write the following:
myName = myName + " Ray"
You can even use a process called string interpolation to combine existing Strings, values returned by methods, and other Swift data types into a new String. Consider this line:
var sentence: String = "Your name is \(myName) and you are \(userAge) years old"
Here I’ve combined the myName string and userAge integer into a single string, assigned to a new variable named sentence. Any time Swift encounters the pattern \(<variable or method name>) in your code, it takes the result, turns it into a string, and substitutes it in place of the pattern. You can use this to quickly format strings based on other variables and methods.
In many languages, strings require special functions to check for equality. In Swift, the same comparison operators you’d use to compare two numbers also work for strings. We’ll look at comparisons a bit later.
A Boolean value has only two states—represented by true or false in Swift. Booleans are most often used in comparisons, although some methods have Boolean parameters that you’ll need to supply. As expected, Booleans are initialized using the same pattern you’ve seen for numbers and strings:
var myFlag: Bool = false
A useful category of data type is a collection. Collections enable your applications to store multiple pieces of information in a single object. An Array is an example of a collection data type that can hold multiple objects, accessed by a numeric index.
You might, for instance, want to create an array that contains all the user feedback strings you want to display in an application:
var userMessages: [String] = ["Good job!", "Bad Job", "Mediocre Job"]
Notice that the word Array doesn’t even appear in the declaration and initialization? That’s because all we need to do to declare an array is wrap the type we want to store (in this case, String values) in square brackets. If I wanted an array of integers, I’d use a type of [Int] and so on. The initialization values are provided as a comma-separated list enclosed in square brackets; if you use [] alone, the array is initialized as empty.
To access the strings in the userMessages array, you use an index value. This is the number that represents a position in the list, starting with 0. To return the "Bad job" message, we use the number 1 (the second item in the list):
userMessages[1]
You can also use the index to assign values to an array, replacing what is currently stored:
userMessages[1]="Try again"
Swift lets you add new items to the end of the list using the array’s append method. For example, to add a new message (“Meh”) to the end of userMessages, I might write the following:
userMessages.append("Meh")
There are several other means of accessing and modifying arrays that we’ll use over the course of the next 21 hours.
Like arrays, dictionaries are another collection data type, but with an important difference. Whereas the objects in an array are accessed by a numeric index, dictionaries store information as key/value pairs. The key is usually an arbitrary string, whereas the value can be anything you want, even objects. If the previous userMessages array were to be created as a Dictionary instead, it might look like this:
var userMessages: [String:String] =
       ["positive":"Good job!", "negative":"Bad Job", "indifferent":"Mediocre Job"]
Similar to declaring the strings, I declare the dictionary without ever using the word dictionary. Instead, I provide the type data types that will form the keys and values within square brackets—for example, [<key data type>:<value data type>]. For the userMessage dictionary, I’m using keys that are strings, and values that are strings. The initialization is similar to an array, but consists of the key, a colon (:), and then the value. Each key/value pair is separated by a comma. Empty dictionaries can be created with the initializer [:].
To access a value in the dictionary, I index into userMessages just like an array, but using the key rather than an integer. To access the “Bad Job” message (tied to the “negative” key), I could type the following:
userMessages["negative"]
Keys can also be used to modify or assign new values. Here the key “apathy” is assigned the value “Meh”:
userMessages["apathy"] = "Meh"
Dictionaries are useful because they let you store and access data in abstract ways rather than in a strict numeric order.
Tip: Counting the Contents
Both dictionaries and arrays include a read-only variable property called count that returns the number of elements they’ve stored. The number of elements in the userMessages array (or dictionary), for example, can be accessed with the expression: userMessages.count.
Just about everything that you’ll be working with in your iOS applications will be an object. Onscreen text, for example, will be instances of the class UILabel. Buttons that you display are objects of the class UIButton. You’ll learn about several of the common object classes in the next hour’s lesson. Apple has literally provided thousands of different classes that you can use to store and manipulate data.
Objects are declared and initialized just like Swift data types. For example, to declare and create a new instance of the UILabel class, you could use the following code:
var myLabel: UILabel = UILabel()
Here, the initializer is UILabel(). This returns a new, ready-to-use instance of the UILabel class. You can initialize all classes using this same syntax <class name>(), but most will require additional setup after initialization. To speed things along, many will provide convenience methods. Convenience methods speed the process of creating a new object by taking the basic parameters needed to create and configure the object, all at once.
Note
When you read through the Xcode documentation (discussed in the next hour), you’ll see initialization methods denoted with the function name init for Swift. This is the internal method name in the class. It is automatically invoked by using the <class name>() syntax.
When we initialized the UILabel instance, we did create an object, but it doesn’t yet have any of the additional information that makes it useful. Attributes such as what the label should say, or where it should be shown on the screen, have yet to be set. We would need to use several of the object’s other methods to really turn it into something ready to be displayed.
These configuration steps are sometimes a necessary evil, but Apple’s classes often provide a special initialization method called a convenience method. These methods can be invoked to set up an object with a basic configuration so that it can be used almost immediately.
For example, the NSURL class, which you use later to work with web addresses, defines a convenience method called initWithString. We can use it to create a brand-new NSURL object, complete with the URL, just by typing the following:
var iOSURL: NSURL = NSURL(string: "http://www.teachyourselfios.com/")!
This is where we (briefly) go off the tracks. Notice that nowhere in that line does initWithString appear. The initWithString method is the name of a convenience method in Objective-C. The method still goes by the same name when used in Swift, but it takes on a simplified form.
The general rule of thumb is that, in Swift, the initWith is removed from the name of convenience method. Whatever remains of the name becomes the first named parameter of the method. A named parameter, as you’ll learn a bit later, is a parameter that requires you to spell out its name in the method call (in this case, string).
Because Xcode supports autocompletion, it is usually pretty easy to start typing in a method named and find it in the list that appears. Just keep in mind that what you see in the Xcode documentation doesn’t necessarily apply to both Objective-C and Swift.
In your adventures in Swift, you will encounter code that doesn’t quite work the way you want. You’ll find legacy CGFloat floating-point numbers that must be used in place of Swift Float. You’ll find places where you need to turn Floats into Ints, and vice versa. You’ll even encounter objects that have no idea what they are. To get around these little snags, you’ll likely employ type conversion, or type casting.
For most of the simple data types, you can convert between types by using the syntax: <Type Name>(<Value to Convert>). For example, if a method calls for a CGFloat and you have a Float value (in the variable myFloat), you can convert it to the proper type with the following:
CGFloat(myFloat)
Swift does everything it can to silently bridge these older data types with the new built-in Swift types—and it is usually very successful. Unfortunately, sometimes this manual conversion will have to happen.
Another common circumstance is when a method returns an object of one type when it needs to be another. When this happens, you must type cast the result.
Type casting takes an object of a higher-level class and tells Xcode which specific subclass it should be. Some methods will return an object of the type AnyObject rather than a specific type. Does this make any sense? Not really, but it happens often.
For example, the NSDate class includes several methods that return a date, but instead of being of the type NSDate, they are of the type AnyObject. The NSDate type method distantPast is one of these methods:
var myPastDate: NSDate = NSDate.distantPast() as NSDate
Because distantPast() results in an object of the type AnyObject, we must “tell” Xcode that it is really an NSDate by adding as NSDate to the end of the assigment. Using the syntax as <class name> after any object will attempt to type cast that object as being of whatever class you name.
After a variable is cast to an object of the correct type, we can interact with it directly as that type. This looks a bit unusual, I know, but it will come in handy later in the book. It’s easier to understand when you see it in an actual application; so for the moment, just be aware that it is an available development tool.
Constants are declared and initialized just like variables, except they begin with the keyword let. For example, to create a constant named lastName that holds a String with my last name, I would write the following:
let lastName: String = "Ray"
The key difference between a constant and a variable is that constants, once assigned, cannot be changed or reassigned. This, however, isn’t as limiting as you might think. When you assign an object to a constant, you can access and modify all the variable properties in that object, execute all its methods, and so on. It can still be used just like any other variable—you just can’t reassign it later.
Constants are more efficient than variables and should be used in their place wherever possible. I think you’ll be surprised to find that we use more constants in our applications than actual variables.
Possibly the most confusing, infuriating thing about Swift is the notion of optional values. In theory, it’s really quite simple. If you’ve developed in other languages, you’ve almost certainly written code that thought it was working with a value, only to find that the value had never been set or that a method that was supposed to return a value didn’t. Making the assumption that we know what is in a variable is dangerous, but it’s something that developers do every day.
In Swift, Apple decided that developers should acknowledge when they’re using a value that might not contain what they expect. The result requires interesting additions to the development process:
1. Method, variable, and constant declarations should state when they may not have, or may not return, a value. These are known as optional values.
2. Why would a method programmed to return a result ever make that result optional? If the method has bad input, or otherwise can’t complete the operation it is tasked with performing, it makes perfect sense to return “nothing”—represented in Swift using the keyword nil.
3. When attempting to access methods or variables that are optional, developers must unwrap the values. This means that the developer acknowledges that he or she knows what is in a variable (or returned by a method), and wants to access and use the results.
Now, you might think to yourself, “Hey, I know what I’m doing, I’m not going to write any code where I name a variable or method return type as optional! That would just be extra work!” You’re right, it is extra work—but it’s utterly unavoidable.
All the code that makes up the Cocoa Touch classes is being updated by Apple to denote which variable properties and methods return optional values—and there are many (and the list is growing). I could tell you stories about the number of times I’ve opened a project while writing this book, only to find that Apple has changed a class somewhere that breaks the code I’ve written. That’s one of the difficulties of being an early technology adopter.
Okay, enough ranting. What does all of this actually mean in terms of coding?
First, when declaring a variable, you can define it as optional by adding a ? after the type name:
var myOptionalString: NSString? = "John"
This also means that if the string isn’t immediately initialized, it automatically contains the value nil.
Note: What the... It’s an Optional Value, But It Has a Value (nil)?!
Yes, this is as weird as it sounds. In Swift, nil represents literally nothing. When we need some value to represent no value at all, nil is used. We can’t use something like an empty string ("") or 0 because those are values. Get used to the idea of nil, because even though it is something, it is also nothing. (Cue Seinfeld music.)
For method definitions, you denote an optional return value by adding ? after the return type. In the sample class in Listing 3.1, I defined the method as having an optional return value of NSDate using this syntax in the declaration:
func myInstanceMethod(myString: String, myURL: NSURL) -> NSDate? {
Tip: Optional Downcasting
You’ve seen the syntax for downcasting, but consider what happens if the class you’re downcasting cannot be cast to what you want. In this case, your app is likely going to crash. To deal with this scenario, you can create an optional downcast. With an optional downcast, if the downcast fails, the resulting variable will contain nil.
To define a downcast operation as optional, simply add a ? to the end of the as keyword, as follows:
var myPastDate NSDate? = NSDate.distantPast() as? NSDate
Note
Constants can also be assigned as optional using the same syntax as variables. Although this might seem counterintuitive (don’t you assign a value when you create a constant?), it makes sense when you consider that you might be assigning a constant to the return value of a method with an optional return type.
After you’ve either created (or encountered Swift variables and methods) that are optional, you need to know how to access them. Accessing optional values is called unwrapping in Swift. The easiest, most brute-force way is to use optional values is to unwrap them by adding an exclamation mark (!) to the end of their name.
In other words, each time I wanted to use the value in myOptionalString, I would reference it as follows:
myOptionalString!
The same goes for the myInstanceMethod method. To use it, I might write a line like this:
var myReturnedDate: NSDate = myInstanceMethod("A cool string", myURL: iOSURL)!
The addition of the ! tells Xcode that we want to access the return value and that we don’t care if it is nil. We can take this a step further by defining what is called an implicitly unwrapped optional. This is just an optional value that will always be unwrapped automatically when we use it.
To create an implicitly unwrapped variable, you add a ! after the type name. For example, I could write the preceding line of code using an implicitly unwrapped variable, like this:
var myReturnedDate: NSDate! = myInstanceMethod("A cool string", myURL: iOSURL)
This declares myReturnedDate as an optional NSDate variable, but one that will be implicitly unwrapped. I can assign it the result of an optional method without unwrapping the return value of the method (because both are optional). However, when I go to use myReturnedDate elsewhere in my code, it will automatically be unwrapped for me—just as if I had put the ! after it each time.
You really won’t be doing this very often, but Xcode is going to do it a lot when it writes code for you. Why? Because every interface object that connects to your code will be referenced through an implicitly unwrapped variable. An interface object may be nil before it is loaded, so it has to be optional; but once your code is active, it should always have a value, and there’s no point in hindering its use—thus, it is implicitly unwrapped for you.
Another (gentler) way to deal with optional values is called optional binding. This is the assignment of an optional value to a constant. If the assignment succeeds, the optional value is accessible through the constant. If it fails, the optional value is nil.
Applying optional binding to the myOptionalString variable, I might write this simple logic to test to see whether an optional value should be used:
if let stringValue:String = myOptionalString {
    // myOptionalString has a non-nil value.
}
This is a good approach for working with optionals in production-ready code. It gives you an opportunity to react to situations where optionals are set to nil and errors may have arisen. If you unwrap an optional and try to work with it even if it is nil, you may crash your code.
For most of the examples in the book, I manually unwrap values with ! because the code is simple and we know how the different components are going to interact. In apps bound for the App Store, I recommend using optional binding to trap for error conditions that you may not have anticipated.
Tip: Optionals: Don’t Be Scared
Optionals exist to help protect you from making bad assumptions in your code. At times, you’ll feel like every single method or variable property you use has been declared as optional—and you’ll likely start to think that your hair is optional as well. The good news is that Xcode recognizes optional values throughout Cocoa Touch and will prompt you if you’re missing the required ? or ! characters. In most cases, it will even correct simple optional unwrapping errors for you.
Don’t feel like you need to start memorizing the tens of thousands of optional values in Cocoa Touch. Xcode knows, and it will let you know.
You’ve already seen how to declare and initialize objects, but this is only a tiny picture of the methods you’ll be using in your apps. Let’s start by reviewing the syntax of calling methods in Swift.
To use a method, provide the name of the variable that is referencing your object followed by the name of the method, followed by a period, the name of the method, and empty parentheses () (empty if there are no parameters). If you’re using a type (class) method, just provide the name of the class rather than a variable name:
<object variable or class name>.<method name>()
Things start to look a little more complicated when the method has parameters. A single parameter method call looks like this:
<object variable or class name>.<method name>([parameter:]<parameter value>)
Earlier I noted that convenience initialization methods will usually include at least one named parameter, such as string when initializing an NSURL object:
var iOSURL: NSURL = NSURL(string: "http://www.teachyourselfios.com/")!
This is important to note because the style of using an initial named parameter is only really used in convenience initialization methods. In other (general use) methods, the first parameter is just provided as a value.
Tip
If you aren’t sure whether the first parameter to a method is named or not, the Xcode documentation can help. If the first character after the parenthesis in a Swift method definition is an underscore (_), that parameter is not named. You’ll learn all about the documentation system in the next hour.
For example, let’s look at a method that takes multiple parameters:
var myFullName: String = "John Ray"
var myDescription: String =
myFullName.stringByReplacingOccurrencesOfString(myFullName, withString: "is awesome!")
This code fragment stores my name in the myFullName variable, then uses the stringByReplacingOccurrencesOfString:withString method to change my last name from “Ray” to “is awesome!”
In this example, the first parameter to the stringByReplacingOccurrencesOfString:with-String method has no name; I just put in the value (myFullName). The second parameter does have a name (withString:), which must be provided along with the value.
The syntax for multiple parameter method calls looks like this:
<object variable or class name>.<method name>([parameter:]<parameter value>,
     <parameter>:<parameter value>, <parameter>:<parameter value> ...)
Note
At the time of this writing, it was very difficult to break lines in Swift without literally breaking the code. I’ve found that you can break lines around assignment statements (<blah> = <blah>) as long as there are spaces around the =, as well as after a comma (,) in lists of parameters.
Note
Throughout the lessons, methods are referred to by name. If the name includes a colon (:), this indicates a required named parameter. This is a convention that Apple has used in its documentation and that has been adopted for this book.
Something that you’ll see when looking at Swift code is that often the result of a method is used directly as a parameter within another method. In some cases, if the result of a method is an object, a developer may immediately use a method or variable property of that object without first assigning it to a variable. This is known as chaining.
Chaining results directly eliminates the need for temporary variables and can make code shorter and easier to maintain.
For example, consider this completely contrived code:
var myString: String = "JoHN ray"
myString = myString.lowercaseString
myString = myString.stringByReplacingOccurrencesOfString("john", withString: "will")
myString = myString.capitalizedString
Here I’ve created a string (myString) that holds my name with very very poor capitalization. I decide that I want to replace my first name (John) with my brother’s name (Will). Because I cannot just search and replace on John because my capitalization is all messy and I don’t want to try to remember how I wrote my name (this is contrived folks), I decide to first convert myString to lowercase by accessing the lowercaseString variable property. Once complete, I can just search for john and replace it with will without worrying about capitalization. Unfortunately, that means I still need a properly capitalized version of the string when I’m done. So, I access the capitalizedString variable property of my string when finished, and use its value for myString. (In case you’re wondering, capitalizedString provides a copy of the string with all of the first letters capitalized.)
The code should make sense, even if my logic is a bit shaky. That said, each of the methods and variable properties I’ve used return a string. Instead of assigning things over and over, I can chain each of these actions together into a single line:
var myString: String = "JoHN ray".lowercaseString.stringByReplacingOccurrencesOfString("john", withString: "will").capitalizedString
Chaining can be a powerful way to structure your code, but when overused it may lead to lines that can be difficult to parse. Do what makes you comfortable; both approaches are equally valid and have the same outcome.
Tip
Although I tend to leaved chained lines unbroken in my projects, you can break a chained line without causing an error if you break it immediately before one of the periods.
Although most of your coding will be within methods, you will also encounter closures when using the iOS frameworks. Sometimes referred to as handler blocks in the Xcode documentation, these are chunks of code that can be passed as values when calling a method. They provide instructions that the method should run when reacting to a certain event.
For example, imagine a personInformation object with a method called setDisplayName that would define a format for showing a person’s name. Instead of just showing the name, however, setDisplayName might use a closure to let you define, programmatically, how the name should be shown:
personInformation.setDisplayName({(firstName: String, lastName: String) in
                   // Implement code here to modify the first name and last name
                   // and display it however you want.
                })
Interesting, isn’t it? Closures are relatively new to iOS development and are used throughout this book. You’ll first encounter closures when writing alerts. The closure will provide the instructions that are executed when a person acts on an alert.
For an application to react to user input and process information, it must be capable of making decisions. Every decision in an app boils down to a true or false result based on evaluating a set of tests. These can be as simple as comparing two values, to something as complex as checking the results of a complicated mathematical calculation. The combination of tests used to make a decision is called an expression.
If you recall your high school algebra, you’ll be right at home with expressions. An expression can combine arithmetic, comparison, and logical operations.
A simple numeric comparison checking to see whether a variable userAge is greater than 30 could be written as follows:
userAge>30
When working with objects, we need to use variable properties within the object and values returned from methods to create expressions. If I have stored an NSDate object with my birthday in it (myBirthday), I could check to see whether the current day is my birthday with the expression:
myBirthday.isEqualToDate(NSDate())
Expressions are not limited to the evaluation of a single condition. We could easily combine the previous two expressions to find a person who is over 30 and is celebrating their birthday today:
userAge > 30 && myBirthday.isEqualToDate(NSDate())
As mentioned repeatedly, you’re going to be spending lots of time working with complex objects and using the methods within the objects. You cannot make direct comparisons between objects as you can with simple data types. To successfully create expressions for the myriad objects you’ll be using, you must review each object’s methods and variable properties.
Typically, depending on the outcome of the evaluated expression, different code statements are executed. The most common way of defining these different execution paths is with an if-then-else statement:
if <expression> {
  // do this, the expression is true.
} else {
  // the expression isn't true, do this instead!
}
For example, consider the comparison we used earlier to check a myBirthday NSDate variable to see whether it was equal to the current date. If we want to react to that comparison, we might write the following:
if myBirthday.isEqualToDate(NSDate()) {
    let myMessage: String = "Happy Birthday!"
} else {
    let myMessage: String = "Sorry, it's not your birthday."
}
Another approach to implementing different code paths when there are potentially many different outcomes to an expression is to use a switch statement. A switch statement checks a variable for a value and then executes different blocks of code depending on the value that is found:
switch (<some value>) {
  case <value option 1>:
    // The value matches this option
  case <value option 2>:
    // The value matches this option
  default:
    // None of the options match the number.
}
Applying this to a situation where we might want to check a user’s age (stored in userAge) for some key milestones and then set an appropriate userMessage string if they are found, the result might look like this:
switch userAge {
    case 18:
        let userMessage: String = "Congratulations, you're an adult!"
    case 21:
        let userMessage: String = "Congratulations, you can drink champagne!"
    case 50:
        let userMessage: String = "You're half a century old!"
    default:
        let userMessage: String = "Sorry, there's nothing special about your age."
}
In some situations, you will need to repeat several instructions over and over in your code. Instead of typing the lines repeatedly, you can loop over them. A loop defines the start and end of several lines of code. As long as the loop is running, the program executes the lines from top to bottom and then restarts again from the top. The loops you’ll use are of two types: for loops and condition-based while/do-while loops.
In a for loop, the statements are repeated a (mostly) predetermined number of times. You might want to count to 1000 and output each number, or create a dozen copies of an object. These are perfect uses for a for loop.
The for loop you’ll encounter most often consists of this syntax:
for  <initialization>;<test condition>;<count update> {
  // Do this, over and over!
}
The three “unknowns” in the for statement syntax are a statement to initialize a counter variable to track the number of times the loop has executed, a condition to check to see whether the loop should continue, and finally, an increment for the counter. A loop that uses the integer variable count to loop 50 times could be written as follows:
for var count=0;count<50;count=count+1 {
    // Do this, 50 times!
}
The for loop starts by setting the count variable to 0. The loop then starts and continues as long as the condition of count<50 remains true. When the loop hits the bottom curly brace (}) and starts over, the increment operation is carried out and count is increased by 1.
Note
Integers are usually incremented by using ++ at the end of the variable name. In other words, rather than using count=count+1, most often you’ll encounter count++, which does the same thing. Decrementing works the same way, but with --.
for loops can also iterate over collections using the following syntax:
for  <variable> in <collection> {
  // Do this for each value in the collection, where <variable> contains the value
}
Consider the array of messages we created earlier in the hour:
var userMessages: [String] = ["Good job!", "Bad Job", "Mediocre Job"]
To loop over this array of messages, we can write a “for in” loop as follows:
for message in userMessages {
    // The message variable now holds an individual message
}
The same applies to dictionaries as well, but the syntax changes just a little bit. If userMessages is defined as a dictionary:
var userMessages: [String:String] =
       ["positive":"Good job!", "negative":"Bad Job", "indifferent":"Mediocre Job"]
We can loop over each key/value pair like this:
for (key, value) in userMessages {
    // The key and value variables hold an individual dictionary entry
}
In a condition-based loop, the loop continues while an expression remains true. You’ll encounter two variables of this loop type, while and do-while:
while <expression> {
  // Do this, over and over, while the expression is true!
}
and
do {
  // Do this, over and over, while the expression is true!
} while <expression>
The only difference between these two loops is when the expression is evaluated. In a standard while loop, the check is done at the beginning of the loop. In the do-while loop, however, the expression is evaluated at the end of every loop. In practice, this difference ensures that in a do-while loop, the code block is executed at least once; a while loop may not execute the block at all.
For example, suppose that you are asking users to input their names and you want to keep prompting them until they type John. You might format a do-while loop like this:
do {
    // Get the user's input in this part of the loop
} while userName != "John"
The assumption is that the name is stored in a string called userName. Because you wouldn’t have requested the user’s input when the loop first starts, you would use a do-while loop to put the test condition at the end.
Loops are a very useful part of programming and, along with the decision statements, will form the basis for structuring the code within your object methods. They allow code to branch and extend beyond a linear flow.
Although an all-encompassing picture of programming is beyond the scope of this book, this should give you some sense of what to expect in the rest of the book. Let’s now close out the hour with a topic that causes quite a bit of confusion for beginning developers: memory management.
In the first hour of this book, you learned a bit about the limitations of iOS devices as a platform. One of the biggies, unfortunately, is the amount of memory that your programs have available to them. Because of this, you must be extremely judicious in how you manage memory. If you’re writing an app that browses an online recipe database, for example, you shouldn’t allocate memory for every single recipe as soon as your application starts.
In the latest Xcode releases, Apple has implemented a new compiler called LLVM, along with a feature known as Automatic Reference Counting (ARC). ARC uses a powerful code analyzer to look at how your objects are allocated and used, and then it automatically retains and releases them as needed. When nothing is referencing an object, ARC ensures it is automatically removed from memory. No more retain or release messages to be sent, no more phantom crashes and memory leaks; you just code and it works.
For most objects you declare and use in a method, you do not need to do anything; when the method is finished, there are no more references to the object, and it is automatically freed. The same goes for variable properties you’ve declared with the weak attribute. Of course, it’s hyperbole to say that errors won’t happen with ARC; we have to use strong references in a few places in this book to keep iOS from deciding that we have finished with an object before we actually do.
When using a variable property that has a strong reference, you should tell Xcode that you’re finished using an object if you want it removed from memory. How do you do that? Easy: by setting its reference to nil.
For example, assume we’ve created a giant object called myMemoryHog:
var myMemoryHog: SomeHugeObject? = SomeHugeObject()
To tell Xcode when we’re done using the object and let it free up the memory, we would type the following:
myMemoryHog = nil
Once the huge object isn’t directly reference by any variables, it can be removed from memory, and all will be well with the world.
You’ve learned quite a bit in this hour’s lesson, and there are plenty of places for even the most experienced developer to make mistakes. As with everything, practice makes perfect, which is why our final topic focuses on a tool that makes practicing Swift fun.
For a new developer, getting started with a language can be a pain. You’ve got to figure out how to create new projects, understand how a bunch of development tools work, and if you’re lucky, after a few hours you might get “Hello World” to display on your screen.
When Apple introduced Swift in Xcode 6, they realized that developers would need a way to get their feet wet (or hands dirty, if you prefer) without all the steps of creating new iOS applications. Heck, why would you want to try building an application if you aren’t sure you’re even going to be writing code that works? Therefore, the iOS Playground was born. The Playground gives you an area to type in experimental code and see the result—immediately—without even pressing a Run button.
As a first step, you’ll need to create a new Playground. We’ll be using the Playground throughout the book, so understanding this process is a must.
To create a new Playground, choose File, New, Playground from the Xcode menu, as shown in Figure 3.2.
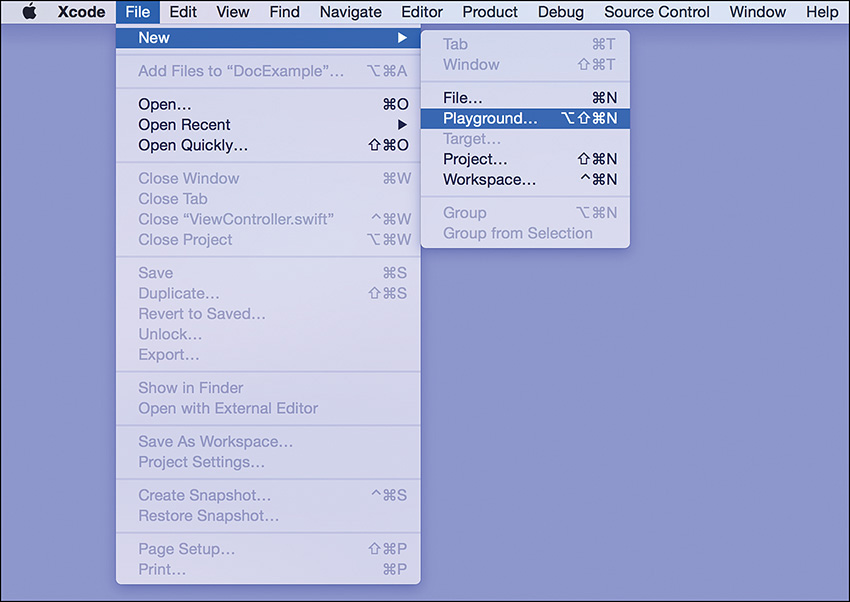
FIGURE 3.2 Create a new Playground from the Xcode File, New menu.
When prompted, provide a name for the playground and make sure that the platform is set to iOS, as demonstrated in Figure 3.3. The name can be anything you’d like. Unlike a project, a Playground creates a single file, so it’s easy to rename later. Click Next to continue.

FIGURE 3.3 Name the playground and set the Platform to iOS.
Finally, choose where the Playground will be saved, and then click Create. After a few seconds, the Playground window opens, as shown in Figure 3.4.
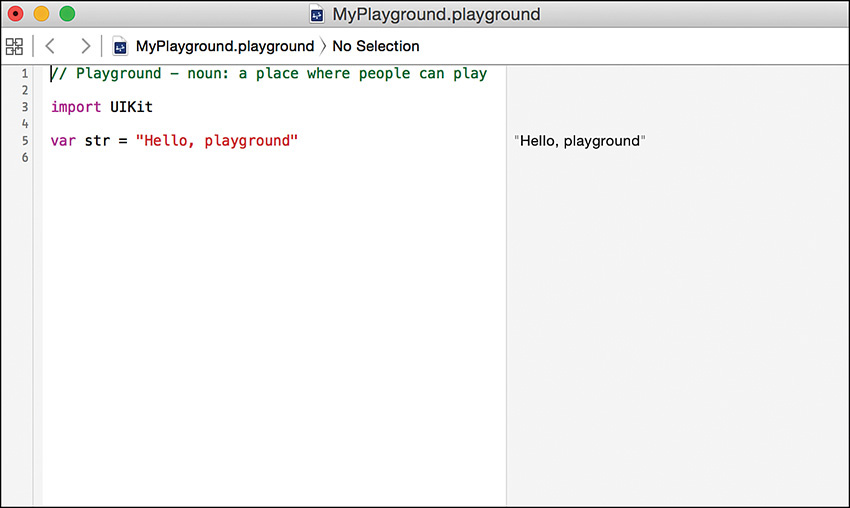
FIGURE 3.4 The new playground opens, already populated with some sample code.
When the Playground first opens, it already contains some sample code that imports the UIKit framework and defines a variable named str. You can safely delete the str line if you’d like, but I recommend that you leave the import statement at the top. This adds access to most of the objects and methods you’ll need to actually do anything useful in the playground.
So, what do you do now? You play. Any code that you enter is immediately evaluated and the results appear in the margin on the right.
For example, remember the calculation of a person’s age in days? Try typing this code into the playground:
var userAge: Int = 30
var userAgeInDays: Int
userAgeInDays = userAge * 365
As you type the lines, watch what happens in the margin on the right. For the first statement, declaring userAge, you’ll see 30 appear in the margin because the variable contains the value 30. The second line won’t generate any output because it doesn’t contain anything yet. The third line, however, calculates and stores the age in days, which is displayed in the margin (10,950, if you’re interested). You can see this in Figure 3.5.

FIGURE 3.5 The contents of your variables are shown on the right.
The iOS Playground can be used to generate and display output as well as inspect variables. Later in the book, we’ll use it to examine the contents of web pages retrieved by our code (and in a variety of other exercises). A simple way to generate output in Swift, however, is to use the print(<String>) or println(<String>) functions. These take a string as an argument and print it—with println adding return at the end.
Add these lines to the end of the code in the Playground:
for var count = 0; count < 50; count++ {
    println("Count is \(count)")
}
Shortly after typing the lines, you’ll see a value in the margin quickly count to 50. This is a count of the number of times the println statement was executed. What you don’t see, however, is the output that is generated.
To view the output, position your cursor over the line that reads “(50 times).” You’ll notice two icons appear; the first (an outline of an eye) is the Quick Look icon and lets you inspect some variable contents more closely. (We’ll do this in the next hour.) The second icon, a circle, opens the assistant editor and displays a value history for that item, as well as any output that was generated.
Go ahead and click the circle by the println statement. The assistant editor displays the output from the println statement, as well as a draggable timeline at the bottom. If your code has values that change over time, you can drag the timeline to inspect their value at an arbitrary point in time. These controls are visible in Figure 3.6.
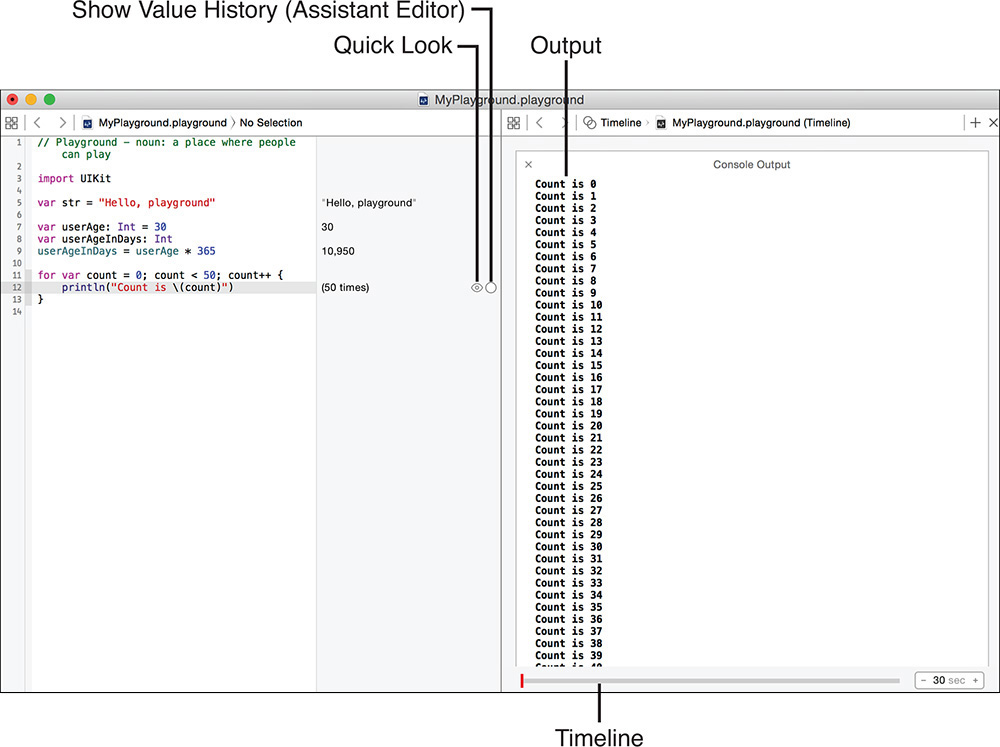
FIGURE 3.6 Additional output and controls are available in the assistant editor.
The beauty of the Playground is that you can do anything you want. Go back and try some of the Swift syntax discussed in this hour. Try comparing dates, test a few loops and switch statements... whatever you want.
We’ll be using the Playground often to explore new code concepts, even making it do a few things that might surprise you. I recommend using it now to gain experience writing Swift.
Although you can be successful in learning iOS programming without spending hours and hours learning more Swift, you will find it easier to create complex applications if you become more comfortable with the language. Swift, as mentioned before, is not something that can be described in a single hour. It is a new language that is evolving to meet the specific needs of Apple’s computing platform.
To learn more about Swift, check out Programming in Objective-C 2.0, Third Edition (Addison-Wesley Professional, 2011), Objective-C Phrasebook (Addison-Wesley Professional, 2011), Sams Teach Yourself Swift in 24 Hours (Sams, 2014), and Xcode 4 Unleashed (Sams, 2012).
Apple has also published a book (The Swift Programming Language) that covers the entirety of the Swift language, including Playground exercises. It is available directly with the iBook store on your Mac or iOS device. This isn’t just recommended reading; it’s a required download for any serious developer-to-be.
In this hour, you learned about object-oriented programming and the Swift language. Swift will form the structure of your applications and give you tools to collect and react to user input and other changes. After reading this hour, you should understand how to make classes, declare objects, call methods, and use decision and looping statements to create code that implements more complex logic than a simple top-to-bottom workflow. You should also have an understanding of the iOS Playground and how it can be used to test code without needing to create a full iOS project.
Keep in mind that a typical book would spend multiple chapters on these topics, so our goal has been to give you a starting point that future hours will build on, not to define everything you’ll ever need to know about Swift and OOP.
Q. Is Swift on iOS the same as on OS X?
A. For the most part, yes. OS X includes thousands of additional application programming interfaces (APIs), however, and provides access to the underlying UNIX subsystem.
Q. Can an if-then-else statement be extended beyond evaluating and acting on a single expression?
A. Yes. The if-then-else statement can be extended by adding another if statement after the else:
if <expression> {
  // do this, the expression is true.
} else if <expression> {
  // the expression isn't true, do this instead.
} else {
  // Neither of the expressions are true, do this anyway!
}
You can continue expanding the statement with as many else-if statements as you need.
Q. Why is the Playground better than coding up a new project? Seems the same to me.
A. The biggest advantage of the iOS Playground is that it lets you see instant feedback from the code you enter. In addition, you don’t even have to add output statements to inspect the contents of variables you declare; they appear automatically in the Playground margin.
1. Start Xcode and create a new project using the iPhone or iPad Single View Application template. Review the contents of the classes in the project folder. With the information you’ve read in this hour, you should now be able to read and navigate the structure of these files.
2. Use iBooks on your iOS Device or Mac to download Apple’s free book The Swift Programming Language. This is an entirely free guide to the complete Swift language, straight from the source: Apple!
3. Use the iOS Playground to test your knowledge of Swift syntax and build simple procedural programs.