|
Once you've
configured the Web Companion, you need to designate which files will be
shared over the Web. This must be done separately for every file you want
to share. FileMaker also requires that you specify how you want each shared
file to be viewed. Before you start using the Web Companion to configure
each file's Web views, however, be sure to create a Web--only layout for
those same files. That will speed up the display of your files over the
Web-and ensure that visitors don't have to wade through irrelevant fields.
To
share a file over the Web:
- Open the
FileMaker file you want to share: Ctrl+O in Windows, Command+O on the
Mac.
- Choose
File > Sharing (Figure 18.12).
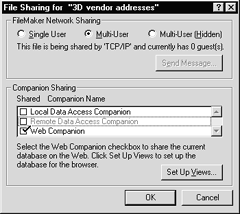
- When the
File Sharing dialog box appears, ignore the FileMaker Networking
Sharing panel. Instead, look within the lower Companion Sharing
panel and check Web Companion (Figure 18.13).
- If you
want to go ahead and set how the file will look over the Web, see step
2 in To set up the browser views on the next page. Otherwise,
click OK. Once you also configure Web Companion, the file will
be shared over the Web. Repeat the steps for every file you want to
share.
Tips
- If you
ever want to stop sharing a file, open the File Sharing dialog box,
uncheck Web Companion, and click OK.
- You won't
be able to activate file sharing unless your password allows you to
export records, which is effectively what you're doing by sharing files
over the Web. If your password doesn't include that privilege, see the
person who assigns FileMaker passwords to get export rights.
|
|
|
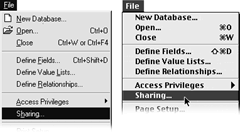
Figure
18.12 To share a file over the Web, open it and choose File > Sharing.
|