Setting Up
the Browser Views
The Web Companion's View Setup dialog box lets you control what visitors see when they call up your Web database. Depending on your needs, you may not need to set all the views.
To set up the browser views:
- Open the
FileMaker file whose views you want to set, then choose File > Sharing
(Figure 18.12).
- Make sure
that Web Companion is not only checked but selected (highlighted),
then click Set Up Views (Figure 18.14).
- When the
Web Companion View Setup dialog box appears, the Web Style tab
will be selected (Figure 18.15). Use the Styles pop-up
menu to select a look for your Web pages (Figure 18.16). Not
every style will work with every Web browser, so see Table 18.1
for help in making your choice. If you don't need to set any of the
other tabs, skip to step 8.
- After
you make your style choice, click the Table View tab (Figure
18.17) to set how the Web Companion will display multiple
records. Use the Layout pop-up menu to choose which layout you
want Web visitors to see. The Field Name(s) window will list
all the fields in the chosen layout. (This is where the advantage
of creating a special Web layout for the file with a limited number
of fields becomes obvious.) If you don't need to set any of the other
tabs, skip to step 8.
- Click
the Form View tab (Figure 18.18) to set how the Web Companion
will display single records. Again, use the Layout pop-up
menu to choose which layout you want Web visitors to see. If you don't
need to set any of the other tabs, skip to step 8.
- Click
the Search tab (Figure 18.19) to see which fields will
be visible to your Web visitors based on the Layout chosen. If
you need to narrow which fields can be searched, you'll need to exit
the Web Companion Set Up dialog box and create a new layout for the
file. If you don't need to set any of the other tabs, skip to step 8.
- Click
the Sort tab (Figure 18.20) to set how the Web Companion
will handle sorting. By default, the Do not sort records radio
button will be selected. If you don't want users to be able to sort
the records, skip to step 8.
To let users sort the file, select the second radio button (User
defines sorting…) and click Specify (Figure 18.21).
When the Specify Sort dialog box appears (Figure 18.22), all
the file's fields--even those not visible in the chosen layout-will
be listed on the left. Select any field in the left--hand list that
you want to sort by, click Move, and it will be added to the
Sort Order list. Continue adding fields, reordering them if needed
by dragging the double arrows, and click OK when you're done.
If you want to control the sort, choose the third radio button (Predefine
sorting…) and click Specify. When the Specify Sort dialog
box appears (Figure 18.23), select fields on the left and click
Move to add them to the Sort Order list. To set how each
field is sorted, select it in the Sort Order list, then choose
Ascending order…, Descending order…, or Custom
order…. Click OK when you're done and your sort orders
will appear in the Sort tab (Figure 18.24).
- When you are finished with the Web Companion View Setup dialog box, click Done and the current Web database will be configured based on your choices.
Tips
- If you
forget to set up sorting in step 7, the Web user won't be able to set
any fields for sorting (top, Figure 18.25). If you select the
User defines sorting… radio button in step 7, users will
be able to choose fields for sorting (bottom, Figure 18.25).
- As noted in step 7, all of a file's fields will be visible in the Specify Sort dialog box (Figure 18.22). If you don't want Web visitors to see those fields, duplicate your original file, delete all the extraneous fields, and publish that file on the Web instead.
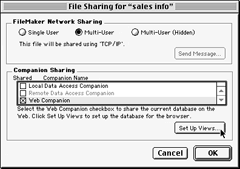
Figure
18.14 To set how the database will appear within a Web browser, highlight
the Web Companion and click Set Up Views.
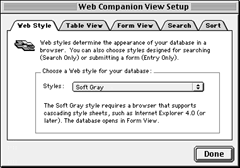
Figure 18.15 To set a style for your Web database, click the Web
Style tab in the Web Companion View Setup dialog box.
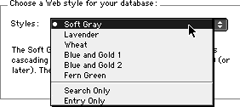
Figure 18.16 Use the pop-up menu to select a style. See Table 18.1
for help on making a choice.
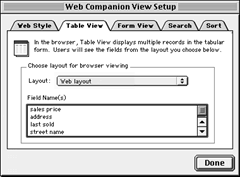
Figure 18.17 To set how the Web Companion displays multiple
records, click the Table View tab and use the Layout pop-up
menu to choose which layout Web visitors will see.
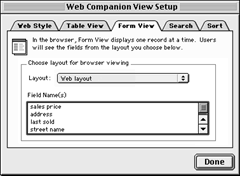
Figure 18.18 To set how the Web Companion displays single records,
click the Form View tab and use the Layout pop-up menu.
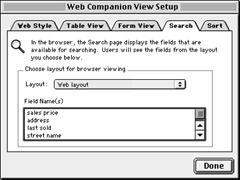
Figure 18.19 Click the Search tab to see which fields your
Web visitors will see, based on the Layout chosen. (You may need
to create a more restrictive layout.)
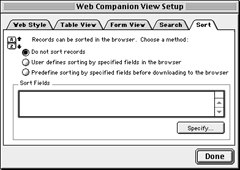
Figure 18.20 By default, sorting is turned off in the Web Companion.
Select the second or third radio button to enable sorting.
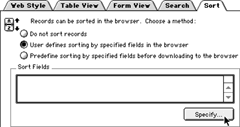
Figure 18.21 To let users sort the file, select the second
radio button and click Specify.
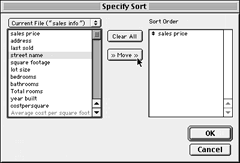
Figure 18.22 Select a field in the left-hand list, click Move,
and it will be added to the Sort Order list. See the Tips on page 274
for a workaround.
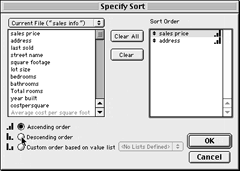
Figure 18.23 To control the sort yourself, choose the third
radio button in Figure 18.20 and use the buttons in the Specify
Sort dialog box.
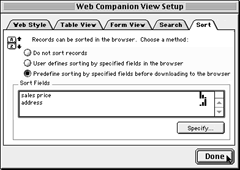
Figure 18.24 After you've set the sort, click Done to close
the setup dialog box.
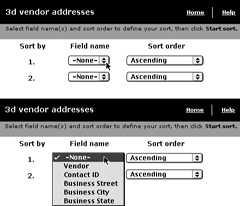
Figure 18.25 Top: If you forget to enable sorting, Web users will
see a pop-up menu only listing None. Bottom: With sorting enabled,
users can select a field to sort.