|
Web Companion
options |
|||
|
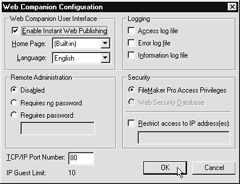
The Web Companion Configuration dialog box (Figure 18.9) controls the user interface, remote administration, the TCP/IP port number, logging activities, and security. Here's a quick rundown of each: Enable Instant Web Publishing: By default, this is checked. Even if you plan on using the FileMaker Developer edition to create custom pages, you'll find the Instant Web Publishing option will be fine for certain pages. Home
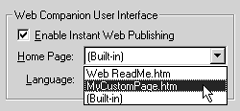
Page: By default, the Web Companion uses its own Built-in home
page. You can, however, use your own custom page (Figure 18.10)
as a home page-if you first place it in FileMaker's Web folder ( Language: This only affects the Instant Web Publishing interface and its built-in Help feature--not your data or layouts. Use the pop-up menu to select one of seven languages. Remote Administration: The three radio buttons in this panel allow you to upload and download Web Companion files if they reside on an offsite server, a handy feature if you depend on an Internet Service Provider for hosting your FileMaker database. You can leave this option off or enable it. If you choose to use remote administration, always check Requires password and enter a password in the text box. For more details, see Security below. TCP/IP Port Number: Unless you've already got a Web server connected to your computer, the default setting of 80 is fine. Otherwise, you'll have to set it to 591 and users visiting your Web site will have to add ":591" to the end of your normal IP address (e.g., 146.98.21:591). IP Guest Limit: As mentioned in this chapter's introduction, unless you're using the $999 FileMaker Unlimited edition, this number will be set at 10. That means only the first 10 users in a rolling 12-hour period will be able to use the Web database. More precisely, the limit is 10 computers since FileMaker tracks the use by the IP address. Any Web browser logging into the database after the first 10 users will get an error message. If one of your first 10 computers has not used the Web database in 12 hours, then FileMaker will let a new computer log into the database. If three of your first 10 computers don't use it in 12 hours, three additional computers will be able to log in, and so on. The problem with this approach, obviously, is FileMaker makes no distinction between 10 computers regularly logging into the Web database and a situation where several computers only tap into the database for one request or just spend five minutes using it. You're limited to 10 IP addresses per 12 hours, no exceptions. If you're a small firm, the workaround is musical chairs: designate 10 machines for tapping the Web database and have people sit at those machines to make their requests. If you're trying to use FileMaker's Web publishing features to serve a Web database to the wider world--which you could do with FileMaker 4--you'll now have to pony up for FileMaker Unlimited. Logging: By default, Web Companion does not store a log of Web activity. Check Access log file if you want to record which IP addresses log into the site and which pages are viewed. Check Error log file if you want a record kept of errors generated by the Web Companion. Check Information log file only if you're creating custom Web publishing files using the FileMaker Developer edition. The log files are stored in the FileMaker Pro 5 folder. Security: The Web Companion's security default is FileMaker Pro Access Privileges, which are set file by file using passwords and groups as explained in Networking on page 235. With this option activated, Web browsers enter the same passwords, and have the same privileges, as they would if they opened those files directly within FileMaker. In a change new to version 5, you should choose Web Security Database only if you'll be creating custom web pages with FileMaker's Developer Edition. You can, however, add another level of security by checking Restrict access to IP address(es) and then entering specific IP numbers into the text window. Separate multiple IP addresses with a comma. You also can use wildcard character (e.g. 192.168.0.*) to specify a range of addresses, a common setup for inhouse intranets. |
|
||
|
|
|||
|
|
|||