
JavaScript and its amped up counterpart jQuery have completely changed the game when it comes to creating rich interactive web pages and web-based applications. JavaScript has long been a critical component for creating dynamic web pages. Now, with the advancements in the jQuery, jQuery UI, and jQuery Mobile libraries, web development has changed forever.
This hour quickly takes you through the world of jQuery and JavaScript development. The best place to start is to ensure that you understand the dynamic web development playground that you will be playing in. To be effective in JavaScript and jQuery, you need a fairly decent understanding of web server and web browser interaction, as well as HTML and CSS.
This hour includes several sections that briefly give a high-level overview of web server and browser interactions and the technologies that are involved. The rest of this hour is dedicated to setting up and configuring a jQuery and JavaScript friendly development environment. You will end with writing your very first web pages that include JavaScript and jQuery code.
JavaScript and jQuery interact with every major component involved in communication between the web server and the browser. To help you understand that interaction better, this section provides a high-level overview of the concepts and technologies involved in web server/browser communication. This is not intended to be comprehensive by any means; it’s a high-level overview that enables you to put things into the correct context as they are discussed later in the book.
The World Wide Web’s basic concept should be very familiar to you: An address is typed into or clicked in a web browser, and information is loaded in a form ready to be used. The browser sends a request, the server sends a response, and the browser displays it to the user.
Although the concept is simple, several steps must take place. The following sections define the components involved, their interactions with each other, and how JavaScript and jQuery are involved.
The web server is the most critical component of the web. Without it, no data would be available at all. The web server responds to requests from browsers with data that the browsers then display. A lot of things happen on the web server, though. For example, the web server and its components check the format and validity of requests. They may also check for security to verify that the request is from an allowed user. Then, to build the response, the server may interact with several components and even other remote servers to obtain the data necessary.
The next most important component is the browser. The browser sends requests to the web server and then displays the results for the user. The browser also has a lot of things happening under the hood. The browser has to parse the response from the server and then determine how to represent that to the user.
Although several browsers are available, the three most popular are Firefox, Internet Explorer, and Chrome. For the most part, each browser behaves the same when displaying web pages; however, occasionally some differences exist, and you will need to carefully test your JavaScript and jQuery scripts in each of the browsers that you want to support.
JavaScript and jQuery can be very involved in the interactions that occur between the browser receiving the response and the final output rendered for the user. These scripts can change the format, content, look, and behavior of the data returned from the server. The following sections describe important pieces provided by the browser.
The browser renders a web page by creating a Document Object Model, or DOM. The DOM is a tree structure with the HTML document as the root object. The root can have several children, and those children can have several children. For example, a web page that contains a list would have a root object, with a child list object that contained several child list element objects. The following shows an example of a simple DOM tree for a web page containing a single heading and a list of three cities:
document
  + html
    + body
      + h1
        + text = "City List"
      + ul
        + li
          + text = "New York, US"
        + li
          + text = "Paris, FR"
        + li
          + text = "London, EN"
The browser knows how to display each node in the DOM and renders the web page by reading each node and drawing the appropriate pixels in the browser window. As you learn later, JavaScript and jQuery enable you to interact directly with the DOM, reading each of the objects, changing those objects, and even removing and adding objects.
The browser tracks several events that are critical to jQuery and JavaScript programs—for example, when a page is loaded, when you navigate away from a page, when the keyboard is pressed, mouse movements, and clicks. These events are available to JavaScript, allowing you to execute functionality based on which events occur and where they occur.
The browser also provides limited access to the browser window itself. This allows you to use JavaScript to determine the display size of the browser window and other important information that you can use to determine what your scripts will do.
The browser is able to access files on the web server using a Uniform Resource Locator, or URL. A URL is a fully unique address to access data on the web server, which links the URL to a specific file or resource. The web server knows how to parse the URL to determine which file/resources to use to build the response for the browser. In some instances, you might need to use JavaScript to parse and build URLs, especially when dynamically linking to other web pages.
Hypertext Markup Language, or HTML, provides the basic building blocks of a web page. HTML defines a set of elements representing content that is placed on the web page. Each element is enclosed in a pair of tags denoted by the following syntax:
<tag>content</tag>
For example:
<p>This is an HTML paragraph.</p>.
The web browser knows how to render the content of each of the tags in the appropriate manner. For example, the tag <p> is used to denote a paragraph. The actual text that is displayed on the screen is the text between the <p> start tag and the </p> end tag.
The format, look, and feel of a web page is determined by placement and type of tags that are included in the HTML file. The browser reads the tags and then renders the content to the screen as defined.
HTML5 is the next generation of the HTML language that incorporates more media elements, such as audio and video. It also provides a rich selection of vector graphic tags that allow you to draw sharp, crisp images directly onto the web page using JavaScript.
Listing 1.1 shows an example of the HTML used to build a simple web page with a list of cities. The HTML is rendered by the browser into the output shown in Figure 1.1.
LISTING 1.1 A Simple HTML Document That Illustrates the HTML Code Necessary to Render a List in a Browser

FIGURE 1.1 List of cities rendered in a browser using the code from Listing 1.1.
One of the challenges with web pages is getting them to look sharp and professional. The generic look and feel that browsers provide by default is functional; however, it is a far cry from the sleek and sexy eye-candy that users of today’s Internet have come to expect.
Cascading Style Sheets, or CSS, provide a way to easily define how the browser renders HTML elements. CSS can be used to define the layout as well as the look and feel of individual elements on a web page. To illustrate this, I’ve added some CSS code to our example from Listing 1.1. Listing 1.2 uses CSS to modify several attributes in lines 07 to 13. These attributes alter the text alignment, font style, and change the list bullet from a dot to an airplane image. Notice how the CSS style changes how the list is rendered in Figure 1.2.
LISTING 1.2 HTML with Some CSS Code in <STYLE> Element to Alter the Appearance of the List

FIGURE 1.2 The CSS code dramatically changes the look of the list in the browser.
Hypertext Transfer Protocol (HTTP) defines communication between the browser and the web server. It defines what types of requests can be made, as well as the format of those requests and the HTTP response.
Hypertext Transfer Protocol with Secure Sockets Layer (HTTPS) adds an additional security layer, SSL/TLS, to ensure secure connections. When a web browser connects to a web server via HTTPS, a certificate is provided to the browser. The user is then able to determine whether to accept the certificate. Without the certificate, the web server will not respond to the user’s requests, thus ensuring that the request is coming from a secured source.
The following sections discuss a little bit about HTTP headers and the two most common types of HTTP requests, GET and PUT.
HTTP headers allow the browser to define the behavior and format of requests made to the server and the response back to the web browser. HTTP headers are sent as part of an HTTP request and response. You can send HTTP requests to web servers from JavaScript, so you need to know at least a little bit about the headers required.
The web server reads the request headers and uses them to determine how to build a response for the browser. As part of the response, the web server includes response headers that tell the browser how to process the data in the response. The browser reads the headers first and uses the header values when handling the response and rendering the page.
Following are a few of the more common ones:
ACCEPT—Defines content types that are acceptable in the response.AUTHORIZATION—Specifies authentication credentials used to authenticate the requesting user.COOKIE—Cookie value that was previously set in the browser by a server request. Cookies are key/value pairs that are stored on the client. They can be set via server requests or JavaScript code and are sent back to the server as part of HTTP requests from the browser.SET-COOKIE—Cookie value from the server that the browser should store if cookies are enabled.CONTENT-TYPE—Type of content contained in the response from the web server. For example, this field may be “text/plain” for text or “image/png” for a .png graphic.CONTENT-LENGTH—Amount of data that is included in the body of the request or response.Many more headers are used in HTTP requests and responses, but the preceding list should give you a good idea of how they are used.
The most common type of HTTP request is the GET request. The GET request is generally used to retrieve information from the web server—for example, to load a web page or retrieve images to display on a web page. The file to retrieve is specified in the URL that is typed in the browser, for example:
http://www.dayleycreations.com/tutorials.html
A GET request is composed entirely of headers with no body data. However, data can be passed to the server in a GET request using a query string. A query string is sent to the web server as part of the URL. The query string is formatted by specifying a ? character after the URL and then including a series of one or more key/value pairs separated by & characters using the following syntax:
URL?key=value&key=value&key=value...
For example, the following URL includes a query string that specifies a parameter gallery with a value of 01 that are sent to the server:
http://www.dayleycreations.com/user.html?gallery.html?gallery=01
A POST request is different from a GET request in that there is no query string. Instead, any data that needs to be sent to the web server is encoded into the body of the request. POST requests are generally used for requests that change the state of data on the web server. For example, a web form that adds a new user would send the information that was typed into the form to the server as part of the body of a POST.
Originally, web pages were static, meaning that the file that was rendered by the browser was the exact file that was stored on the server, as shown in Figure 1.3. The problem is that when you try to build a modern website with user interactions, rich elements, and large data, the number of web pages needed to support the different static web pages is increased dramatically.
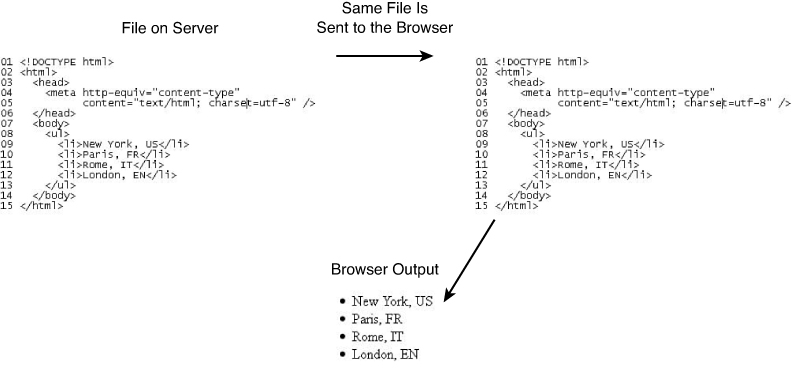
FIGURE 1.3 With static pages, the same page that is located on the web server is sent to the browser and rendered directly.
Rather than creating a web server full of static HTML files, it is better to use scripts that use data from the web server and dynamically build the HTML that is rendered in the browser.
Those scripts can either run on the server or in the client browser. The following sections discuss each of those methods. Most modern websites use a combination of server- and client-side scripting.
Server-side scripting is the process of formatting server data into an HTML response before it is sent back to the browser. The main advantages of server-side scripting are that data processing is done completely on the server side and the raw data is never transferred across the Internet; also, problems and data fix-ups can be done locally within the server processing. The disadvantage is that it requires more processing on the server side, which can reduce the scalability of some applications. Listing 1.3 shows a simple server-side PHP script that dynamically adds the list of cities to an HTML document before sending it to the browser.
Figure 1.4 shows an example of a simple PHP server-side script. Notice that the file located on the server is different from the one sent to the browser, but the same one sent to the browser is what is rendered.
LISTING 1.3 A PHP Script That Is Run at the Server Populates the City List Items
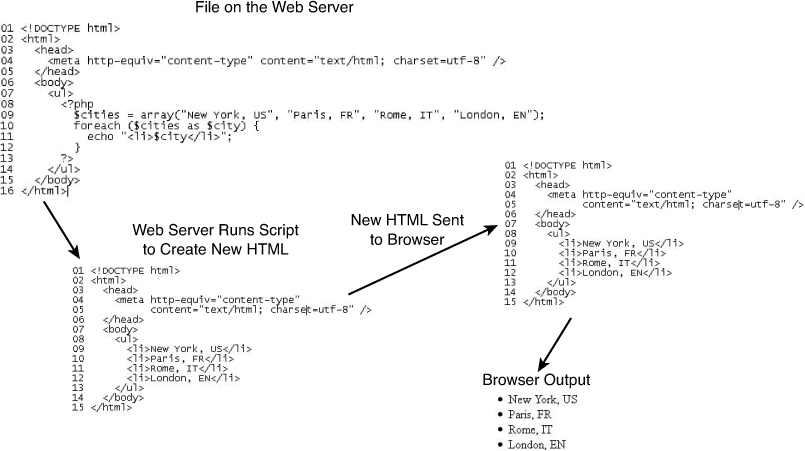
FIGURE 1.4 The PHP script is executed on the web server, and so the HTML document sent to the browser is different from what is actually contained on the server.
Client-side scripting is the process of sending code along with the web page. That code gets executed either during the loading of the web page or after the web page has been loaded.
There are a couple of great advantages of client-side scripting. One is that data processing is done on the client side, which makes it easier to scale applications with large numbers of users. Another is that browser events can often be handled locally without the need to send requests to the server. This enables you to make interfaces respond much more quickly to user interaction.
JavaScript and jQuery are by far the most common form of client-side scripting. Throughout this book, you learn why that is the case.
JavaScript is a programming language much like any other. What separates JavaScript the most from other programming languages is that the browser has a built-in interpreter that can parse and execute the language. That means that you can write complex applications that have direct access to the browser and the DOM.
Access to the DOM means that you can add, modify, or remove elements from a web page without reloading it. Access to the browser gives you access to events such as mouse movements and clicks. This is what gives JavaScript the capability to provide functionality such as dynamic lists and drag and drop.
jQuery is a library that is built on JavaScript. The underlying code is JavaScript; however, jQuery simplifies a lot of the JavaScript code into simple-to-use functionality. The two main advantages to using jQuery are selectors and built-in functions.
Selectors provide quick access to specific elements on the web page, such as a list or table. They also provide access to groups of elements, such as all paragraphs or all paragraphs of a certain class. This allows you to quickly and easily access specific DOM elements.
jQuery also provides a rich set of built in functionality that makes it easy to do a lot more with a lot less code. For example, tasks such as hiding an element on the screen or animating the resize of an element take just one line of code.
Listing 1.4 shows an example of a simple JavaScript client-side script. Figure 1.5 diagrams the flow of data between the web server and the browser. Notice that this time the file located on the server is the same one sent to the browser, but the JavaScript changes the HTML that is loaded in the browser.
LISTING 1.4 A Simple JavaScript Client-Side Script That Is Run in the Browser to Populate the City List Items
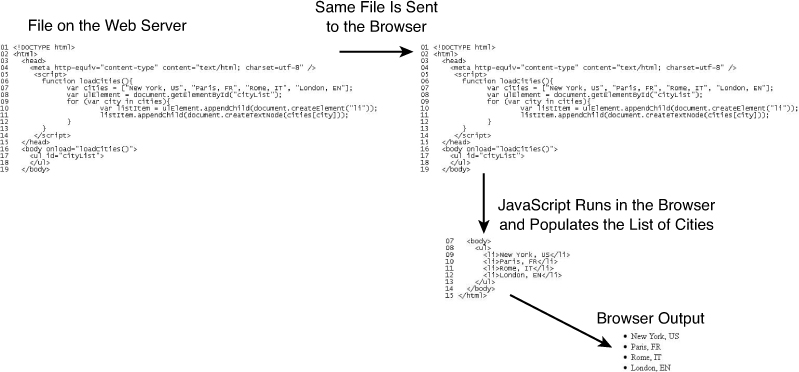
FIGURE 1.5 The JavaScript is executed in the browser, and so the HTML document rendered by the browser is different from the one that was originally sent.
Asynchronous JavaScript and XML, or AJAX, is the process of using JavaScript to continue to communicate with the web server after the web page has been loaded. AJAX reduces the need to reload the web page or load other web pages as the user interacts. This reduces the amount of data that needs to be sent with the initial web server response and also allows web pages to be more interactive.
For a simple example of AJAX, I’ve constructed two scripts—Listing 1.5 and Listing 1.6. Listing 1.5 is an HTML document with JavaScript that runs on the client after the page is loaded. The JavaScript makes an AJAX request back to the server to retrieve the list of cities via a server-side PHP script, shown in Listing 1.6. The list of cities returned is then used to populate the HTML list element with items.
LISTING 1.5 A Simple JavaScript Client-Side Script Executes an AJAX Request to the Server to Retrieve a List of Cities to Use When Building the HTML List Element
LISTING 1.6 A Server-Side PHP Script That Returns a Simple JSON String That Can Be Parsed and Used by the JavaScript in Listing 1.5
1 <?php
2    echo '["New York, US", "Paris, FR", "Rome, IT", "London, EN"]';
3 ?>
Figure 1.6 illustrates the flow of communication that happens during the AJAX request/response. Notice that a second request is made to the server to retrieve the list of cities.
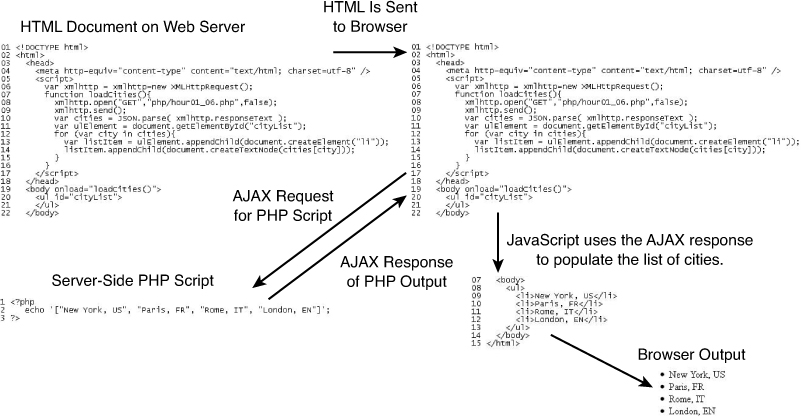
FIGURE 1.6 Using an AJAX request, JavaScript can send an additional request to the server to retrieve additional information that can be used to populate the web page.
With the brief introduction to dynamic web programming out of the way, it is time to cut to the chase and get your development environment ready to write jQuery and JavaScript.
The development environment can make all the difference when you are writing jQuery and JavaScript projects. The development environment should have these following characteristics:
Setting up a web development environment requires three steps. First, install an IDE that will provide the tools to create and edit code. Second, add and enable JavaScript debugging tools in your web browser(s). Third, set up a development web server that you can test your scripts from. The following sections take you through each of those tasks.
The IDE is the most important aspect when developing with JavaScript. An IDE integrates the various tasks required to write web applications into a single interface. In reality, you could use any text editor to write HTML, CSS, JavaScript, and jQuery code. However, you will find it much more productive and easy to use a good IDE.
Several IDEs are available. Some are open source; others cost a lot. Pick the one that best fits your needs. You should have an IDE with code completion and error checking, because those two features save the most time.
Possible IDEs include Dreamweaver, Visual Studio, and several others. However, Eclipse features numerous plug-ins that provide extensibility. For jQuery and JavaScript, consider using Aptana Studio because it is simple to set up and get going with, and it is supported on Mac, Windows, and Linux.
For the purposes of this book, you step through the process of installing and configuring Aptana, although all the editing and debugging concepts apply equally to whatever IDE you are working with.
Note
You will need to have a Java JRE or JDK installed to be able to install Aptana Studio.
You can download Aptana Studio from the following location: www.aptana.com/products/studio3/download
You should select Standalone Version and specify which operating system that you are installing it on, as shown in Figure 1.7. After the install is downloaded, execute it and follow the prompts; they are very straightforward.
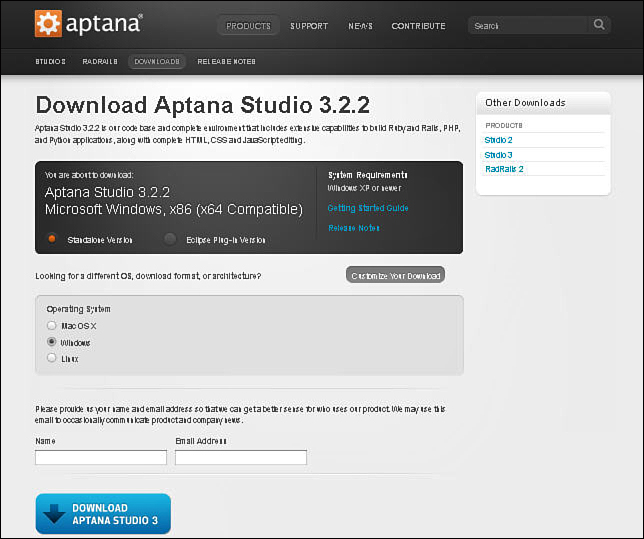
FIGURE 1.7 Aptana Studio download page.
After Aptana Studio is installed, launch it. When you launch it for the first time, you need to specify a location for your workspace. The workspace is where your projects and files will be stored, so pick a location that you can easily manage.
Note
You can also import and export themes from this themes preferences dialog. On the book website is a file named AptanaTheme.tmTheme, which is the theme used in writing this book. You can import that theme here.
Now that Aptana Studio is installed, there are just a few more steps to configure it. Do the following:
1. Select Commands, Bundle Development, Install Bundle from the main menu. Then select jQuery from the bundles list and click the OK button.
2. Select Windows, Preferences from the main menu to load the Preferences dialog shown in Figure 1.8. From the Preferences dialog select Aptana Studio, Themes, also shown in Figure 1.8, and then select a theme from the drop-down list. The theme will set window, menu, selection, and code element colors and fonts. Choose a theme that works well for you. You can also customize the theme for this page.
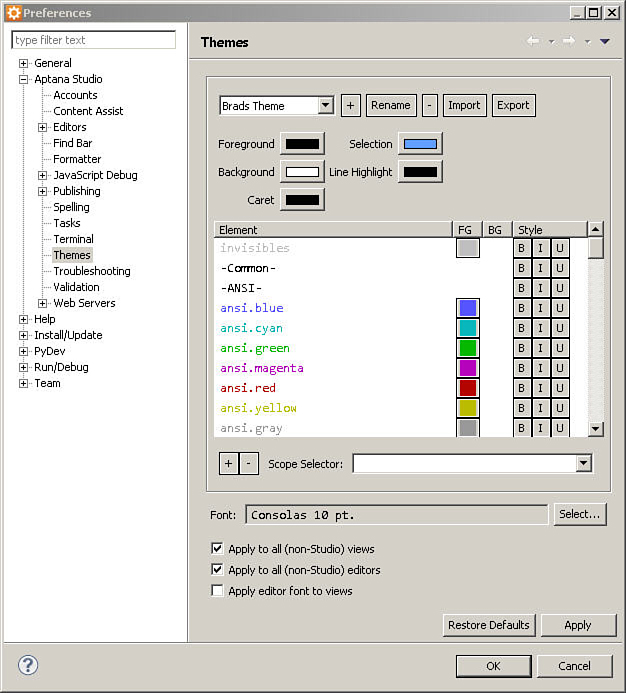
FIGURE 1.8 Aptana Studio Preferences dialog.
3. Select and drag the Outline tab in the bottom left and merge it next to the App Explorer tab. This gives you a better view of the outline in your scripts and allows you to close the snippets and sample tabs in the bottom that you do not need. The final result should look something like Figure 1.9.
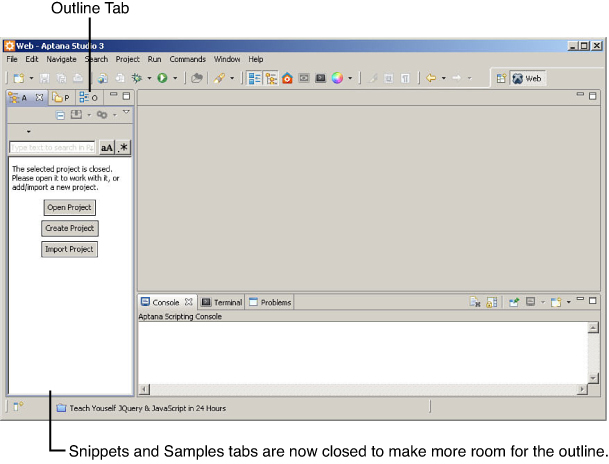
FIGURE 1.9 Aptana Studio with Outline tab moved.
4. Play around with the preferences and menus to familiarize yourself with the interface.
Aptana Studio is now set up and ready for you to begin creating projects.
After you have Aptana Studio set up, you are ready to configure your browsers to debug JavaScript. In this section, you follow the steps needed to enable JavaScript debugging on each of the three main browsers. It doesn’t really matter which browser you choose; however, Firefox is used in the next section and throughout the book.
Firefox seems to have the most consistent experience and has been the most reliable. Firefox also seems to have the most consistent cross-platform support.
Use the following steps to enable JavaScript debugging on Firefox:
1. Open Firefox.
2. Select Tools, Add-Ons from the main menu.
3. Type Firebug into the search box in the top right to search for Firebug, and then click the Install button to install it.
4. Type FireQuery into the search box in the top right to search for FireQuery, and then click the Install button to install it. FireQuery extends Firebug to also support jQuery.
5. When you reload Firefox, click the Firebug button to display the Firebug Console, as shown in Figure 1.10.
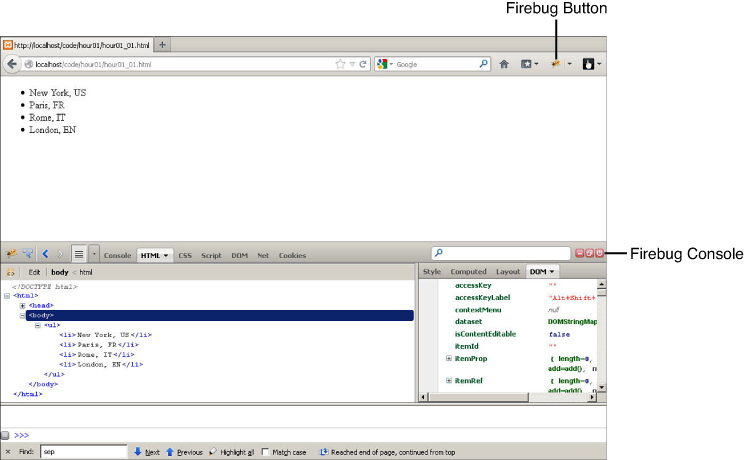
FIGURE 1.10 Firefox with Firebug enabled.
Use the following steps to enable JavaScript debugging on Internet Explorer:
1. Open Internet Explorer.
2. Click the Settings button and select Developer Tools from the drop-down menu, or press the F12 key.
3. The Developer Console is displayed as shown in Figure 1.11.

FIGURE 1.11 Internet Explorer with the Developer Console loaded.
Use the following steps to enable JavaScript debugging in Chrome:
1. Open Chrome.
2. Click the Settings button and select Tools, Developer Tools from the drop-down menu. You can also press Ctrl+Shift+j on PCs or CMD-Shift-j on Macs.
3. The JavaScript Console is displayed as shown in Figure 1.12.
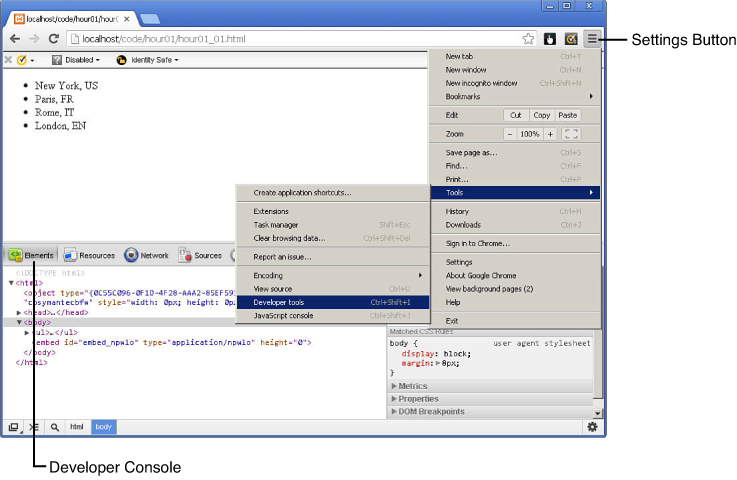
FIGURE 1.12 Chrome with the Developer Console loaded.
After you have your browser ready, the final step is to install and configure a simple development server. If possible, it is usually best to have a basic web server installed on your development machine.
Caution
The Allow from All option will allow anyone access to the files in that folder while the web server is running. It is perfect for debugging. If you would like stricter security, check out Apache’s security guide at http://httpd.apache.org/docs/2.2/configuring.html.
You can choose from several options, but the two most common are Apache or IIS. The best option for a development server is using a prebuilt Apache stack that includes MySQL and PHP support. This book uses the XAMPP stack because it is available for Mac, Windows, and Linux.
The XAAMP stack can be downloaded from the following location: www.apachefriends.org/en/xampp.html
Use the following steps to install and configure XAMPP as your development server:
1. Download the XAMPP installer and install XAMPP. The installation is straightforward. Remember the location where you choose to install it. You will be using that location later.
2. Load the XAMPP Control Panel shown in Figure 1.13.
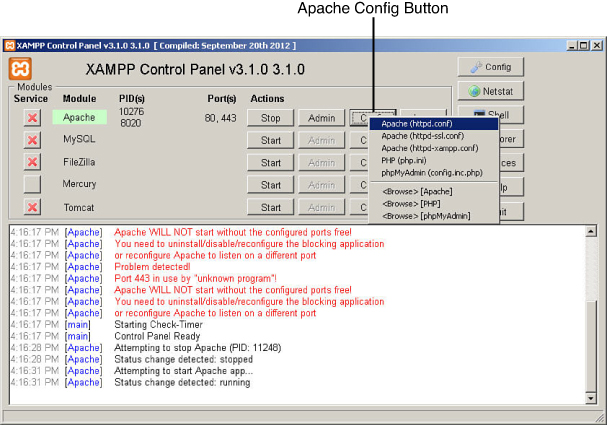
FIGURE 1.13 Selecting the Apache config file http.conf from the XAMPP Control Panel.
Note
In step 4, the directory is a Windows path for the default settings of XAMPP. If you installed XAMPP to a different location or on Linux and Mac systems, you will need to make adjustments to the path specified in the Directory directive.
3. From the XAMPP Control Panel, click the Apache Config button and select the httpd.conf file to load the Apache configuration file in the editor.
4. Add the following directive to the httpd.conf file to enable a code directory for you to access directly when the server is running:
<Directory "C:/xampp/htdocs/code">
    # Allows Browser Access to Your jQuery and JavaScript code Directory
    Options Indexes FollowSymLinks Includes ExecCGI
    AllowOverride All
    Allow from All
</Directory>
5. Save the file.
6. Create a directory named code in the /xamp/htdocs directory or wherever your Apache root directory is set to. This is the directory that you will be adding your code to.
7. Stop and then Start the Apache service using the XAMPP Control Panel.
8. Go to the following location in your web browser; an empty directory link similar to the one in Figure 1.14 should be displayed in the browser:
http://localhost/code
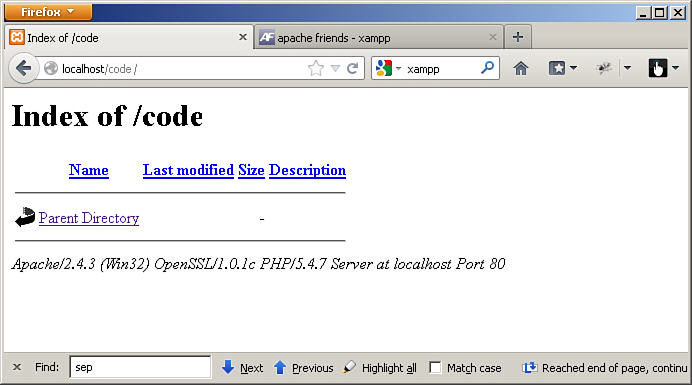
FIGURE 1.14 Verifying that the web browser has access to the newly created code directory.
Your web server is now ready to be used for web development.
After you have installed your IDE and web server, you are ready to begin creating projects. In this section, you learn some concepts and go through the process of creating a project in Aptana Studio.
When you first begin a web project, you typically start off small with a few images and only a couple of files. However, as time goes by and more files are added to the project, poorly organized projects can quickly become a mess.
To avoid that problem, plan your directory structure ahead of time. The best directory structure will depend on what your needs are, how many images you will be incorporating, what file types, and so on.
To give you a quick example, consider a basic directory structure similar to the following:
The purpose of the preceding list is to give you an idea of one way to structure your files so that they remain organized. The best way is totally up to you. You may want more subdirectories; just don’t add so many that the URL to reach files in them becomes a mess.
Another area you need to pay attention to when creating a web project are filenames. Here are a few things to consider:
Video 1.1—Try it Yourself: Creating a Project
1. Select File, New, Web Project to launch the Project Template dialog.
2. Select Default Project and click Next.
3. Type in a project name. Keep it short, but make it mean something. For example, TYjQueryCode is the project name for this book.
4. Unselect the Use Default Location option.
5. Add the location of the directory that you added to the httpd.conf file previously. In this case, it was c:\xampp\htdocs\code.
6. Click the Finish button and the project should show up in the workspace tab, as shown in Figure 1.15.
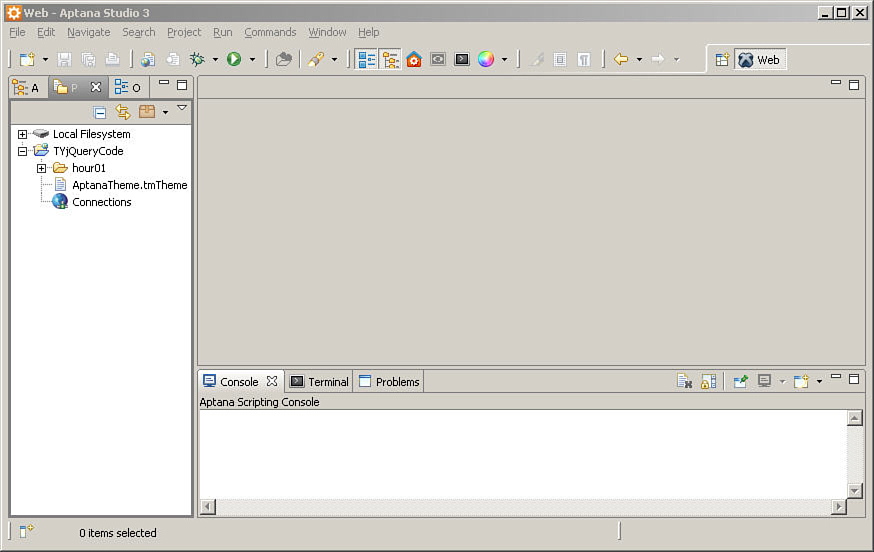
FIGURE 1.15 Creating a new project in Aptana Studio.
7. Right-click the project name and select New, Folder; then name the folder hour01 to store code for this hour.
8. Your first project has now been created.
That’s it. All the basic HTML elements are now in place. In the next section, you stylize the <span> element so that Click Me looks more like a button.
The simple text rendered by the browser is pretty plain, but that problem can quickly be solved by adding a CSS style. In this section, you use CSS to make the text appear more like a button.
Use the following steps to add the CSS style to the <span> element. For reference, the style changes you make in these steps are shown in the final script in Listing 1.7:
1. Add the following code inside the <head> tags of the web page to include a CSS <style> element for all <span> elements:
<style>
  span{
  }
</style>
2. Add the following property setting to the span style to change the background of the text to a dark blue color:
background-color: #0066AA;
3. Add the following property settings to the span style to change the font color to white and the font to bold:
color: #FFFFFF;
font-weight: bold;
4. Add the following property settings to the span style to add a border around the span text:
border-color: #C0C0C0;
border:2px solid;
border-radius:5px;
padding: 3px;
5. Add the following property settings to the span style to set an absolute position for the span element:
position:absolute;
top:150px;
left:100px;
6. Save the file.
7. Open the following URL in your web browser, and you should see the stylized text Click Me appear as shown in Figure 1.16:
http://localhost/code/hour01/first.html

FIGURE 1.16 <span> element stylized to look like a button.
Now that the HTML is stylized the way you want it, you can begin adding dynamic interactions. In this section, you add a link to a hosted jQuery library so that you will be able to use jQuery, and then you link the browser mouse event mouseover to a JavaScript function that moves the text.
Follow these steps to add the jQuery and JavaScript interactions to your web page:
1. Change the <span> element to include an ID so that you can reference it, and also add a handler for the mouseover event, as shown in line 30 of Listing 1.7:
<span id="elusiveText" onmouseover="moveIt()">Click Me</span>
2. Add the following line of code to the <head> tag, as shown in line 6 of Listing 1.7. This loads the jQuery library from a hosted source:
<script src="http://code.jquery.com/jquery- latest.min.js"></script>
3. Add the following JavaScript function to the <head> as shown in lines 6–13 of Listing 1.7. This function creates an array of coordinate values from 10 to 350, then randomly sets the top and left CSS properties of the span element each time the mouse is moved over it:
function moveIt(){
  var coords = new Array(10,50,100,130,175,225,260,300,320,350);
  var x = coords[Math.floor((Math.random()*10))];
  var y = coords[Math.floor((Math.random()*10))];
  $("#elusiveText").css({"top": y + "px", "left": x + "px"})
}
4. Save the file.
5. Open the following URL in your web browser, and you should see the stylized text Click Me appear, as shown in Figure 1.16:
http://localhost/code/hour01/first.html
6. Now try to click the Click Me button. The button should move each time the mouse is over it, making it impossible to click it.
7. Find someone who annoys you, and ask them to click the button.
LISTING 1.7 A Simple Interactive jQuery and JavaScript Web Page
In this hour, you learned the basics of web server and browser communications. You learned differences between GET and POST requests, as well as the purposes of server-side and client-side scripts. You also learned about the DOM and how the browser uses it to render the web page that is displayed to the user.
You have set up a good web development environment and created your first project. As part of creating your first project, you created a dynamic web page that incorporates HTML, CSS, jQuery, and JavaScript.
Q. Which is better—a client-side or a server-side script?
A. It really depends on what you are trying to accomplish. Some people say that one way or the other is the only way to go. In reality, it is often a combination of the two that provides the best option. A good rule to follow is that if the interaction with the data is heavier based on user interaction such as mouse clicks, use a client-side script. If validation or error handling of the data requires interaction with the server, use a server-side script.
Q. Why don’t all browsers handle JavaScript the same way?
A. To render HTML and interact with JavaScript, the browsers use an engine that parses the data from the server, builds objects, and then feeds them into a graphical rendering engine that writes them on the screen. Because each browser uses a different engine, each interprets the scripts slightly differently, especially with fringe elements that have not yet become standardized. If you want to support all browsers, you need to test your web pages in each of them to verify that they work correctly.
1. Modify your first.html file to change the background color of your button randomly each time it is moved. Add the following two lines to randomly select a color:
var colors = new Array("#0066AA", "#0000FF", "#FF0000", "#00FF00");
var color = colors[Math.floor((Math.random()*4))];
Then modify the CSS change in your JavaScript to include background-color, as shown next:
$("#elusiveText").css({"top": y + "px", "left": x + "px", "background-color": color})
2. Add an additional <span> element to your first.html file with the same behavior as the first. To do this, add the following two lines in the appropriate locations. You should be able to figure out where they go:
$("#elusiveText2").css({"top": x + "px", "left": y + "px"})
<span id="elusiveText2" onmouseover="moveIt()">Click Me</span>