
The core of your development work will be spent in two applications: Xcode and the iOS Simulator. These apps provide the core tools that you need to design, program, and test applications for the iPhone and iPad. And, unlike other platforms, they’re entirely free.
This hour walks you through the basics you need to work with Xcode’s code-editing tools and the iOS Simulator, and you get some hands-on practice working with each. We cover Xcode’s interface-creation tools in Hour 5, “Exploring Interface Builder.”
When you think of coding—actually typing the statements that will make your iDevice meet Apple’s “magical” mantra—think Xcode. Xcode is the IDE, or integrated development environment, that manages your application’s resources and lets you edit the code and user interface (UI) that ties the different pieces together.
After you install Xcode, as described in Hour 1, “Preparing Your System and iDevice for Development,” you should be able to find it in the Application folder located at the root level of your hard drive or in Launchpad. We walk through the day-to-day use of Xcode’s tools in this hour. If you haven’t finished the installation, do so now.
Launch Xcode now. After a few moments, the Welcome to Xcode screen displays, as shown in Figure 2.1.
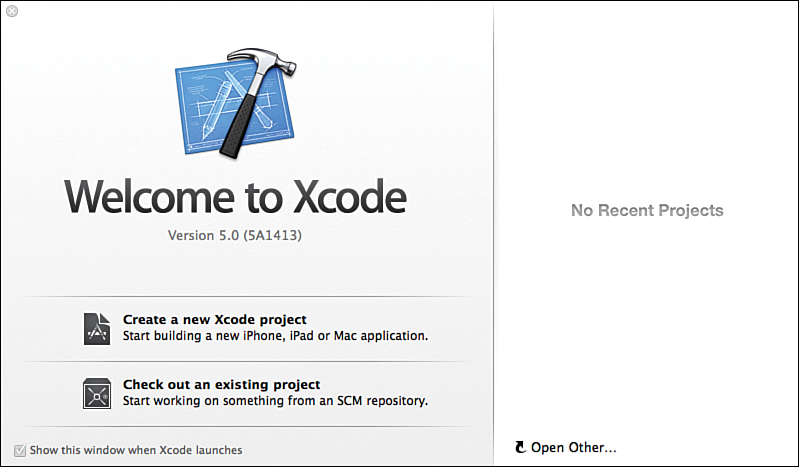
FIGURE 2.1 Create a new project (or open an existing one), right from the Xcode Welcome screen.
You can choose to disable this screen by unchecking the Show This Window When Xcode Launches check box. In Hour 4, “Inside Cocoa Touch,” we take a detailed look at the documentation system included in Xcode, which is quite extensive. For now, click the close box (X) in the upper-left corner to exit the Welcome screen.
Most of your development work will start with an Xcode project. A project is a collection of all the files associated with an application, along with the settings needed to “build” a working piece of software from the files. This includes images, source code, and a file that describes the appearance and objects that make up the interface.
To create a new project, choose File, New Project (Shift-Command-N) from the Xcode menu. Do this now. Xcode prompts you to choose a template for your application, as shown in Figure 2.2. The Xcode templates contain the files you need to quickly start a new development effort.
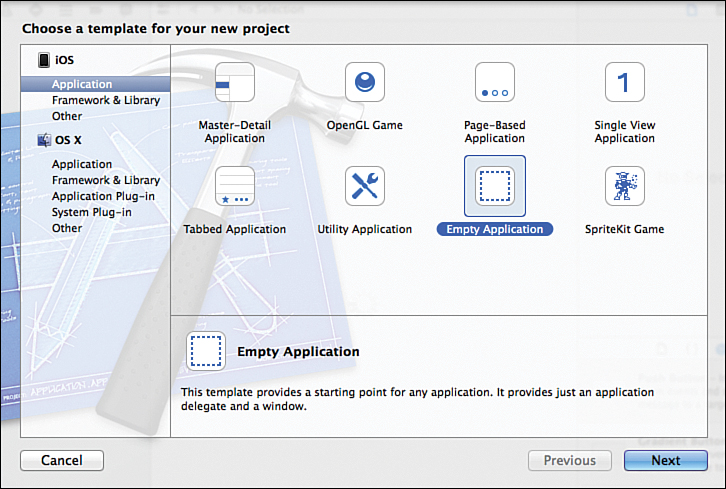
FIGURE 2.2 To create a new project, start by choosing an appropriate template.
Note
The class prefix is an arbitrary string that is appended onto the start of the filenames in an Xcode application template. Apple has traditionally automatically assigned the product name as the prefix but has changed this in recent versions of Xcode.
Core Data is an advanced means of storing application data that may be of interest as your project’s needs grow.
This topic is beyond the scope of this book, but you can read more about Core Data using the Xcode documentation system discussed in the next hour.
Although it is possible to build an application completely from scratch, the time saved by using a template is significant. We use several templates throughout this book, depending on what type of application we’re building.
Along the left side of the Template window are the categories of templates available. Our focus is on the iOS Application category, so be sure that it is selected.
On the right side of the display are the templates within the category, with a description of the currently highlighted template. For this tutorial, click the Empty Application template, and then click Next.
After choosing the template, you are prompted for a product name, organization name, and a company identifier. The product name is the name of your application, and the organization name can be anything you want, such as your name or your company name. The Company Identifier field is a bit different. This is typically the domain name of the organization or individual producing the app, but in reverse order. Together, the product name and the company identifier make up something called the bundle identifier, which uniquely identifies your application among all other iOS apps.
For example, in this hour, we create an app called HelloXcode. This becomes the product name. I own the domain teachyourselfios.com, so I enter com.teachyourselfios in the Company Identifier field. If you do not own a domain name, you’ll need to enter something, as this is a required field.
Go ahead and enter HelloXcode as your product name, and then provide an organization name and a company identifier of your choice. Leave the Class Prefix field empty. Choose which device (iPad or iPhone) you are using from the Device Family pop-up. The Use Core Data check box should be unchecked. Your screen will look similar to mine shown in Figure 2.3.
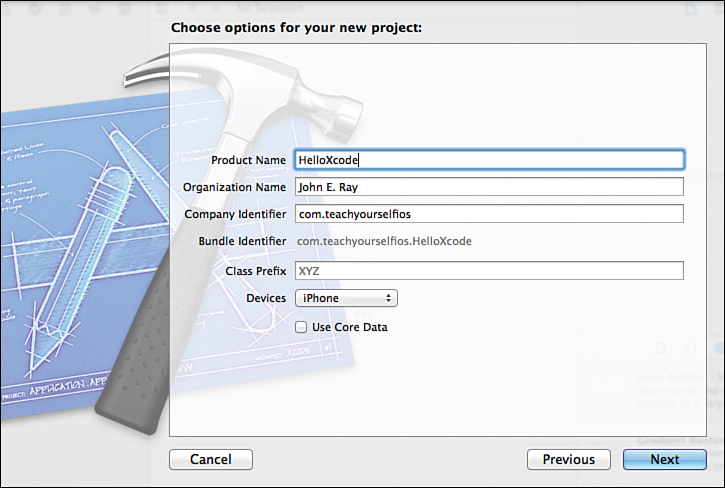
FIGURE 2.3 Choose a product name, company name, and company identifier for your app.
When satisfied with your settings, click Next. Xcode prompts for a save location for the project. Navigate to an appropriate location on your drive, leave the Source Control option unchecked, and then click Create. Xcode makes a folder with the name of the project and places all the associated template files within that folder.
Video 2.1—Creating Projects
Tip
Within your project folder, you’ll find a file with the extension .xcodeproj. This is the file you need to open to return to your project workspace after exiting Xcode.
After you’ve created or opened a project in Xcode, the interface displays a single window that will be used for everything from writing code to designing your application interfaces. If this is your first time in Xcode, the assortment of buttons and menus and icons can be more than a little intimidating. To help get a feel for what all of this is, let’s start by defining the major functional areas of the interface, shown in Figure 2.4.
Toolbar: Displays project status and provides easy access to common functions.
Navigator: Manages files, groups, and other information related to your project.
Editor: Edits project content (code, interfaces, and more).
Utility: Provides quick access to object inspectors, help, and project components.
Debug: If something goes wrong with your code during execution or you generate log output, this is where you’ll find it.
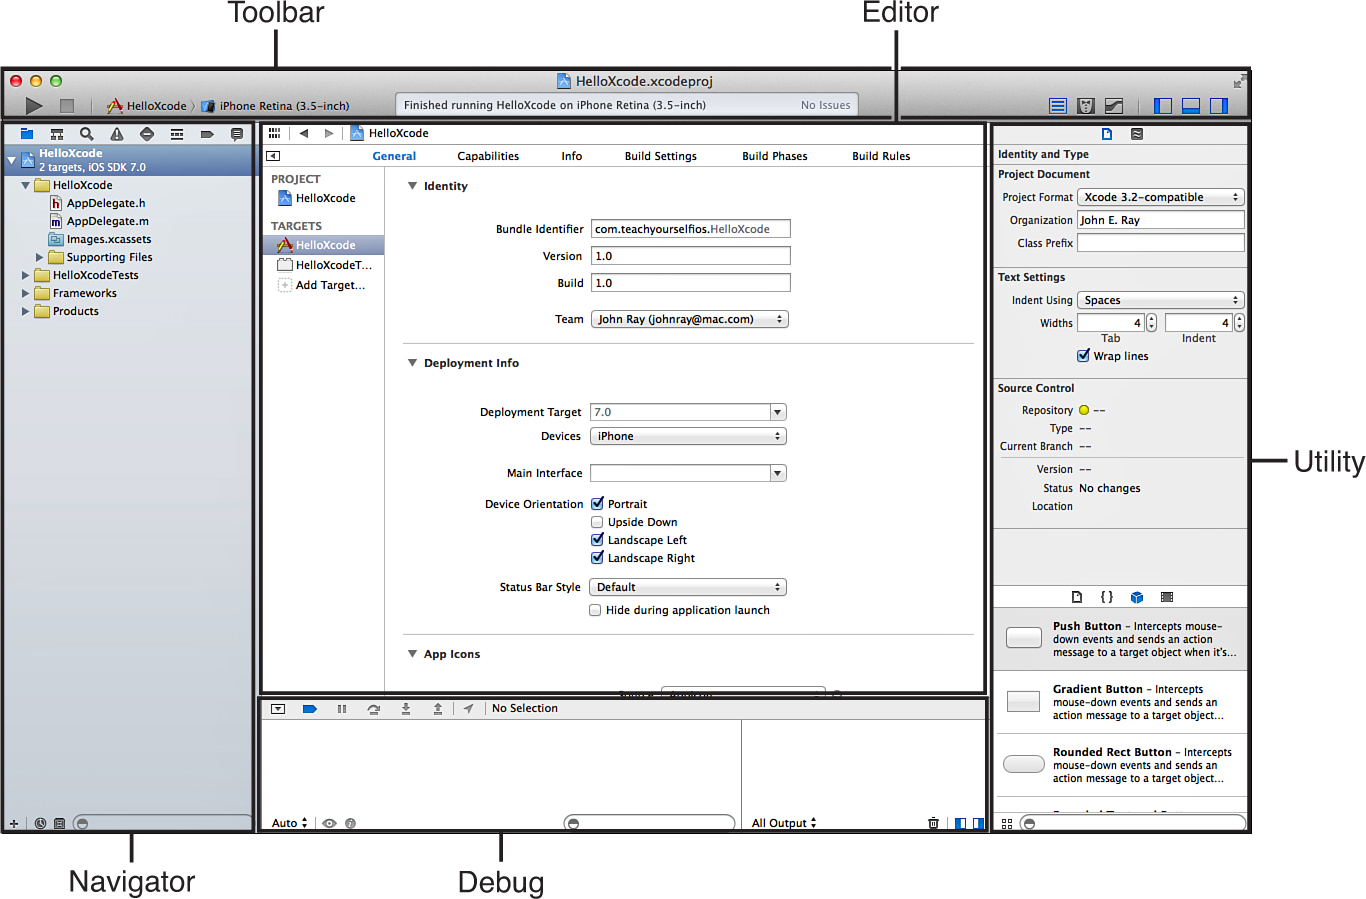
FIGURE 2.4 Finding your way around the Xcode interface can be intimidating at first.
Note
By default, the debug and utility areas are usually hidden. You can toggle the debug visibility using the second to last button in the toolbar and the utility area using the last. This cluster of three buttons comprises the view controls. The first button in the set is used to hide and show the navigator. You’ll get accustomed to the features offered within each of these areas as we work through the book. For now, we focus on the navigator and editor areas.
If you ever find that your display seems completely different from what you’re expecting, use the View menu on the Xcode menu bar to show the toolbar, navigator, or any other pieces that have gone missing.
The navigator can operate in many different modes, from navigating your project files to searching results and error messages. The modes are changed using the icons immediately above the navigator content area. The folder icon shows the project navigator and is where you’ll spend most of your time.
The project navigator displays a top-level icon representing (and named after) your project; this is the project group. You can use the disclosure arrow in front of the project group to open and show the files and groups that make up your application. Let’s take a look at the HelloXcode project we created a few minutes ago.
In Xcode, expand the HelloXcode project group in the project navigator. You’ll see four folders associated with the application, as highlighted in Figure 2.5.
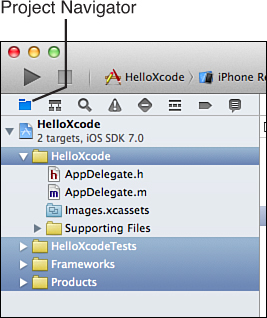
FIGURE 2.5 Use the project navigator to browse your project resources.
Note
The folders you see in Xcode are logical groupings. You won’t necessarily find all these files in your project directory, nor will you find the same folder structure. The Xcode layout is designed to help you find what you’re looking for easily, not to mirror a file system structure.
Within the project group are four subgroups:
If you dig a bit further, you’ll find a Supporting Files group within the Project Code folder. This contains files that, although necessary for your application to work correctly, are rarely edited by hand. You’ll also notice a folder icon labeled Images.xcassets. This is an asset catalog, which we cover in depth in a few minutes.
Tip
If you find that you want additional logical groupings of files, you can define your own groups via File, New, New Group. Some people, for example, like to keep images, icons, and other files grouped in a Resources group.
Even though the Apple iOS application templates give you a great starting point for your development, you’ll find, especially in more advanced projects, that you need to add additional code files to supplement the base project. To add a new file to a project, first highlight the group you want to add the file to (usually the project code group). Next, choose File, New or click the + button located at the bottom-left corner of the navigator. In an interface similar to the project templates, Xcode prompts you, as shown in Figure 2.6, for the category and type of file that you want to add to the project. You are fully guided throughout this book, so don’t worry if the options in the figure look alien at first.
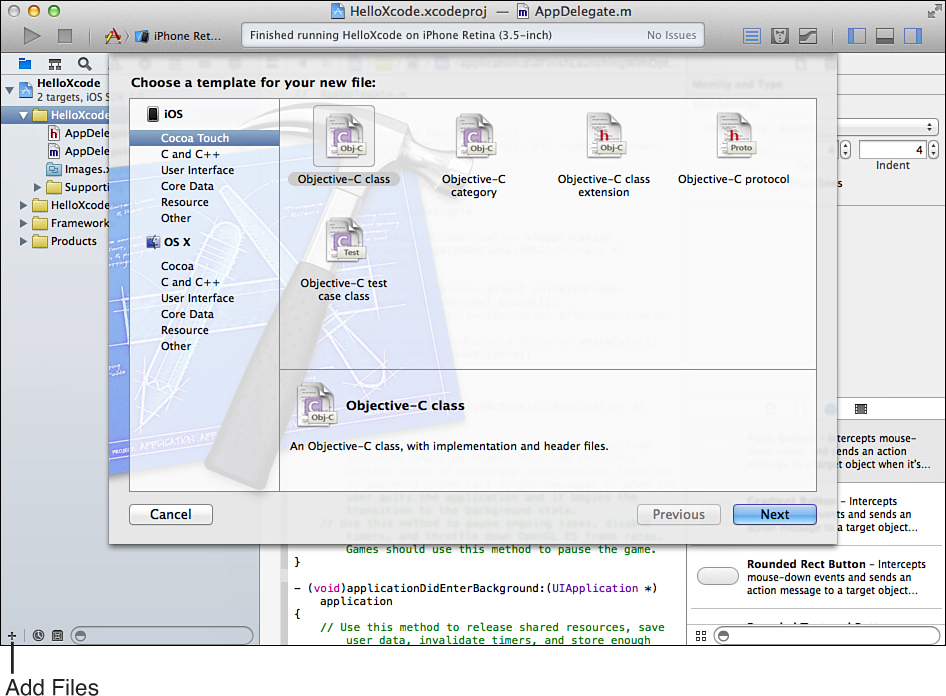
FIGURE 2.6 Use Xcode to add new files to a project.
Many applications will require sound or image files that you’ll integrate into your development. Obviously, Xcode can’t help you “create” these files, so you’ll have to add them by hand. To do this, just click and drag the file from its location into the project code group in Xcode. You are prompted to copy the files. Always make sure the Copy check box is selected so that Xcode can put the files where they need to go within your project directory.
In the provided HelloXcode project folder that corresponds with what you’re building this hour, you’ll find a Resources folder containing the file Test.wav. Drag this file into your project code group within the Xcode navigator. Choose to copy if needed, as shown in Figure 2.7. Copying the files ensures that they are correctly placed within your project and accessible by your code.
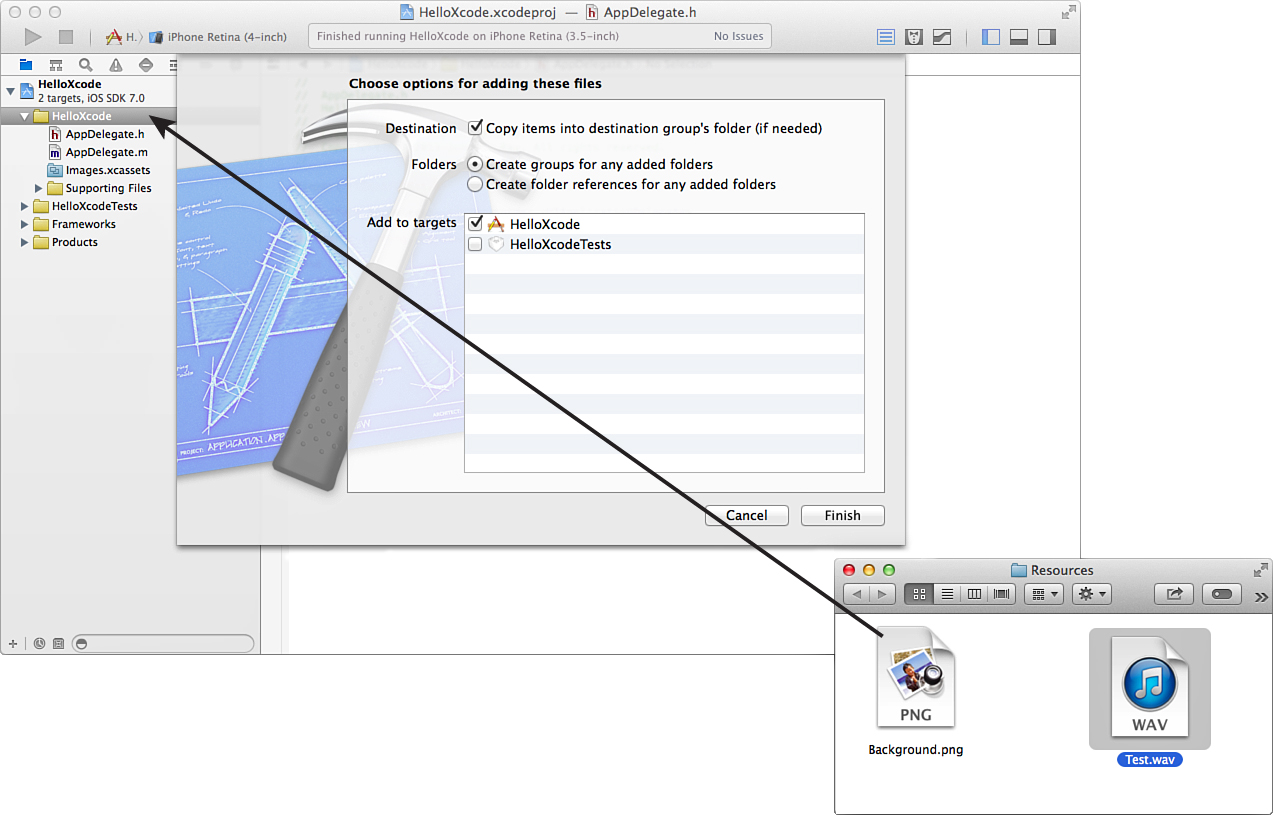
FIGURE 2.7 Drag the Test.wav file into the project code folder and choose to copy if needed.
Tip
If you drag a folder with multiple files into your project, Xcode, by default, automatically creates a group containing all the files.
If you’ve added something to Xcode that you decide you don’t want, you can delete it easily. To remove a file or resource from your project, simply select it within the project navigator and press the Delete key. Xcode gives you the option to move the file to the Trash or just to delete the project’s reference to the file (see Figure 2.8).
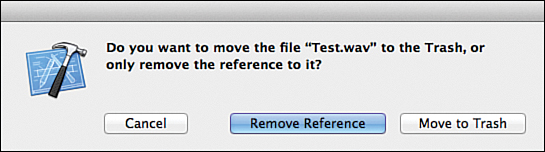
FIGURE 2.8 Deleting a file’s reference leaves the actual file untouched.
If you choose to delete references, the file itself will remain but will no longer be visible in the project.
Note
If Xcode can’t find a file that it expects to be part of a project, that file is highlighted in red in the Xcode interface. This might happen if you accidentally use the Finder to delete a file from the project folder. It also occurs when Xcode knows that an application file will be created by a project but the application hasn’t been generated yet. In this case, you can safely ignore the red .app file within the Products group.
Starting in Xcode 5, Apple has provided a new (and better) method to managing your PNG image resources. Although you can still add them to your project using the method we just covered, I recommend taking advantage of Xcode asset catalogs. Asset catalogs provide a central location for storing and managing all of your project’s images (from your application icons to your UI graphics).
Asset catalogs offer two features “above and beyond” just dragging an image folder into Xcode. First, they provide a nice clean interface for defining Retina and non-Retina images. Second, images in an asset catalog can be “sliced,” which is Apple’s term for defining areas of an image that can be resized if the image is stretched. We put that feature to the test in Hour 7, “Working with Text, Keyboards, and Buttons.”
All projects created in Xcode 5 include a default asset catalog named Images.xcassets. If you open an older project, or have a need to create multiple asset catalogs (different images for iPad versus iPhone, for example), you can add a new asset catalog by choosing File, New from the menu bar and then selecting the Resource category and Asset Catalog from the New File dialog, as shown in Figure 2.9.
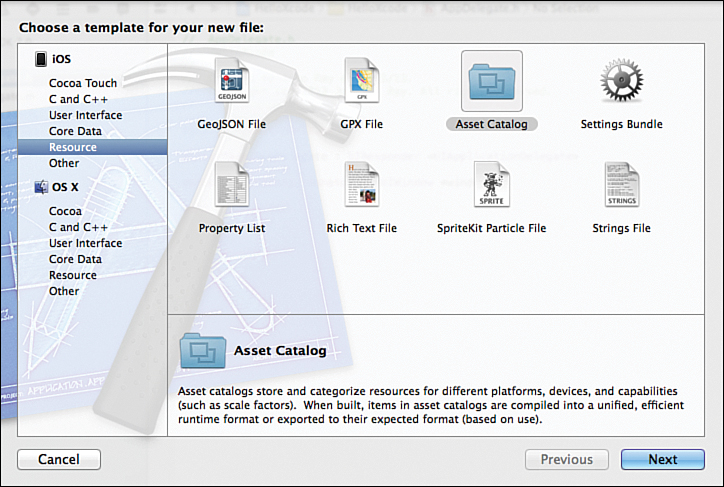
FIGURE 2.9 Create a new asset catalog, if needed. All Xcode 5+ projects already include an asset catalog.
To view the contents of an asset catalog, select the asset catalog (usually Images.xcassets) in the project navigator. Your screen will refresh to show a column of image names on the left of the content area. Selecting an entry in the list displays it on the right. You’ll notice there are two items already in the list by default: AppIcon and LaunchImage. These are special placeholders for your application icons and launch images (the graphics displayed as an application is launching); we come back to these later this hour.
For now, let’s concentrate on how we add new content to the catalog. Our HelloXcode project relies on the file Background.png found in the Resources folder within this hour’s Projects folder. We’ll get our feet wet by adding this file to the asset catalog:
1. Open the Resources folder containing the Background.png file in the Finder.
2. Select the Images.xcassets file in your HelloXcode project navigator.
3. Drag Background.png into the left column of the asset catalog, as shown in Figure 2.10.
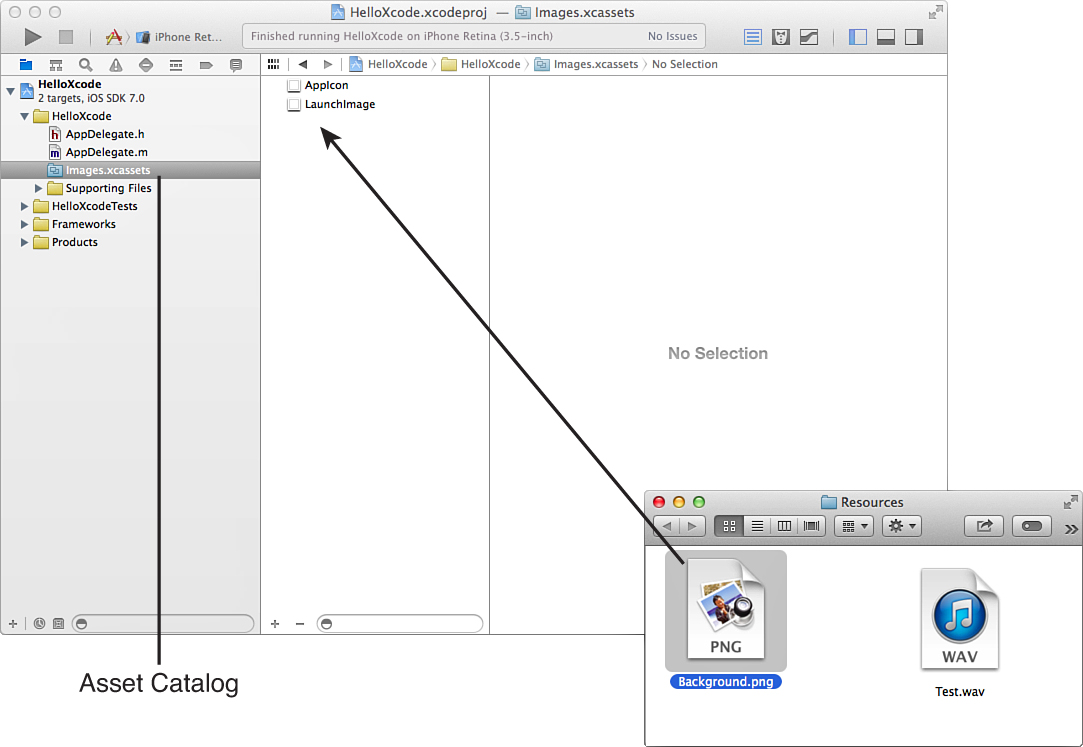
FIGURE 2.10 Drag from the Finder into the asset catalog list. The new item will be added.
You’re done. No prompting to make copies, nothing. You’ve added your first image to an asset catalog.
For the projects throughout the book, this is the method we’ll be using to add images to our projects. In the tutorials, I usually add multiple files by dragging the whole folder into the asset catalog; doing so adds a group to the catalog list, making organization a cinch.
Tip
If you’re more into point-n-click versus click-n-drag, you can use the + and − buttons at the bottom of the asset catalog entry list to add (+) or remove (−) entries.
Caution: JPEG No More
If you’re a fan of JPEG images, it’s time to switch to PNG. Although Objective-C works just fine with many image formats, Apple is focusing on PNG for the asset catalogs. Try as you might, you won’t be able to add a JPEG.
After you add an image to their asset catalog, you’ll notice something interesting when you view it in the catalog: there are spots for two images, one labeled 1x and the other 2x, as shown in Figure 2.11. These represent non-Retina (1x) and Retina (2x) graphics.
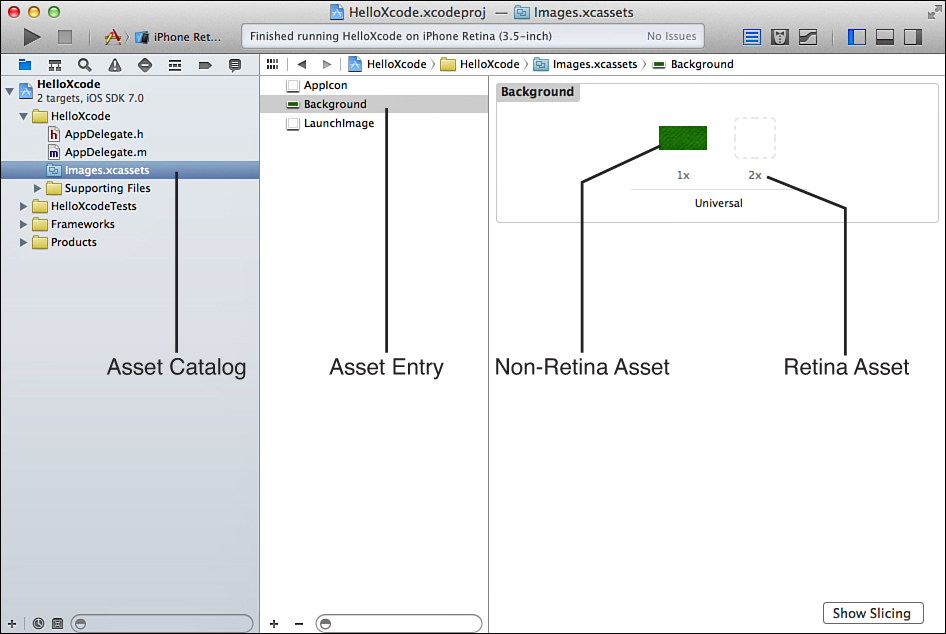
FIGURE 2.11 Asset catalogs track both Retina and non-Retina versions of images.
Tip
When you reference an image in your code, you’ll always refer to the non-Retina name (for example, what you see listed as the image name in the asset catalog). iOS automatically substitutes the Retina version of the image into your application as it runs. In other words, you don’t need to do anything special to use the right image at the right time. Just add your images into the asset catalog, make sure that both the 1x and 2x images are defined, and reference the image using the name shown in the left-hand column of the catalog.
Retina graphics are twice the vertical and horizontal resolution of non-Retina images (hence 2x). Although they are two separate graphic files, they are presented under a single image name in the asset catalog. If you add an image into a catalog, and then want to add the corresponding Retina image, just drag the image into the 2x spot. The asset catalog does the rest.
Apple requires that all applications include Retina resources, so you want to consider that when creating application graphics. Retina images are usually named with a @2x prefix. A Retina version of the Background.png image would be named Background@2x.png, for example. Although naming isn’t important if you’re using an asset catalog and adding images by dragging them into the 2x spot, using the Retina-naming convention ensures that the Retina and non-Retina images are properly paired up if you drag them into the asset catalog together.
Enough about images. Let’s move on to editing code.
To edit code in Xcode, just use the project navigator to find the file you want to edit, and then click the filename. The editable contents of the file are shown in the editor area of the Xcode interface (see Figure 2.12).
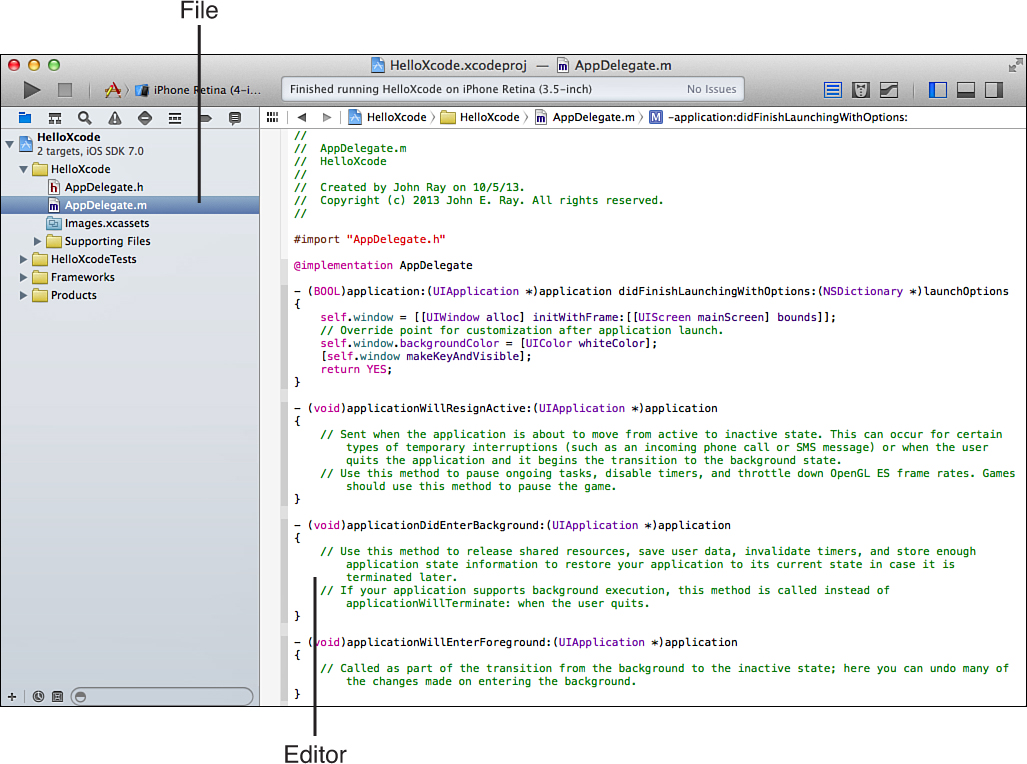
FIGURE 2.12 Choose the group, then the file, and then edit.
The Xcode editor works just like any text editor, with a few nice additions. To get a feel for how it works, open the project code group within the HelloXcode project, and then click AppDelegate.m to begin editing the source code. Notice that above the editor is a visual path to the file you are editing. Clicking any portion of the path reveals a pop-up menu for quickly jumping to other files in same location. To the left of the path are forward and back arrows that move back and forth between files that you’ve been editing, just like pages you visit in a web browser.
For this project, we use an interface element called a label to display the text Hello Xcode on your device’s screen. This application, like most that you write, uses a method to show our greeting. A method is just a block of code that executes when some thing needs to happen. In this example, we use an existing method called application:didFinishLaunching WithOptions that runs as soon as the application starts.
The easiest way to find a method or property within a source code file is to use the symbol navigator, opened by clicking the icon to the immediate right of the project navigator. This view, shown in Figure 2.13, enables you to expand your project classes to show all the methods, properties, and variables that are defined. Choosing an item from the list jumps to and highlights the relevant line in your source code.
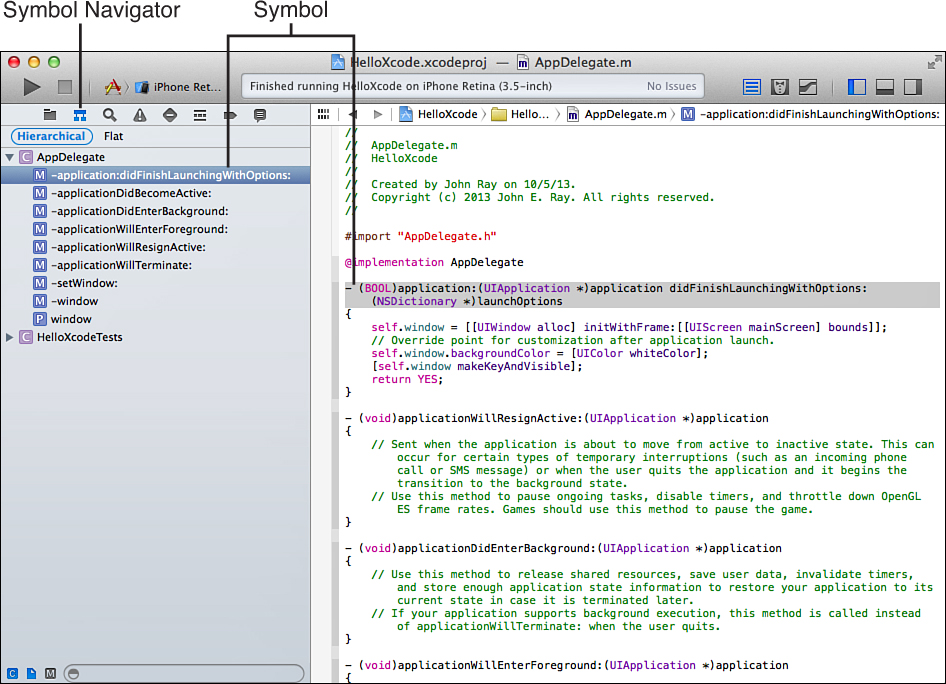
FIGURE 2.13 The symbol navigator is a quick way to jump between methods and properties.
Tip
When you are editing a file, the visual path above the editor ends in the symbol label where your cursor is currently located (if any). Clicking this label displays a list of the symbols defined in code you are working on, and choosing one jumps to that section of code.
Switch to the symbol navigator and expand the AppDelegate item. This is the only object used in this application. Next, find and select application:didFinishLaunchingWithOptions from the list that is displayed. Xcode jumps to the line where the method begins. Let’s start coding.
Caution: Haste Makes Waste
If you decide to skip ahead and run this application, you’ll quickly realize that the code you entered is not going to work. Some errors have been intentionally included here that you correct later this hour.
Note
It’s not important to understand exactly what this code does—at this point, you just need to get experience in the Xcode editor. The “short and sweet” description of this fragment, however, is that it creates a label object reading "Hello Xcode" in the upper-left corner of the screen; sets the label’s text, font, size, and color; and then adds it to the application’s window. As a final step, once the "Hello Xcode" message is displayed onscreen, the application also logs a message ("Hello Xcode (again)") to the debugger area in Xcode.
Using the Xcode editor, type the following text to implement the application:didFinish LaunchingWithOptions method. Start a new line immediately following the line with the text //Override point for customization after application launch (a comment). You need to enter just the bolded code lines shown in Listing 2.1.
LISTING 2.1 Your First Code Exercise
- (BOOL)application:(UIApplication *)application didFinishLaunchingWithOptions:
                       (NSDictionary *)launchOptions
{
    self.window = [[UIWindow alloc] initWithFrame:[[UIScreen mainScreen] bounds]];
    // Override point for customization after application launch.

    UILabel *myMessage;
    UILabel *myUnusedMessage;
    myMessage=[[UILabel alloc]
               initWithFrame:CGRectMake(30.0,50.0,300.0,50.0,50.0)];
    myMessage.font=[UIFont systemFontOfSize:48.0];
    myMessage.text=@"Hello Xcode";
    myMessage.textColor = [UIColor colorWithPatternImage:
                           [UIImage imageNamed:@"Background"]];
    [self.window addSubview:myMessage];
    self.window.rootViewController=[UIViewController new];
    NSLog(@"Hello Xcode (again)");

    self.window.backgroundColor = [UIColor whiteColor];
    [self.window makeKeyAndVisible];
    return YES;
}
As you type, you should notice something interesting happening. As soon as you get to a point in each line where Xcode thinks it knows what you intend to type, it displays an autocompleted version of the code, as demonstrated in Figure 2.14.
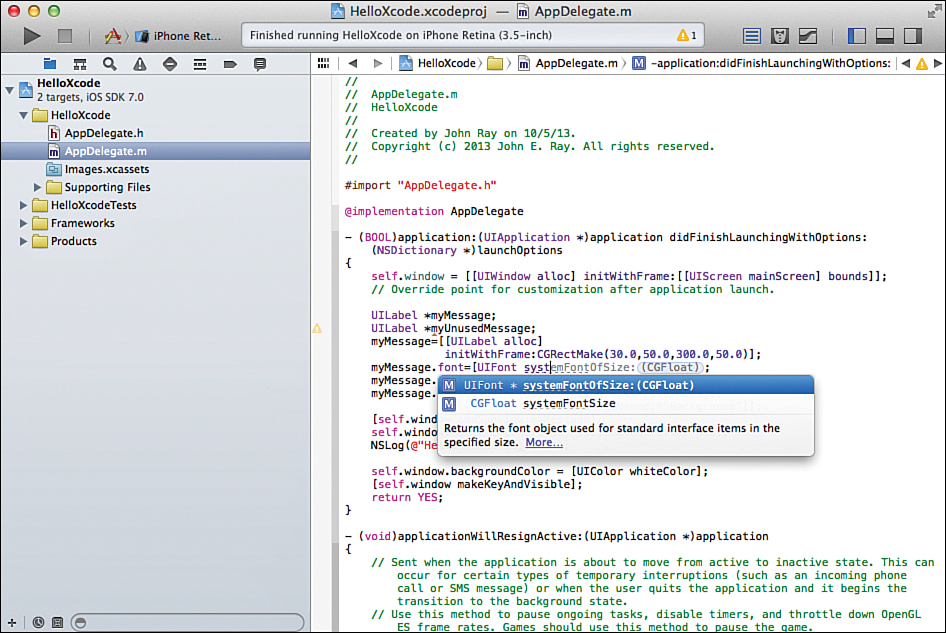
FIGURE 2.14 Xcode automatically completes the code as you type.
To accept an autocompletion suggestion, press Tab, and the code will be inserted, just as if you typed the whole thing. If there are multiple possible outcomes for the autocomplete line, you can arrow up and down to select the one you want and then press Tab. Xcode tries to complete method names, variables that you’ve defined, and anything else related to the project that it might recognize.
If you are completing a method name, chances are that you need to provide parameters as well. (In the case of systemFontOfSize, it is a floating-point value that describes the size of the text.) You can again use the arrow keys to move between the parameter fields and enter the values you want, or you can just press Tab to skip from parameter to parameter.
After you’ve made your changes, you can save the file by choosing File, Save.
Note
In addition to automatically completing your code, Xcode automatically inserts the complementary curly brace or square bracket when you type the first bracket. In other words, if you type {, Xcode automatically adds a corresponding } for you. You can disable this behavior in the Xcode Text Editing preferences (Xcode, Preferences, Text Editing, Editing).
Searching for text anywhere in your project is trivial using the search navigator. To access this search feature, click the magnifying glass icon in the icon bar above the navigator. A search field is displayed at the top of the navigator area where you can enter whatever you want to find. Press Return to show the results, as shown in Figure 2.15. Click the button under the search term to change the scope of the search, which is initially set to In Project (searching all files within the project). Use the menu to the right of the Search Scope button to choose whether the search is case sensitive.
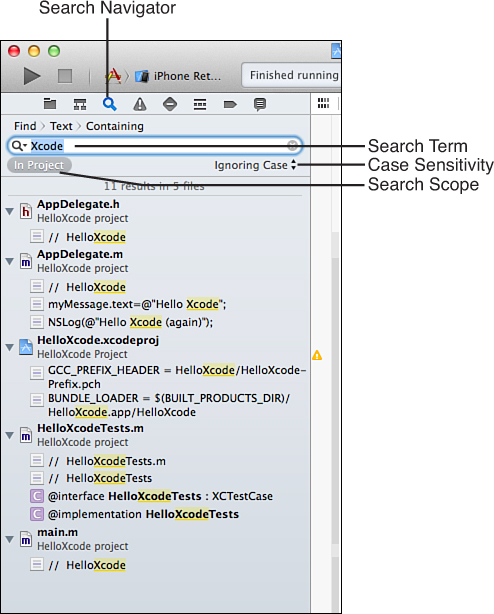
FIGURE 2.15 Use the search navigator to find text throughout your project.
The search results display below the search field, along with a snippet of the file containing the text you were looking for. Clicking a search result opens the corresponding file in the editor and jumps to the line containing your search string.
To make things even more interesting, you can use the filter field at the bottom of the search navigator to filter your search results by a secondary term. You can also click the Find label at the top of the search navigator to switch to a Replace mode—enabling you to perform project-wide find and replace.
Tip
If you’re looking for a string within a file you are actively editing, choose Edit, Find (Command-F) to open a more traditional Find field at the top of the editor. This gives you quick access to find (or find/replace) within a given file, rather than across the entire project.
Sometimes navigating code by symbols or with a search isn’t very efficient. To help denote important pieces of code in plain English, you can insert a #pragma mark directive. Pragma marks do not add any features to your application; instead, they create logical sections within your code. These sections are then displayed, with the rest of the code symbols, when you click the last item in the visual path above the editor.
There are two common types of pragma marks:
#pragma mark -
and
#pragma mark <label name>
The first inserts a horizontal line in the symbol menu; the second inserts an arbitrary label name. You can use both together to add a section heading to your code. For example, to add a section called “Methods for handling background operations” followed by a horizontal line, you could type the following:
#pragma mark Methods for handling background operations
#pragma mark -
After the pragma mark has been added to your code and saved, the symbol menu updates accordingly, as shown in Figure 2.16. Choosing a pragma mark from the symbol menu jumps to that portion of the code.
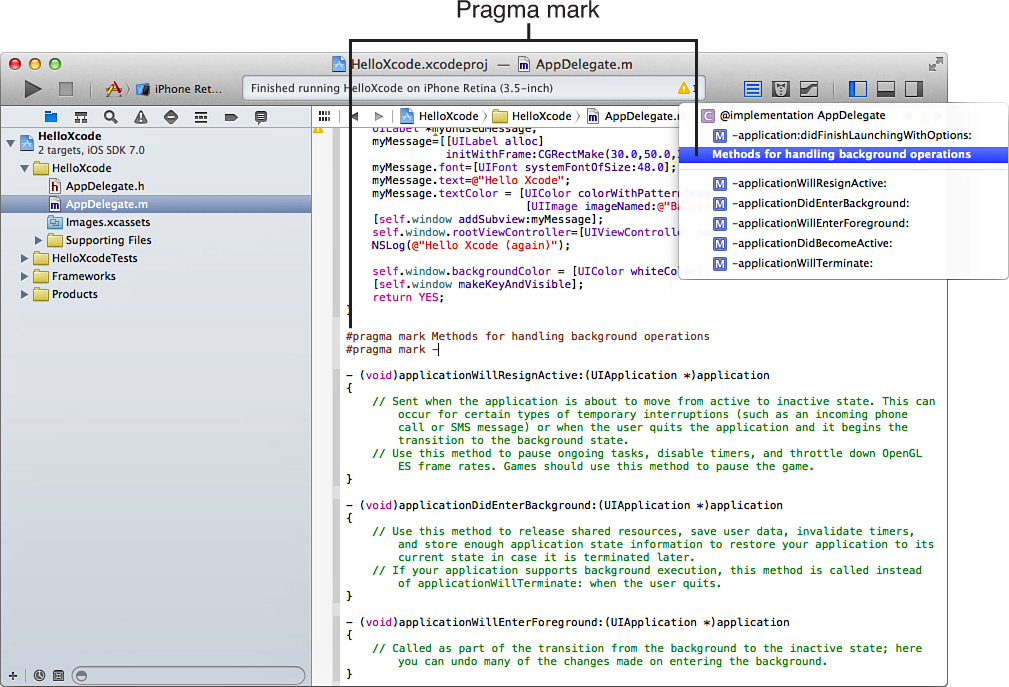
FIGURE 2.16 Pragma marks can create logical divisions in your code.
For those lucky enough to have large monitors, you can take advantage of Xcode’s assistant editor mode. In the next hour, you learn about the different files you need to edit to create working programs. What you’ll quickly realize is that most program functionality comes from editing one of two related files: an implementation file (.m extension) and an interface file (.h extension). You’ll also learn that when you make changes to one of these two files you often need to make changes to the other.
Xcode simplifies this back-and-forth editing with the assistant editor mode. The assistant editor (or called just assistant in Apple documentation) automatically looks at the file you have opened for editing and opens, right beside it (or under it, if you prefer), the related file that you also need to work on, as shown in Figure 2.17.

FIGURE 2.17 The assistant editor opens related files to the right of the file you are working on.
Note
In the upper-right corner of the assistant editor’s jump bar, notice a + icon and an X icon. The + icon adds another assistant editor to your screen; the X icon closes the current assistant editor.
Use the View, Assistant Editor menu to choose how the editor is added to the display and what will happen if multiple assistant editors are in use.
To switch between standard and assistant editor modes, you use the first and second buttons, respectively, in the Editor section of the Xcode toolbar.
Tabbed editing is just like tabbed browsing in your favorite web browser. Using tabbed editing, you can have many files open simultaneously and switch between them by clicking tabs at the top of the editor area.
To create a new tab, choose File, New, New Tab (Command-T). A new tab appears with the contents of the file you are currently editing. You can switch the contents of the tab to whatever you want by clicking a file in the project navigator. You can repeat this process to create as many tabs as you want, with whatever file contents you want, as shown in Figure 2.18.
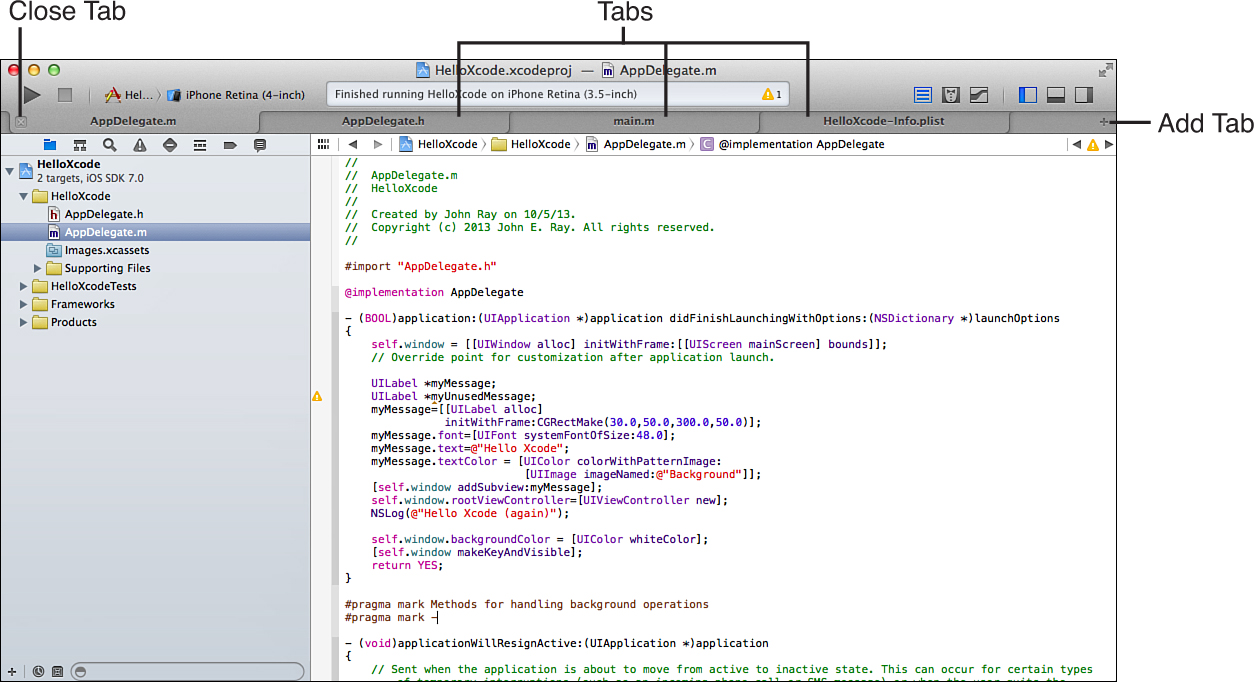
FIGURE 2.18 Keep multiple editors open simultaneously with tabs.
To close a tab, click the X that is displayed on the left side of the tab when hovering over it with your mouse. As with all files in Xcode, the files you edit in tabs are automatically saved when you close them; you do not have to explicitly use the Save command.
If you’re planning to make many changes to your code and you’re not quite sure you’ll like the outcome, you might want to take advantage of the Xcode “snapshot” feature. A code snapshot is, in essence, a copy of all your source code at a particular moment in time. If you don’t like changes you’ve made, you can revert to an earlier snapshot. Snapshots are also helpful because they show what has changed between multiple versions of an application.
To take a snapshot, choose File, Create Snapshot. You are prompted for a name of the snapshot and for a description, as shown in Figure 2.19. Provide appropriate input, and then click Create Snapshot. That’s it.
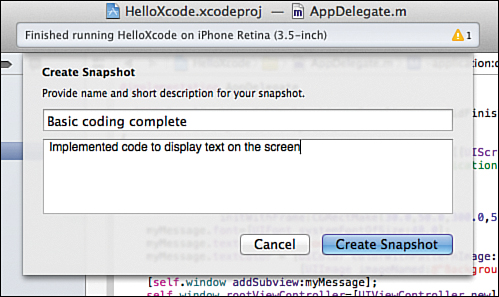
FIGURE 2.19 Create a snapshot of your project at any point in time.
To view (and possibly restore) an available snapshot, choose File, Restore Snapshot. The snapshot viewer displays available snapshots. Choose one, and then click Restore. Don’t worry; it won’t restore just yet. The display updates to show the files that changed between your current code and the chosen snapshot. Clicking a filename (if more than one has changed) shows the snapshot code on the left and the current code on the right, highlighting changes between the different versions of code, as shown in Figure 2.20.
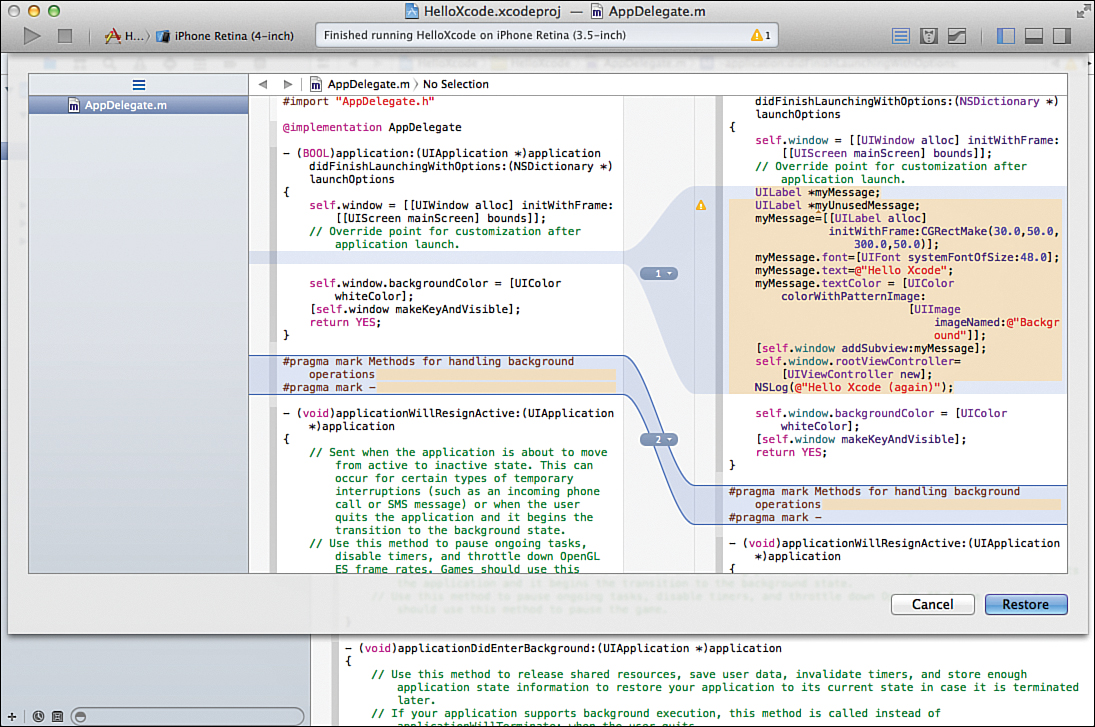
FIGURE 2.20 Use a snapshot to figure out what changes you’ve made among different versions of your application. Here a snapshot of the original empty project is compared to the current version.
If, after viewing the changes, you still want to restore to the selected snapshot, make sure the files you want to restore are checked in the file list, and then click the Restore button. Click Cancel to return to the editor without making any changes.
Video 2.2—Using Snapshots
Tip
Xcode snapshots are a limited form of version control. Xcode also includes the GIT version control system and Subversion support. We do not use these tools in this book because the snapshot support is more than enough for most small to medium-size projects.
After you’ve completed your source code, it’s time to build and run the application. The build process encompasses several different steps, including compiling and linking. Compiling translates the instructions you type into something that your iOS device understands. Linking combines your code with the necessary frameworks the application needs to run. During these steps, Xcode displays any errors that it might find.
Before building an application, you must first choose what it is being built to run on: the iOS Simulator or a physical iDevice.
To choose how your code will be built, use the Scheme pop-up menu at the upper left of the Xcode window. This pop-up menu is actually two separate menus in one, depending on which side you click. Click to the right side of the Scheme menu to display the possible devices that can be targeted in the build process, as shown in Figure 2.21.
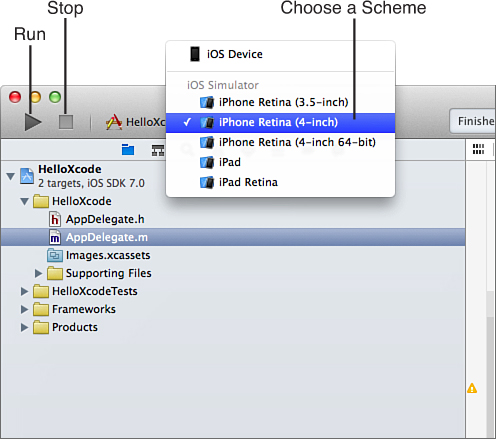
FIGURE 2.21 Change the scheme to target an iOS device or one of the variants of the iOS Simulator.
Choose between iOS Device (your physical iPhone or iPad) and the iOS Simulator devices. For most day-to-day development, you’ll want to use the Simulator; it is faster than transferring an application to your device each time you make a simple change.
Note: 64-Bit iOS Devices
When choosing a device, you’ll see 64-bit options displayed for Apple’s latest and greatest A7 processors. Xcode automatically creates 64-bit code for you, so you don’t have to do anything different to target these processors unless you are using advanced mathematical functions or manipulating memory directly. We do a lot in this book, but we never even come close to encountering 64-bit specific considerations.
By default, the schemes that you use to run your application run it with a debugger. This helps identify problems in your application by allowing you to trace its execution. For applications you intend to submit to the App Store, switch to a release configuration. You learn more about debugging in Hour 24, “Application Tracing, Monitoring, and Debugging.”
To build and run the application, click the Run icon on the Xcode toolbar (Command-R) (visible in Figure 2.21). Depending on the speed of your computer, this run process might take a minute or two to complete. Once done, the application is transferred to your iOS device and started (if selected in the scheme menu and connected) or started in the chosen iOS Simulator.
To just build without running the application (useful for checking for errors), choose Build (Command-B) from the Product menu. Better yet, you can choose Product, Analyze (Command-Shift-B) to locate build errors and identify potential issues with your application logic that wouldn’t stop the code from building but might crash your program.
Tip
Quite a few intermediate files are generated during the build process. These take up space and aren’t needed for the project itself. To clean out these files, choose Clean from the Product menu.
Figure 2.22 shows the HelloXcode application running in the iOS Simulator. Try clicking the run icon on the Xcode toolbar to build and start your version of the application now.
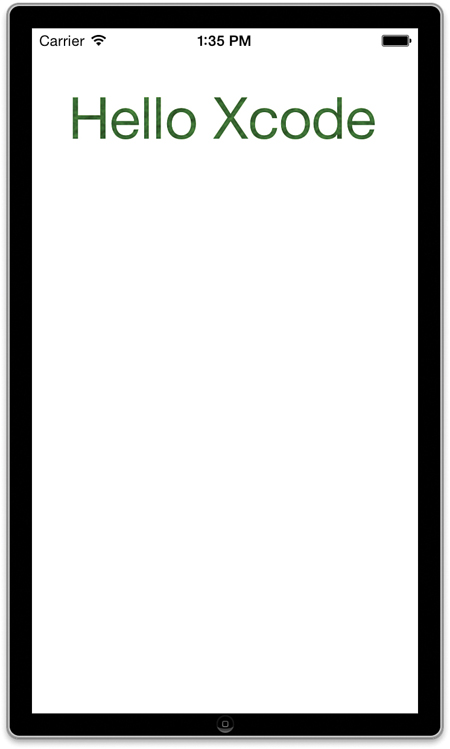
FIGURE 2.22 The iOS Simulator is a quick and easy way to test your code.
Tip
If you are in the middle of editing a file that contains errors and you attempt to build, run, or analyze the code, you’ll see the errors immediately displayed onscreen; there’s no need to jump back and forth to the issue navigator. You can also quickly cycle through your errors using the forward and backward arrows found at the rightmost side of the window, directly above the editor. These controls are visible only if there are errors, however.
If you’ve been following along, your application should... not work. There are two problems with the code you were asked to type in earlier. Let’s see what they are.
You can receive three general types of feedback from Xcode when you build and analyze an application: errors, warnings, and logic problems. Warnings are potential problems that may cause your application to misbehave and are indicated by a yellow caution sign. Errors, however, are complete showstoppers. You can’t run your application if you have an error. The symbol for an error, appropriately enough, is a red stop sign. Logic problems, found by the Xcode analyze process, are shown as a blue badge. All of these bugs, across all of your files, are consolidated in the issue navigator, shown in Figure 2.23. The issue navigator displays automatically if problems are found during a build or analyze process. You may also open it directly by clicking the exclamation point icon on the toolbar above the navigator area.
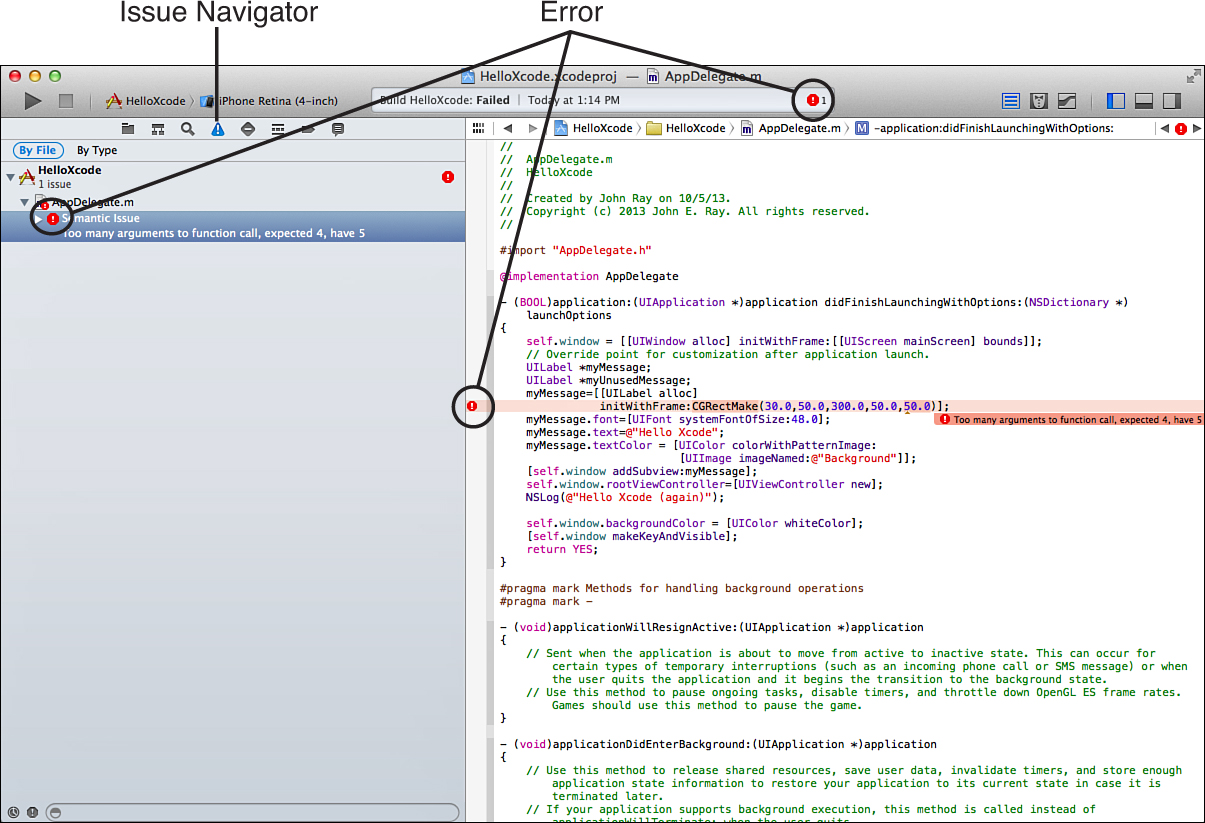
FIGURE 2.23 Use the issue navigator to find and correct problems in your code.
To jump to an error in your code, just click it in the issue navigator. The corresponding code is opened, and the error message is visible directly after the line that caused the problem.
When you first try to build the HelloXcode, you will encounter an error: “Too many arguments to function call, expected 4, have 5” (shown in Figure 2.23). The reason for this is that the function CGRectMake takes four numbers and uses them to make a rectangle for the label—we’ve typed in five numbers. Delete the fifth number and preceding comma from the CGRectMake function. Almost immediately after you fix the error, the issue navigator updates to show a new warning, as shown in Figure 2.24.

FIGURE 2.24 Some errors and warnings are detected only after you’ve solved another.
Tip
If you’ve surmised that the numbers used by CGRectMake are for positioning, you might want to try changing them to see how they control where text is displayed on your iDevice’s screen. For example, to center the text on an iPhone screen, use the values 25.0,225.0,300.0,50.0. To center the text on an iPad, try 250.0,475.0,300.0,50.0 instead. The first two values represent the distance over and down on the display that the label is positioned; the third and fourth values are the width and height of the label.
The warning points out that we have an unused variable, myUnusedMessage, in the code. Remember, this is just a helpful warning, not necessarily a problem. If we choose to remove the variable, the message goes away; but even if we don’t, the application will still run. Go ahead and delete the line that reads UILabel *myUnusedMessage; in AppDelegate.m. This fixes the warning, and the issue navigator is empty. We’re ready to run.
Click the Run icon. HelloXcode should now start in the iOS Simulator, you’ll also notice that the debugger area in Xcode appears and displays the message "Hello Xcode (again)", as shown in Figure 2.25. This is produced by the NSLog command and demonstrates where output not related to your iPhone application’s on-screen display is shown.
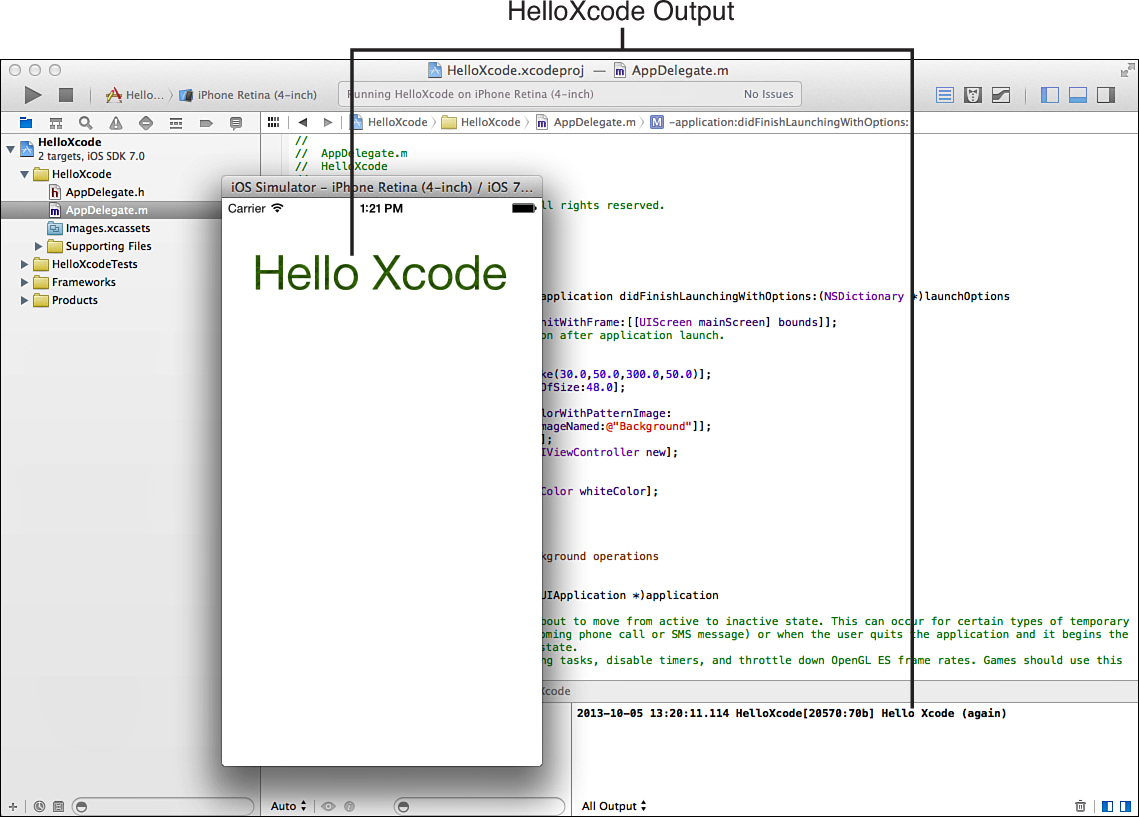
FIGURE 2.25 The HelloXcode application (finally) runs and displays output on both the iPhone screen and in the Xcode debugger area.
Note
The first time you run the iOS Simulator, you may receive a message asking whether Developer Mode should be enabled on your Mac. Enabling Developer Mode allows the simulator to run seamlessly with Xcode and forego prompting you for a password each time it starts.
Before finishing our brief tour of the Xcode interface, quickly turn your attention to something a bit different: the properties that describe a project itself. An application’s icons, launch images, supported device orientations, and so on need to be set somewhere, so where is that? The answer is the project plist file.
This file, found in a project’s Supporting Files folder, is created automatically when you start a new project, is prefixed with the project name, and ends in Info.plist. Although you can edit the values directly in the plist file, Xcode provides an easier approach. Let’s take a look at how it works.
Switch to the project navigator and click the top-level project icon for HelloXcode (the blue paper icon), and make sure that the application icon under Targets in the column to the right is highlighted. The editor area refreshes to display several tabs across the top, shown in Figure 2.26.
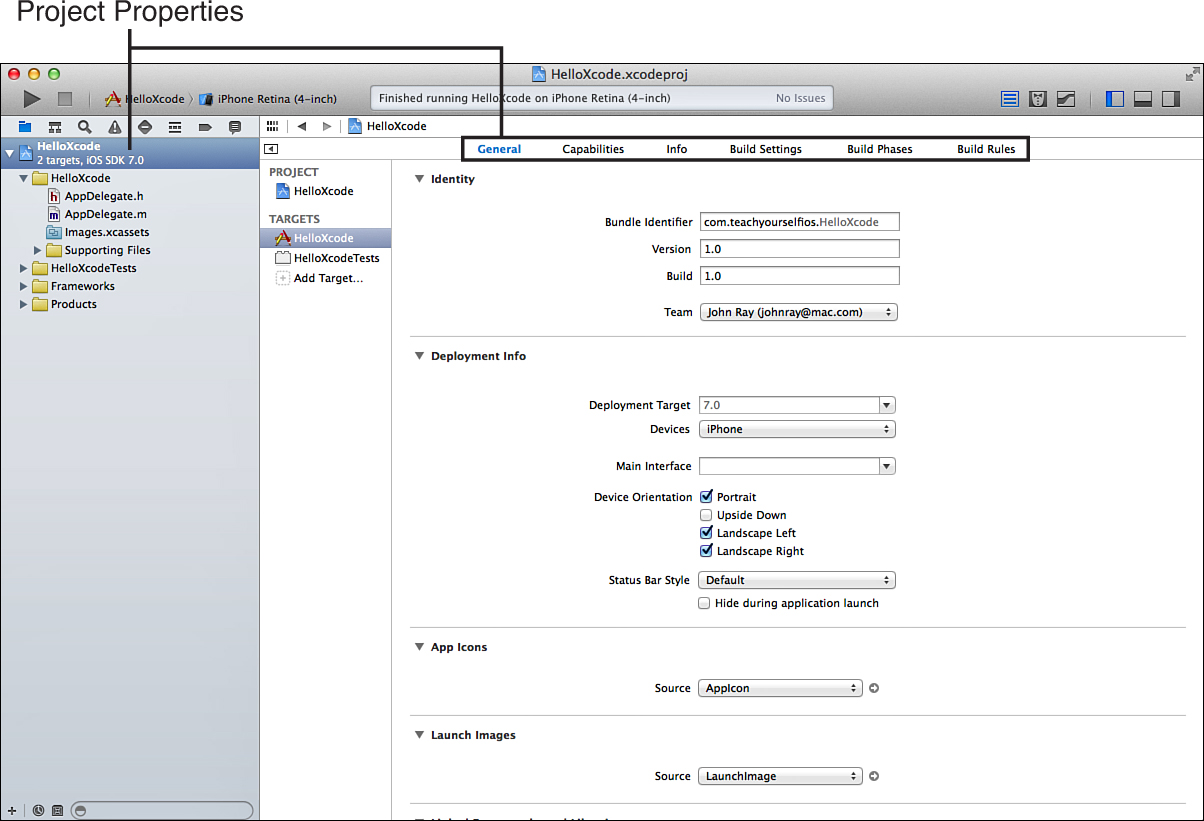
FIGURE 2.26 Project properties control a few important settings for your application.
Caution: Fix Your Bugs to Find Your Bugs!
As you’ve discovered in this exercise, sometimes not all errors are detected and displayed in the issue navigator. After fixing a line or two, you might find that new, previously undetected errors appear. Conversely, you’ll also sometimes see false errors that disappear when you correct other errors.
The first, General, allows you to set many of the project’s general attributes (version, supported devices, and so on). The second, Capabilities, gives you on/off switches to activate certain iOS application features, such as iCloud, Game Center, and Backgrounding (running in the background). Changing the settings in these two tabs is actually altering settings in your project’s plist.
The third tab (and the last mentioned for now), Info, provides direct access to the plist file itself. As you make changes in the first two tabs, you’ll see them appear in the Info tab.
As I’m sure you’re well aware, not all applications support all device orientations (portrait, landscape right, landscape left, upside down). To denote which device orientations your app will support, you can edit the Deployment Info section within the General area. Scroll down through the different sections until you see the Deployment Info section. Use the disclosure arrow to expand the section if needed.
Near the bottom of the Deployment Info, you’ll find settings for Supported Device Orientations. To set the orientations you plan to use, just click the corresponding check boxes beside Portrait, Upside Down, Landscape Left, and Landscape Right, as shown in Figure 2.27. To remove support for an orientation, uncheck the check box. Simple!
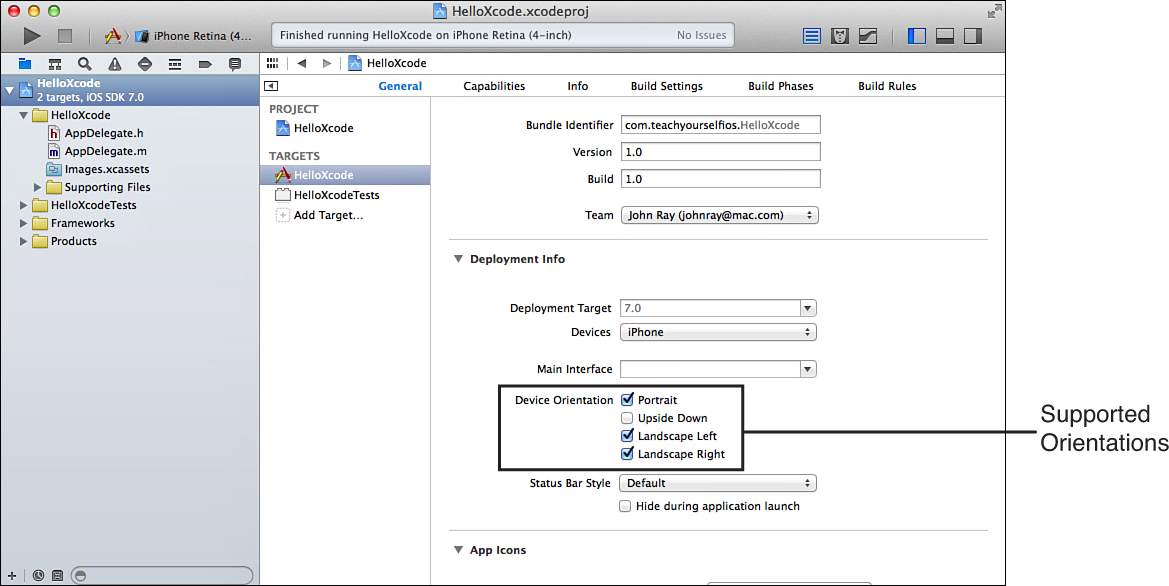
FIGURE 2.27 Choose the orientations your app will support.
Caution: It’s Not Quite That Simple
Unfortunately, just setting a device orientation doesn’t magically make your application work correctly in that orientation. It just signals your intent to make it work. You’ll still have to code for device rotation, which you learn about in Hour 16, “Building Responsive and Backward-Compatible User Interfaces.”
Immediately following the device orientation settings are the status bar settings. The status bar is the thin line with the carrier name, signal strength, and battery status at the top of an iOS device display.
If you are developing iOS 6 apps, Use the style menu to set the appearance of the status bar, or click the Hide check box to disable it entirely. In iOS 7, the status bar is configured differently (through code). We’ll see how this works later in the book.
Next up are the App Icons and Launch Images sections. The app icons are the icon files used to represent your application on the iOS home screen. Launch images, in contrast, are essentially “splash screens” that display as the application launches.
In older projects (created before Xcode 5), you may see spaces to drag and drop your image files to add them as icons or launch images. For new projects, you’ll notice a Source: AppIcon section and a Source: LaunchImage section, as shown in Figure 2.28.
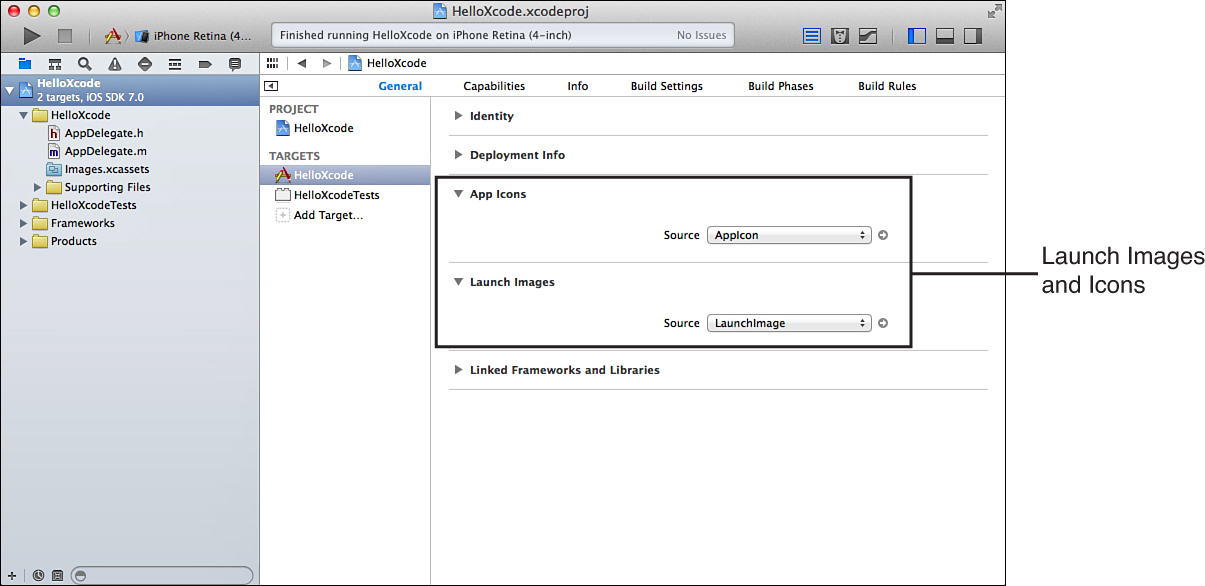
FIGURE 2.28 The source for app icons and launch images are AppIcon and LaunchImage in Xcode 5. What?!
So, what does this mean? It means that in the Xcode asset catalog that we looked at earlier, there are predefined entries named AppIcon and LaunchImage that will hold your icon and launch image files.
To set an icon, for example, follow these steps:
1. Open the asset catalog by clicking the Images.xcassets item in the project navigator.
2. Select the AppIcon entry in the Asset Catalog list on the left. On the right, Xcode refreshes the display to show placeholder spots for the different icon files you can add to your project.
3. Drag from a properly sized PNG file in the Finder into the dotted lines around the placeholder (known as an image well), as shown in Figure 2.29. Xcode copies the icon into the asset catalog and names it properly.
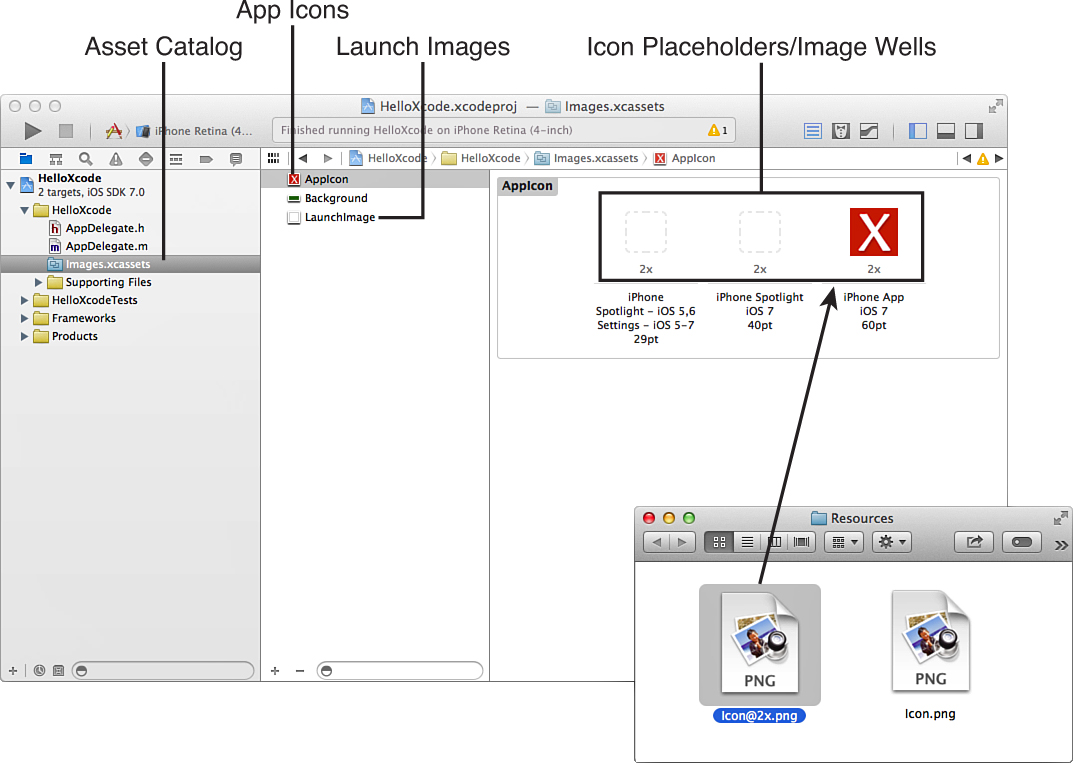
FIGURE 2.29 The asset catalog contains placeholders for all your application icons.
By default, there are three types of icons you’ll want to consider adding: Settings, Spotlight, and the App icon.
The Settings icon is what is displayed in the iOS Settings application (if your application offers settings), the Spotlight icon is displayed in iOS Spotlight search results, and the App icon is what your users will see front and center on their iDevice screen. In this book, we are worrying only about App icons; once you know how to set those, everything else should be easy.
Now, you might be wondering what a “properly sized PNG file” is. Apple has been kind enough to provide the sizes of icons in points underneath each placeholder. On non-Retina displays, a point is a pixel, but Apple also requires Retina graphics, which have twice the width and height as non-Retina. To determine the pixel size for an icon, look at the label under the placeholder in the asset catalog and note what the multiplier is (currently only 1x or 2x). You will multiply the point size by that number to get the number of pixels (height and width) for each icon. There are no “non-Retina” iPhones anymore, so all the image wells will read 2x. On iPad projects, you’ll see 1x under some of the image wells because Apple still supports non-Retina iPads.
Tip
The icons you create do not need to have rounded corners; iOS automatically styles them for you. To learn more about icon sizes and design standards for iOS, I recommend reading the iOS 7 Design Cheat Sheet, by Ivo Mynttinen: http://ivomynttinen.com/blog/the-ios-7-design-cheat-sheet/.
To make life easier, here are the application icon sizes that you need to use in your projects:
You’ll notice icon files in the archive you downloaded for this book. iPhone icon files are named Icon@2x.png. iPad files are named Icon-iPad.png and Icon-iPad@2x.png.
Launch images are set in exactly the same way as icons. Click the LaunchImage entry in the default asset catalog to see the different placeholders. Drag PNG files into the placeholder to set them.
Caution: Just for Looks
The property settings covered here are the ones that relate to how your app looks on an iDevice and in the Simulator. You’ll also learn other settings throughout this book that govern how the application runs.
Note
Note that although it isn’t covered here, Xcode includes a wonderful documentation system. You learn more about this as you start to get your feet wet with the Cocoa framework in Hour 4.
Launch images should be sized according to the full-screen resolution of the devices you’re supporting:
If you don’t provide a launch image for your application, you’ll see a black screen as it starts up. Creating launch images is left as an exercise for you, the reader.
That’s it for Xcode! There’s plenty more that you’ll find as you work with the software, but these should be the foundational skills you need to develop apps for iOS. Let’s round out this hour by looking at the next best thing to your phone: the Apple iOS Simulator.
In Hour 1, you learned that you don’t even need an iOS device to start developing for the platform. The reason for this is the iOS Simulator is included with Xcode. The Simulator does a great job of simulating the Apple iPhone and iPad, with the Safari, Photos, Contacts, Settings, Game Center, Calendar, Maps, Newsstand, and Passbook apps available for integration testing, as shown in Figure 2.30.
Video 2.3—Using the iOS Simulator
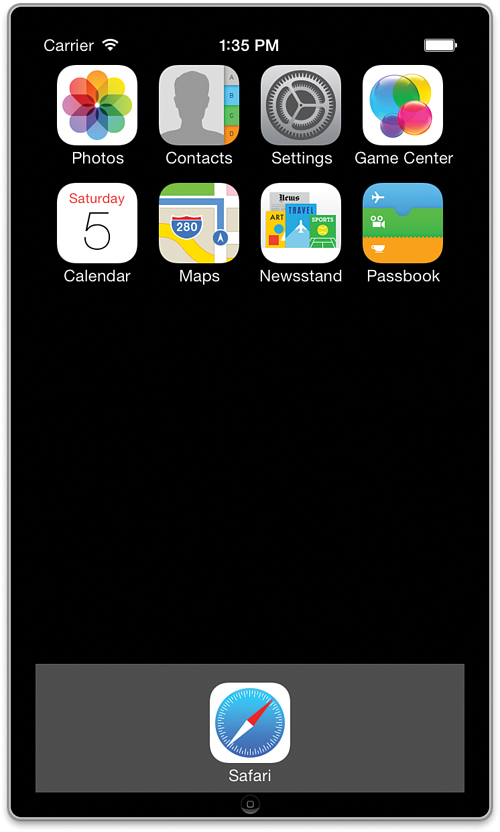
FIGURE 2.30 The iOS Simulator includes a stripped-down version of Apple’s standard iOS apps.
Targeting the Simulator for the early stages of your development can save you a great deal of time; you won’t need to wait for apps to be installed on your physical device before seeing the effects of changes in your code. In addition, you don’t need to buy and install a developer certificate to run code in the Simulator.
The Simulator, however, is not a perfect iDevice. It can’t simulate complex multitouch events or provide real readings from some sensors (gyroscope, accelerometer, and so on). The closest it comes on these counts is the ability to rotate to test landscape interfaces and a simple “shake” motion simulation. That said, for most apps, it has enough features to be a valuable part of your development process.
Caution: A Fast Mac Doesn’t Equal a Fast iPhone!
One thing that you absolutely cannot count on in the Simulator is that your simulated app performance will resemble your real app performance. The Simulator tends to run silky smooth, whereas real apps might have more limited resources and not behave as nicely. Be sure to occasionally test on a physical device so that you know your expectations are in line with reality.
Note
Launching an application in the Simulator installs it in the Simulator, just like installing an app on a real device. When you exit the app, it is still present on the Simulator until you manually delete it.
To remove an installed application from the Simulator, click and hold the icon until it starts “wiggling,” and then click the X that appears in the upper-left corner. In other words, remove apps from the Simulator in the same way you would remove them from a physical device.
To quickly reset the Simulator back to a clean slate, choose Reset Content and Settings from the iOS Simulator menu.
To launch an application in the Simulator, open the project in Xcode, make sure that the scheme is set to the iOS device of your choosing (iPad, iPhone 3.5", iPhone 4", and so on) and then click Run. After a few seconds, the Simulator launches and the application loads. You can test this using the HelloSimulator project included in this hour’s Projects folder.
Once up and running, the HelloSimulator app, shown here on the iPad Simulator, should display a simple line of text and a random image fetched from a website (see Figure 2.31).
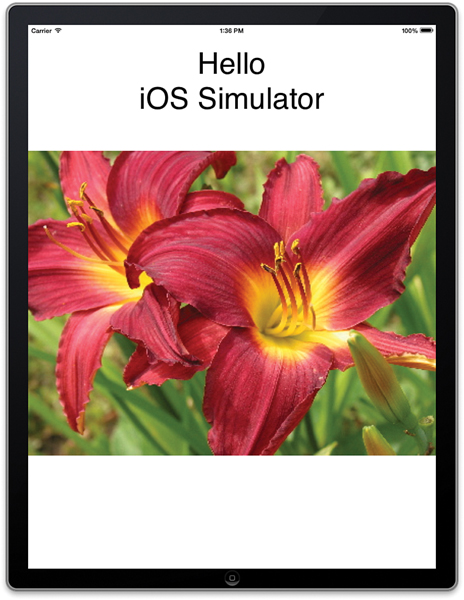
FIGURE 2.31 Click the Run button in Xcode to launch and run your application in the Simulator.
When an application is running, you can interact with it using your mouse as if it were your fingertip. Click buttons, drag sliders, and so on. If you click into a field where input is expected, the onscreen keyboard will display. You can “type” using your Mac keyboard or by clicking the onscreen keyboard’s buttons. The iOS copy and paste services are also simulated by clicking and holding on text until the familiar loupe magnifier appears.
Click the Stop button in the Xcode toolbar to exit the app. Clicking the virtual Home button (or choosing Hardware, Home from the menu) also exits the application, but Xcode itself may continue to think it’s running and get “out of sync.”
Tip
At any time, you can switch your simulated hardware to a different simulated device by making a selection from the Hardware, Device menu.
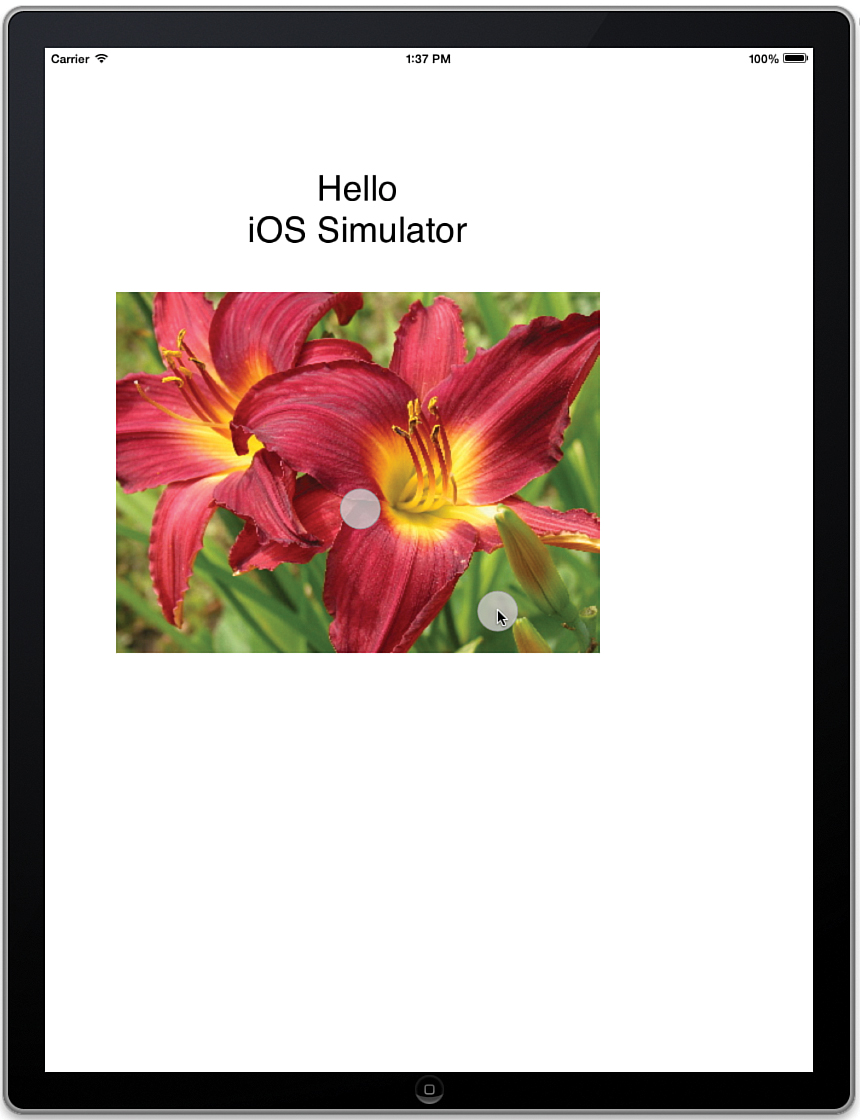
Even though you have only a single mouse, you can simulate simple multitouch events, such as two-finger pulls and pinches, by holding down Option when your cursor is over the Simulator “screen.” Two circles, representing fingertips, are drawn and can be controlled with the mouse. To simulate a touch event, click and drag while continuing to hold down Option. Figure 2.32 shows the “pinch” gesture.
Tip
To move the simulated multitouch fingertips around in the Simulator (so that you can “pinch” near the top of bottom of the screen, for example), hold down Shift while dragging them. As long as you keep Shift pressed down, you can reposition the fingertips anywhere you want.
FIGURE 2.32 Simulate simple multitouch with the Option key.
Try this using the HelloSimulator app. You should be able to use the Simulator’s multitouch capabilities to shrink or expand the onscreen text and image.
To simulate a rotation on your virtual device, choose Rotate Right or Rotate Left from the Hardware menu (see Figure 2.33). You can use this to rotate the Simulator window through all four possible orientations and view the results onscreen.
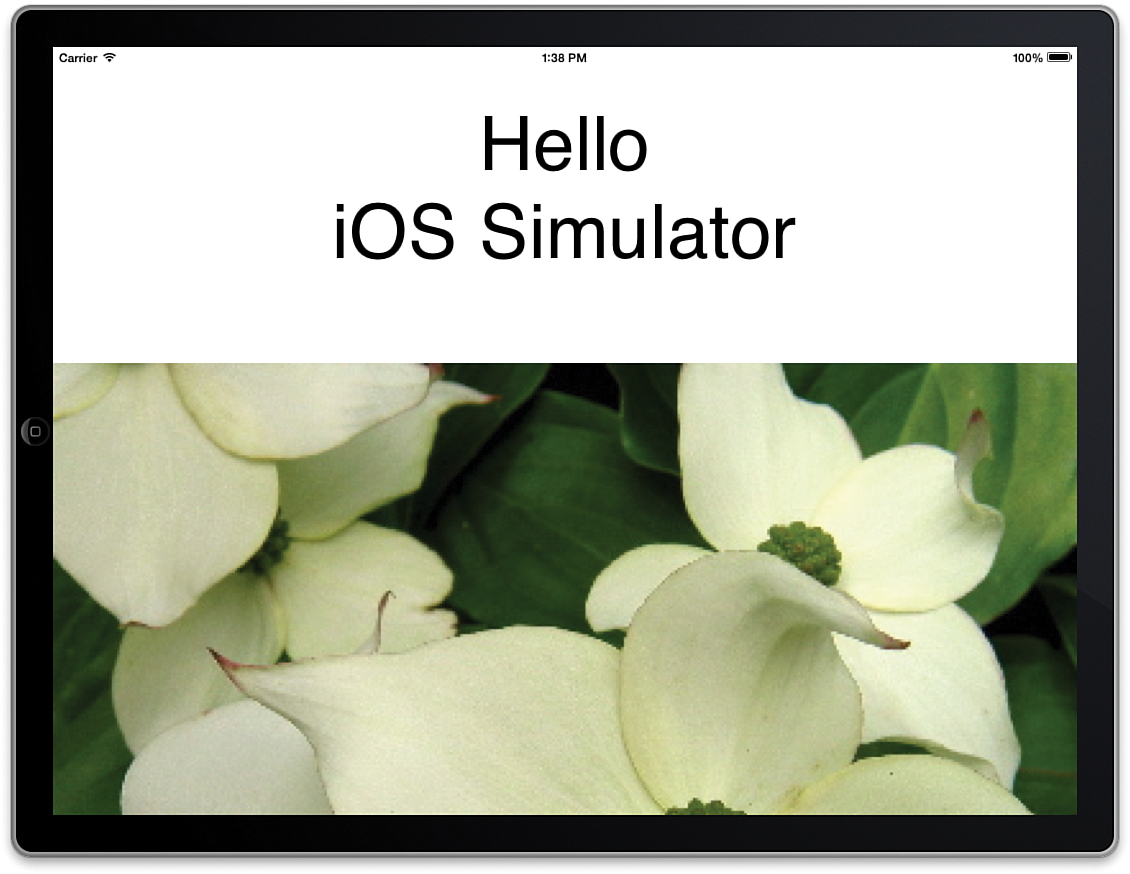
FIGURE 2.33 Rotate the interface through the possible orientations.
Again, test this with HelloSimulator. The app will react to the rotation events, orient the text properly, and fetch a new image with each rotation.
You want to test against a few other esoteric conditions in the Simulator. Using the Hardware menu, you can access these additional features:
Test a few of these on the HelloSimulator application. Figure 2.34 shows the application’s reaction to a simulated shake gesture.
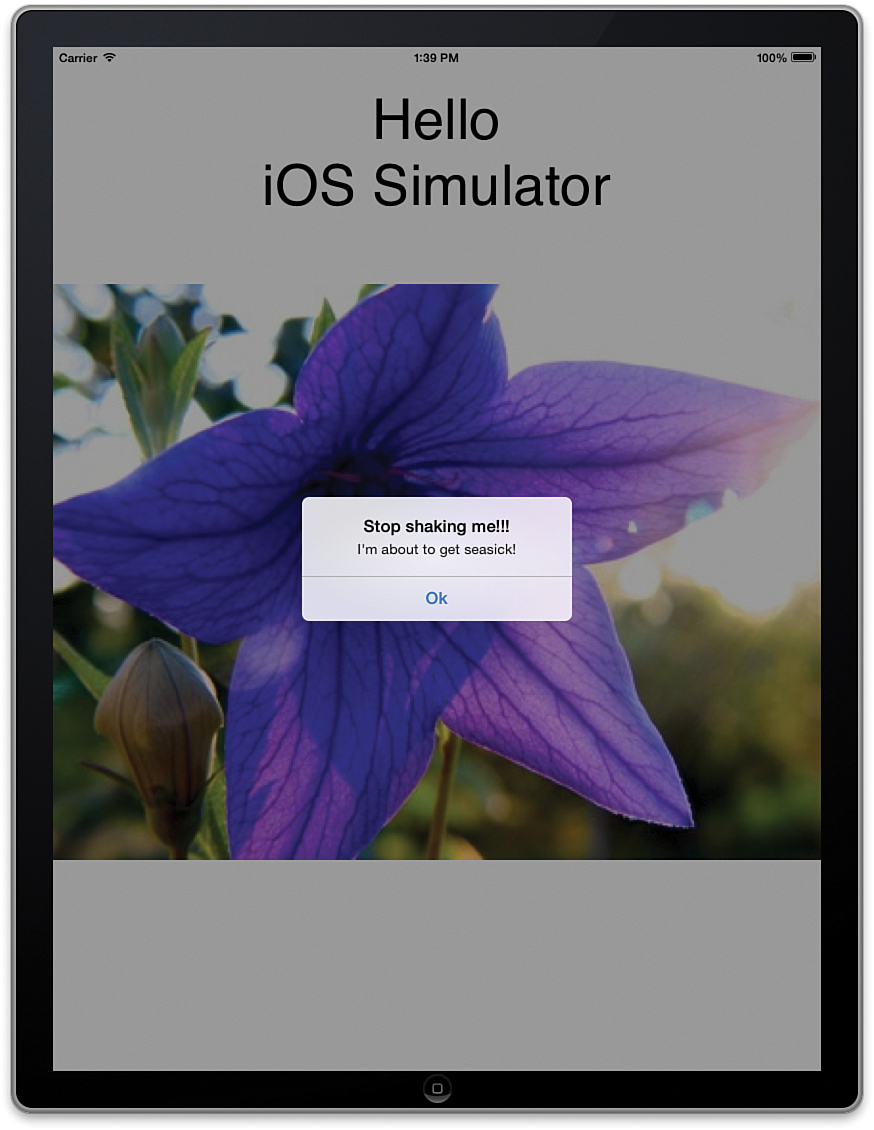
FIGURE 2.34 The iOS Simulator can test for application handling under several unique conditions.
Caution: Recover from iOS Application Crashes
If something goes wrong in your application and it crashes while running in the iOS Simulator, Xcode changes its view to show the debugger. To recover from this, use the Xcode toolbar’s Stop button to exit the application; then hide the debugger and check your work. You learn how to use the debugger to find crashing bugs in Hour 24.
You’re not quite at the stage yet where I can ask you to go off and read some code-related tutorials, but if you’re interested, you might want to take some time to look into more of the features offered in Xcode. This introduction was limited to roughly a dozen pages, but entire volumes can be (and have been) written about this unique tool. Anything else you need is covered in the lessons in this book, but you should still review Apple’s Xcode 5 Overview. You can find this document by choosing Help, Xcode Overview from the menu while in the Xcode application.
This hour introduced you to the Xcode development environment and the core set of tools that you’ll be using to create your applications. You learned how to create projects using Apple’s iOS templates and how to supplement those templates with new files and resources. You also explored the editing and navigation capabilities of Xcode that you’ll come to depend on every day. To illustrate the concepts, you wrote and built your first iOS application, and even corrected a few errors that were intentionally added to try to trip you up.
This hour finished with a walkthrough on the use of the iOS Simulator. This tool will save wear and tear on your device (and your patience) as it provides a quick and easy way to test code without having to install applications on a physical device.
Q. What is Interface Builder, and how does it fit in?
A. IB is a very important component of Xcode that gets its own lesson in Hour 5. As the name implies, Interface Builder is mostly used for creating the UI for your applications.
Q. Do I have to worry about constantly saving if I’m switching between files and making lots of changes in Xcode?
A. If you switch between files in the Xcode Editor, you won’t lose your changes. Xcode even saves your files for you if you close the application.
Q. I noticed that there are OS X templates that I can access when creating a project. Can I create a Mac application?
A. Yes, but.... All the coding skills you learn in this book can be transferred to Mac development. iOS, however, is a somewhat different piece of hardware than the Mac, so you need to learn the Mac model for windowing, UI, and so on.
Q. Can I run commercial applications on the iOS Simulator?
A. You can only run apps that you have built within Xcode.
1. Begin creating projects and navigating the Xcode Editor. Try out some of the common Editor features that were not covered in this lesson, such as Find and Replace. Test the use of pragma marks for creating helpful jump-to points within your source code.
2. Go to the Apple iOS Developer Center and download a sample application. Using the techniques described in this hour’s lesson, build and test the application in the iOS Simulator or on your device.