ColdFusion 4 Web Application Construction Kit (©QUE, 1999) ISBN: 0-7897-1809-X
Chapter 4
Administering ColdFusion
The ColdFusion Administrator is used to manage and configure your ColdFusion Application Server. The Administrator is a web based management tool that lets you use your web browser to manage all versions of ColdFusion, regardless of platform.
Using the ColdFusion Administrator
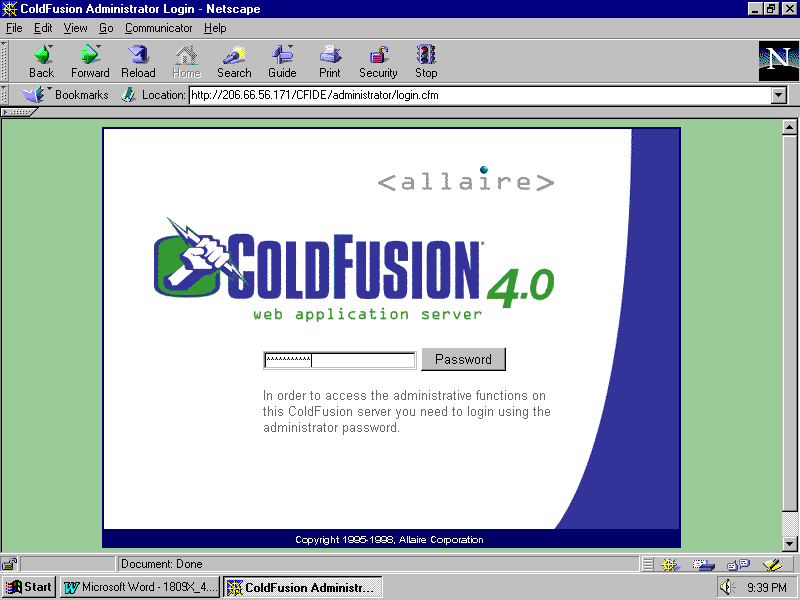
To use the Administrator, select the "ColdFusion Administrator" from the ColdFusion program group beneath the Start button’s "Programs" menu. If you have password protection enabled (it is enabled by default when ColdFusion is installed), then you’ll be presented with a login screen, like the one shown in Figure 4.1. Enter the password that you specified during the ColdFusion Application Server installation process to gain access to the Administrator for the first time.
Figure 4.1. The ColdFusion Administrator should be protected with a login password.
The ColdFusion Administrator uses a framed window interface. The left side of the screen contains a series of options divided into 6 sections, and clicking on any option displays a relevant configuration screen on the right.
The rest of this chapter discusses each of these sections and options.
Using the "Server" Options
The Server options are used to manage global settings and configuration parameters that effect the behavior of all ColdFusion applications running on this server. Many of these options may be overridden by application specific settings specified using the <CFAPPLICATION> tag within your application.
Settings
The Settings screen (shown in Figure 4.2) allows you to configure the ColdFusion Application Server. When you have made your changes, click the Apply button to save them.
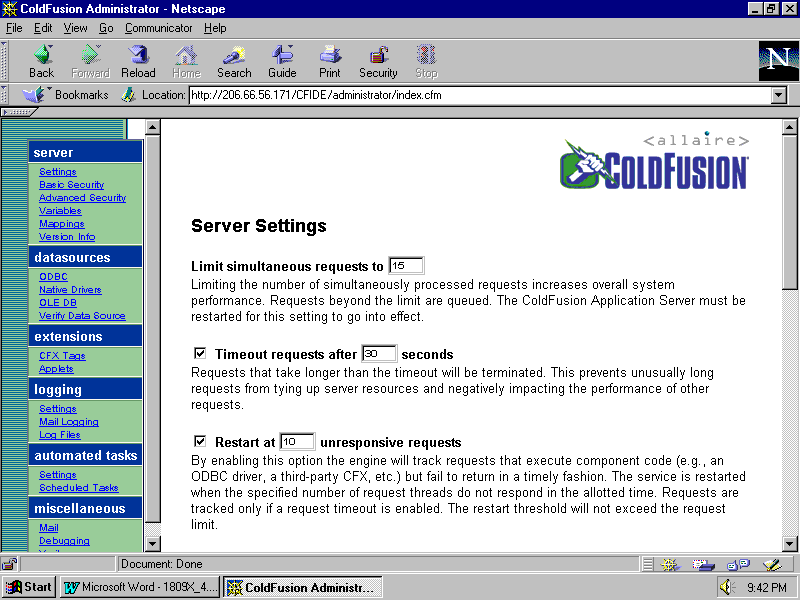
Figure 4.2. The Server Settings screen is used to set server wide Application Server options.
Limit simultaneous requests to ?
ColdFusion can process multiple requests simultaneously. The default number of requests that can be simultaneously processed is 15. If your applications are extremely load intensive, or your server cannot handle the load because it is not powerful enough, then lowering the number of simultaneous requests can help improve performance. Likewise, this number can be increased of your hardware supports it.
Of course, the downside of restricting requests is that additional requests will be queued. So that while those requests that are being processed are processed quicker, those that are queued to be processed will actually take longer to complete.
Timeout requests after ? seconds
The maximum number of seconds that ColdFusion should allow for the processing of any particular request. Timing out requests can be disabled altogether, but this is generally not a good idea, as it would allow a badly behaved request (perhaps a slow database connection, or badly written SQL statement) to tie up server resources.
The default value is 30 seconds. If you are working with large complex templates, or complex database operations, then you should consider raising this value.
Restart at ? unresponsive requests
ColdFusion monitors its own internal processes to ensure that the are responsive, resetting them if needed automatically. ColdFusion can also optionally monitor the performance of external calls (ODBC requests, calls to a CFX tag, COM object requests, etc.) By enabling this option the engine will track the number of requests that execute component code but fail to return in a timely fashion. The service can then automatically be restarted when the specified number of requests fail. Requests are tracked only if a request timeout is enabled.
Enforce strict attribute validation
ColdFusion supports two modes of syntax checking: strict, and relaxed. In strict mode the syntax checker will not allow extraneous or invalid attributes, these are allowed in relaxed mode. Enforcing strict mode can boost system performance.
Caution
If you are upgrading to ColdFusion 4 from an older version of ColdFusion, do not enable this option without first testing the pages thoroughly on a testing server. You will likely find that some of your existing code that worked under older version of ColdFusion (which only supported relaxed mode) no longer works under ColdFusion 4.
Template cache size
The maximum amount of memory (in kilobytes) that ColdFusion may use to cache templates. The ideal number here is something a little bigger than the total size of all templates within your applications. This would allow for all templates to be cached, which will improve system performance.
Note
It is important to note that ColdFusion does not reserve this memory. Rather, it allocates it as needed, until the maximum size allowed has been reached. Therefore, there is no real risk in assigning a very high value here. On the other hand, the performance penalty brought about by having too small a cache can be quite severe.
Trusted cache
When ColdFusion pages are cached the Application Server does not need to read them from the hard drive when they are requested. However, it still needs to check to see if the page has been updated, it does this by comparing the date time stamp of the file with the copy stored in the cache. Checking this option forces ColdFusion to not check for newer versions of files, always trusting that the copy in the cache is the newest copy. This can improve performance slightly on heavy volume sites.
TIP
To improve performance of sites that change infrequently, enable this option. Do not enable this option for sites that change regularly, or sites that are under development.
Limit database connection inactive time to ? minutes
To improve database connection performance, ColdFusion caches and pools database connections. By default these connections are held open for up to 60 minutes, after which time they are closed automatically. This value may be raised or lowered as needed. Enter 0 if you want inactive connections to be maintained as long as the ColdFusion server is executing.
Note
Database connections are only cached and pooled when the maintain database connections attribute is checked for a data source.
Limit the maximum number of cached queries on the server to ? queries
To improve performance of applications that make multiple database requests for the same data, applications can cache query results. This option specifies the maximum number of cached queries that the server will maintain. Cached queries reside in memory on the server, if memory usage is a concern then this value should be lowered. The maximum number of cached queries that is allowed at any given time is 100. When this value is exceeded, the oldest query is dropped from the cache and is replaced with the specified query.
Basic Security
The Basic Security screen (shown in Figure 4.3) is used to define the basic ColdFusion security options. The options specified here are used only if Advanced Security is not enabled. If Advanced Security is enabled those settings override any Basic Security settings.

Figure 4.3. The Basic Security screen is used to manage basic administration and ColdFusion Studio security options.
When you have made your changes, click the Apply button to save them.
Use a ColdFusion Administration Password
As you can see from reading this far, the ColdFusion Administrator is used to manage and configure the ColdFusion Application Server. Any user with access to the Administrator can completely reconfigure the server, and could even render your application inoperable.
By default the ColdFusion Administrator is password protected. However, you may opt to remove the password protection. This is not generally an advisable things to do. In fact, there are only two scenarios when you should even consider doing this:
Caution
Your server’s ColdFusion Administrator should always be password protected. Without password protection any user can reconfigure the server, and even render your applications inoperable.
You may change the Administrator password. To do so enter the new password in the "New Password" and then reenter it in the "Confirmation" field.
Note
The ColdFusion Administration password is initially set during ColdFusion installation. This screen is primarily used to change the password.
Use a ColdFusion Studio Password
ColdFusion Studio users can remotely access server directories, files, and data sources. Therefore, Studio access should always be password protected.
By default ColdFusion Studio is password protected. However, you may opt to remove the password protection. This is not generally an advisable things to do, as you’d be allowing unauthorized access to your hard disks, files, and databases.
Caution
ColdFusion Server access via ColdFusion Studio should always be password protected. Without password protection any user will have unlimited access to all of your server’s hard drives, files, and databases.
You may change the ColdFusion Studio password. To do so enter the new password in the "New Password" and then reenter it in the "Confirmation" field.
Note
The ColdFusion Studio password is initially set during ColdFusion installation. This screen is primarily used to change the password.
Tag Restrictions
Several ColdFusion tags could potentially be misused compromising system security. This is rarely a problem in typical installations, but in environments where the same ColdFusion Application Server is shared my multiple organizations (ISP’s for example), then there might be justification to restrict the use of these tags. The tags are <CFDIRECTORY>, <CFFILE>, <CFCONTENT>, and <CFOBJECT>. By default this tags are all enabled.
Note
Enabling these tags is not in itself a security risk. These tags can only be abused if users have the ability to save ColdFusion files on the server for execution. As long as users cannot save their own files on your server, there is no security risk at all.
TIP
For more granular control over the access to these tags, as well as all other ColdFusion features, use the Advanced Security settings instead of the basic Tag Restrictions.
Advanced Security
Advanced Security provides ColdFusion developers with a powerful framework for building secure applications and development environments. Some of the features of Advanced Security are:
ColdFusion Advanced Security is beyond the scope of this book, and is covered in depth in my book "Advanced ColdFusion 4 Application Development" (also published by Que, ISBN 0789718103).
Variables
The Variables screen (shown in Figure 4.4) is used to set the storage for ColdFusion variables, as well as the default behavior of various variable types. When you have made your changes, click the Apply button to save them.
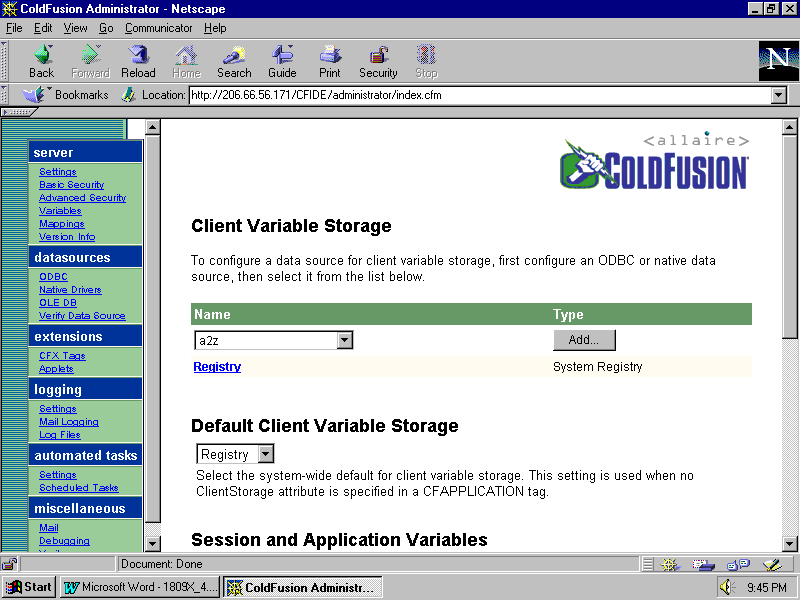
Figure 4.4. The Variables screen is used to create and manage client variable storage locations, and to establish variable timeout defaults.
Client Variable Storage
Client variables are usually stored in the system registry or in client cookies. To store client variables in a database, first create the data source (see the Data Sources options below), select the data source, and then click the Add button to display the Create Client Variable Storage screen, as shown in Figure 4.5.
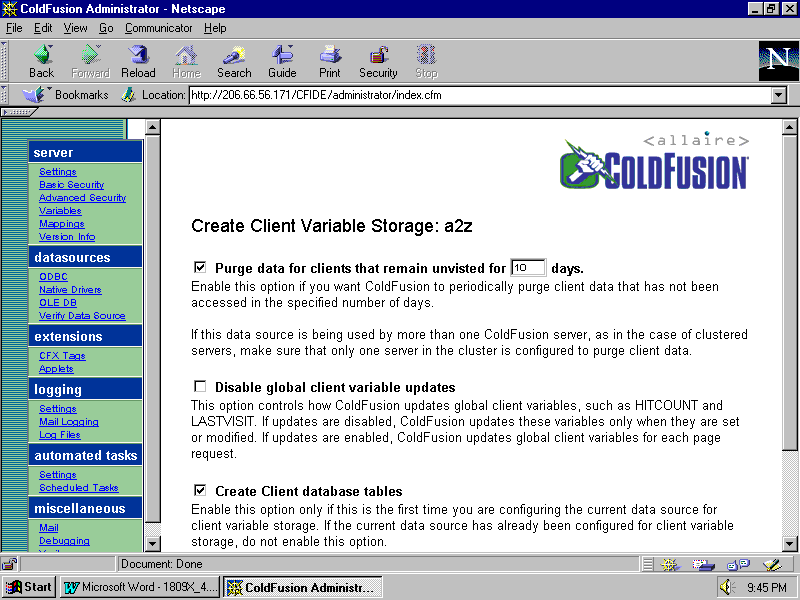
Figure 4.5. The Create Client Variable Storage screen is used to define the life span of client variables and other options.
This screen lets you specify the variable purge period (for how much time since the last visit should the variable be saved), whether or not to update global variables are updated in each page request, and whether or not to create the database tables to store client variable data.
Caution
Only check the Create Client Database Tables option when you first create a client variable storage location. Checking this option for a data source that already has these tables created could result in the tables being overwritten and the client variable data lost.
TIP
To share client variable data between different computers, create a data source on each computer pointing to the same external database, and use that database for client variable storage.
Default Client Variable Storage
Client variable storage can be specified per application using the <CFAPPLICATION> tag. If no explicit storage is specified, the system default setting is used. By default the system default location is the system registry. To change the default location select an option from the Default Client Variable Storage select box.
TIP
To use a data source as the default storage location, first create a data source based storage location, and then select it from the select box.
Enable Application Variables
Application variables are application wide settings that are stored in memory on the ColdFusion server. If you are not using application variables in any of your application, you can save server memory by disabling them.
Enable Session Variables
Session variables are session specific settings that are stored in memory on the ColdFusion server. If you are not using session variables in any of your application, you can save server memory by disabling them.
Application and Session Variable Timeouts
Application and session variables are stored in the server’s memory until they timeout. This means that if they are not accessed for the specified amount of time, then they are deleted. If support for these variables are enabled, you may specify the timeout interval. The default interval for application variables is 2 days, the default interval for session variables is 20 minutes.
The timeout values specified here are system wide settings. Application and session variable timeouts may also be specified for specific applications using the <CFAPPLICATION> tag. However, in the event that invalid timeout values are specified at the application level, you may also specify maximum values that should be used instead. In practice, the default and the maximum values should usually be the same.
Mappings
The Mappings screen (shown in Figure 4.6) is used to create ColdFusion level directory mappings. These allow you to use directory aliases at a ColdFusion level.
To add a map, enter the alias name in the "Logical Path" field, and the actual path in the "Directory Path" field (or click the Browse Server button to locate the directory).
Once the mapping is added, you can use it in all ColdFusion tags (for example <CFINCLUDE>). However, you will not be able to use it in HTML paths (for example <A HREF> or <IMG> tags).
To edit or delete an existing mapping, click on it in the list of currently assigned mappings.
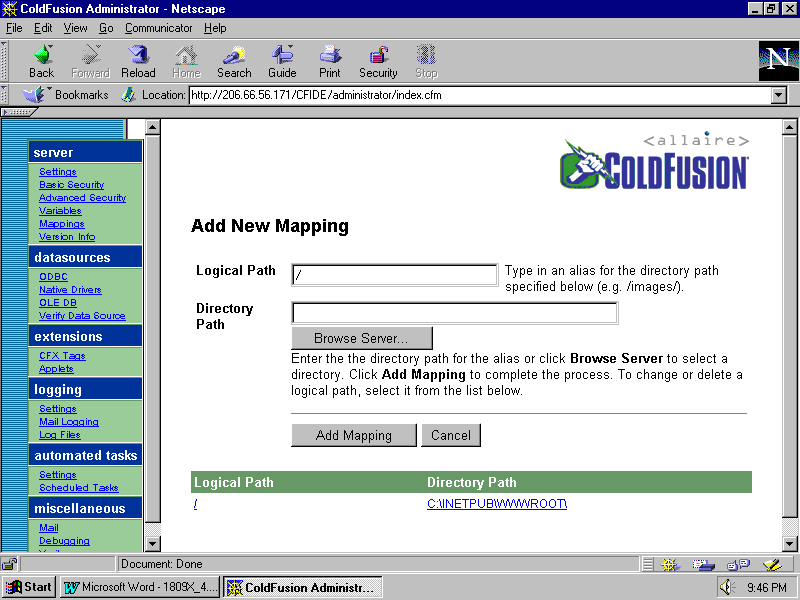
Figure 4.6. The Mapping tag allows you to configure ColdFusion level alias mappings.
Note
ColdFusion level mappings should only be used for aliases needed within ColdFusion code. Mappings and aliases to be used at an HTML level should be defined within the web server’s own administration options.
Version Info
The Server Information area provides information about your ColdFusion Server and the environment it is running on. Make sure you have this information accessible if ever you need to contact Allaire Technical Support.
Using the "Data Sources" Options
ColdFusion uses data sources to interact with databases. ColdFusion supports ODBC and OLE-DB data sources, as well as native drivers for Sybase and Oracle. ODBC data sources are typically created and managed using the ODBC applet in the Windows Control Panel. However, as the Windows Control Panel is not accessible from remote computers, the ColdFusion Administrator has it’s own interface for creating and configuring ODBC data sources.
ODBC
The screen displays a list of currently installed data sources. You may click on any data source name to view or edit its settings. You may also add a new data sources by entering the data source name in the "Data Source Name" field and selecting the ODBC Driver from the drop down list, and then clicking the Add button. This will display the "Create ODBC Data Source" screen shown in Figure 4.7. To add the data source fill in the appropriate information, and click the "Create" button.
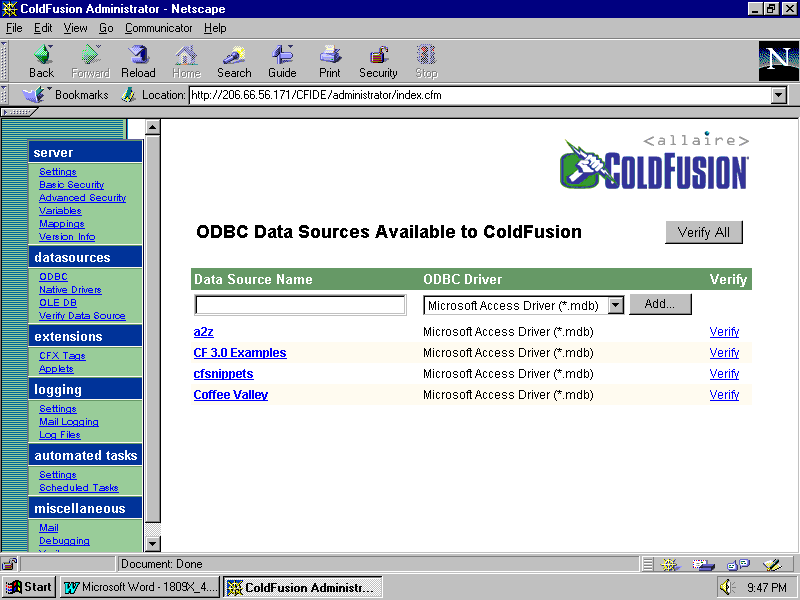
Figure 4.7. The Data Sources tab can be used to remotely add new ODBC data sources.
Note
If you are creating a data source to a client-server database like Microsoft SQL Server, you must click on the CF Settings button to expand the create screen so that you may specify the required database login information.
Each data source has a Verify link associated with it then can be clicked to verify that the data source is working correctly. You may also click the Verify All button to verify that all the listed data sources are operational.
Native Drivers
If you are using ColdFusion to connect to Sybase or Oracle databases, you can take advantage of ColdFusion’s native data driver support for these products. The Native Driver configuration screen is shown in Figure 4.8.
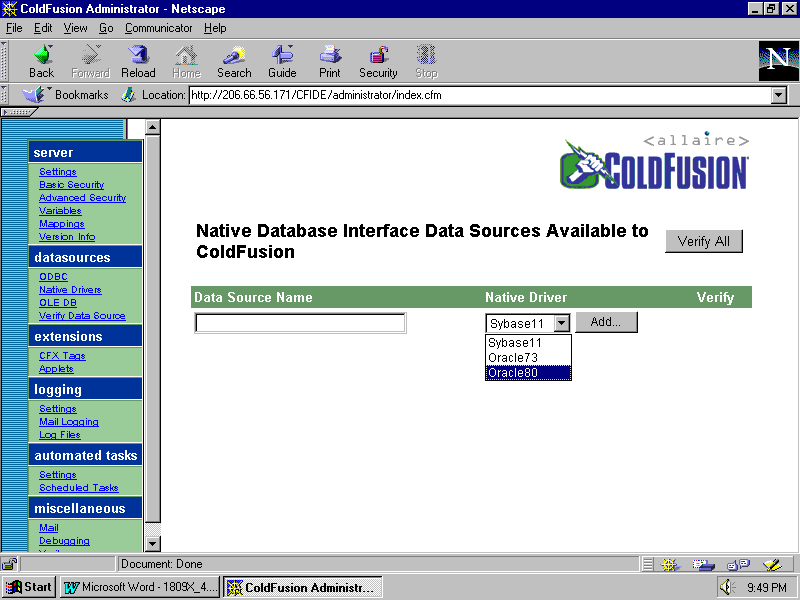
Figure 4.8. ColdFusion supports the use of native database drivers for Sybase and Oracle database servers.
To set up a native data source specify a unique data source name, select the driver, and click the Add button.
Each data source has a Verify link associated with it then can be clicked to verify that the data source is working correctly. You may also click the Verify All button to verify that all the listed data sources are operational.
OLE-DB
If you are using ColdFusion to connect to databases or products with OLE-DB support (e.g. Lotus Notes, Microsoft Exchange 5.5, Microsoft SQL Server 7), you can take advantage of ColdFusion’s OLE-DB support. The OLE-DB configuration screen is shown in Figure 4.9.
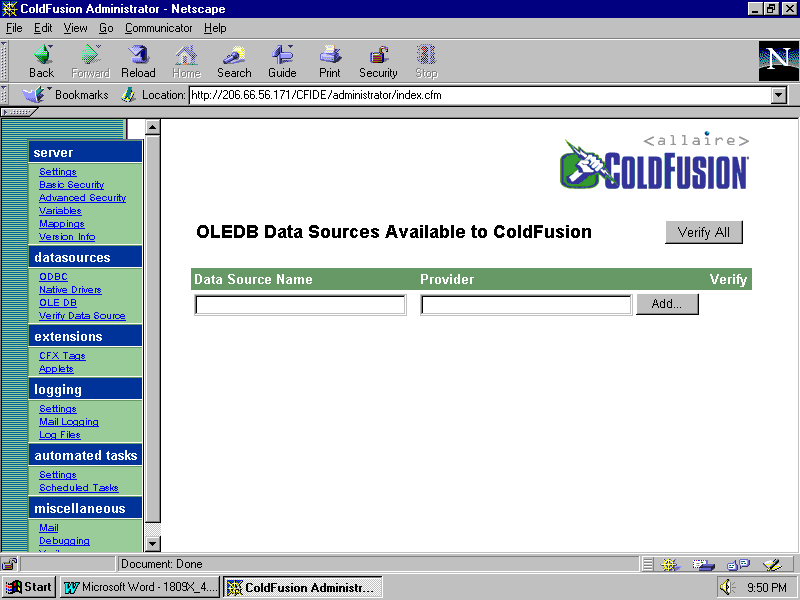
Figure 4.9. ColdFusion's OLE-DB support can be used to connect to Lotus Notes, Microsoft Exchange, Microsoft SQL Server 7, and other systems.
To set up an OLE-DB data source, specify a unique data source name, specify the provider, and click the Add button.
Each data source has a Verify link associated with it then can be clicked to verify that the data source is working correctly. You may also click the Verify All button to verify that all the listed data sources are operational.
Verify Data Sources
In addition to being able to verify data sources within the screens used to create and manage them, this screen provides a single interface with which to verify any and all data sources, regardless of type.
To verify a single data source, simply click on its name, if the database is functioning properly you’ll see a screen similar to the one shown in Figure 4.10. To verify all data sources click the Verify All button, the screen will be updated to show the verification status as shown in Figure 4.11.
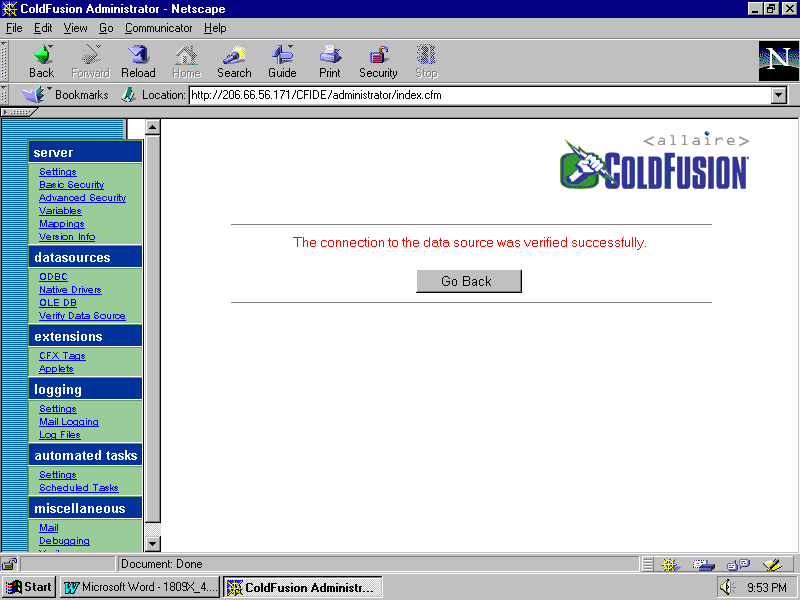
Figure 4.10. Verifying the operation of data sources is a vital part of application debugging and troubleshooting.
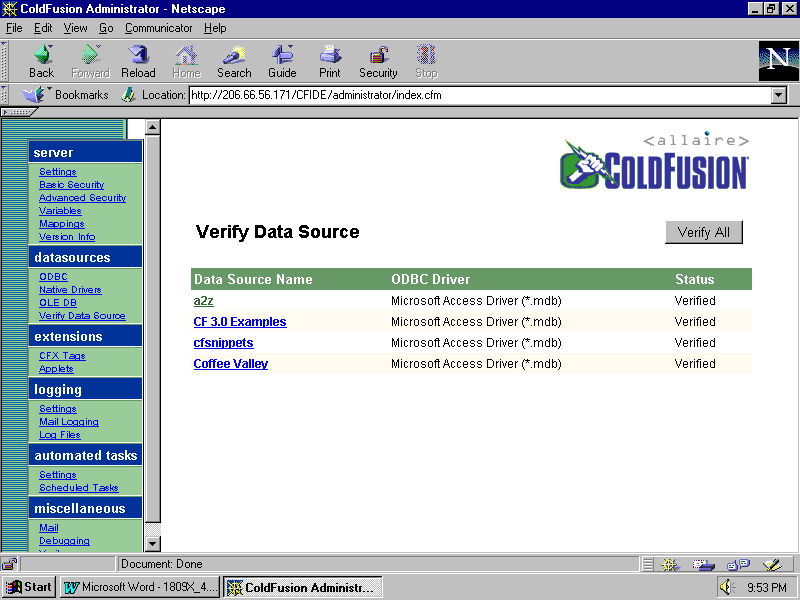
Figure 4.11. To verify the operation of all data sources (regardless of type), click the Verify All button.
TIP
Verifying data sources is an important debugging tool. If your application is having difficulty accessing or interacting with a database, the first thing you should so is use this screen to verify that the data source is functioning correctly.
Using the "Extensions" Options
The Extensions options are used to configure ColdFusion’s interaction with third party tags and Java applets.
CFX Tags
CFX tags can be created as DLL’s. To use DLL based tags within ColdFusion they must first be registered. The list of installed CFX tags is displayed in Registered CFX Tags page, as seen in Figure 4.12

Figure 4.12. The Registered CFX Tags page can be used to install and manage CFX tags.
To register your tag you must first copy the DLL onto your ColdFusion server, and then enter it’s name into the "Tag Name" field, and click the Add button to display the "New CFX Tag" screen shown in Figure 4.13.
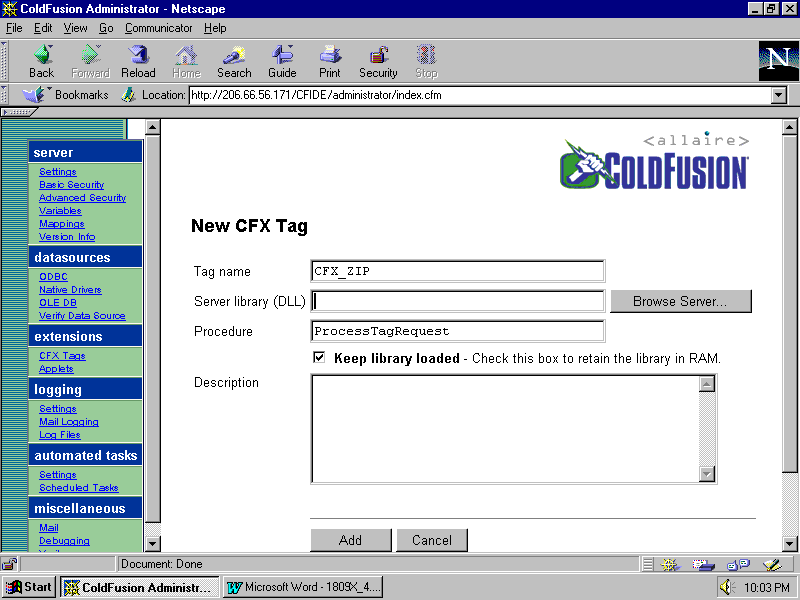
Figure 4.13. The New CFX Tag screen is used to add CFX tags to your ColdFusion server.
To register the tag you must specify the full path to the DLL in the "Server library" field, or click the Browse button to browse the server to find the file. The Procedure field should always be left with the default value of "ProcessTagRequest".
By default, CFX tag DLL’s are loaded into memory when the are first used and kept there. This improves the performance of subsequent calls to the tag. However, resident tags take up server memory, and so if the tag is infrequently used you might want to disable the "Keep library loaded" option.
The "Description" is optional.
A collection of CFX tags are provided on the accompanying CD.
Applets
ColdFusion comes with a collection of Java applets that you may use to enhance your forms. These are accessed using the ColdFusion <CFFORM> tag. You may register your own Java applets, and them to your <CFFORM> forms using the <CFAPPLET> tag.
Registered applets are listed in Applets tab, shown in Figure 4.14. To register a new applet, enter it’s name in the Applet field, and click the Register New Applet button to display the Register New Applet form shown in Figure 4.15. Once you have filled in the form, click the Create button to register the applet.
You may also edit existing registered applets by clicking on their names in the main Applet tab screen shown in Figure 4.14.
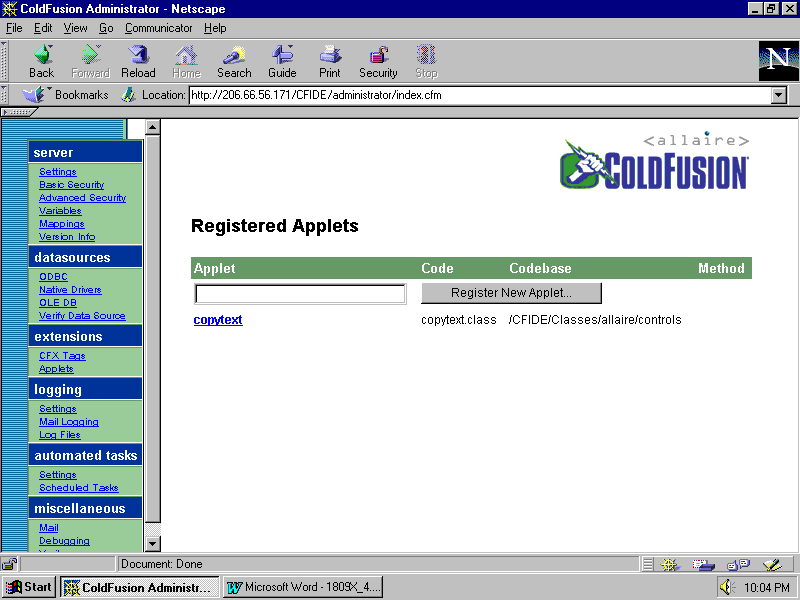
Figure 4.14. The Applet tab lists any registered Java applets.

Figure 4.15. Use the Register New Applet form to register your own Java applets for use with the <CFAPPLET> tag.
Using the "Logging" Options
ColdFusion log files are used to log server activity, warnings, and error conditions. The Logging options allow you to manage and fine tune the behavior of the logging capabilities.
Settings
The Settings screen (shown in Figure 4.16) is used to manage ColdFusion logging, and to specify exactly what should be logged. When you have made your changes, click the Apply button to save them.
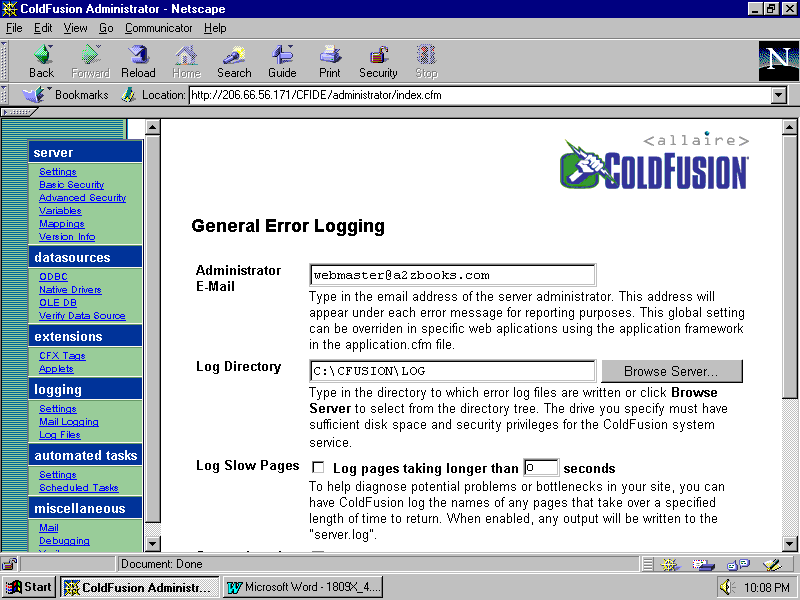
Figure 4.16. The Logging screen is used to manage ColdFusion error and event logging.
Administrator E-Mail
If an error occurs, ColdFusion displays an error message describing the error condition. If you enter an E-Mail address here, ColdFusion will also display it instructing the visitor to notify that address of the error condition. You may override this address for a specific application by specifying an address in the <CFAPPLICATION> tag in the APPLICATION.CFM file.
TIP
ColdFusion only allows you to specify a single E-Mail address for the mail administrator. To have messages sent to multiple recipients, create a mail group on your mail server, and specify that group address in the Administrator E-Mail field.
Log Directory
By default ColdFusion log files are stored in a directory called LOG beneath the ColdFusion root directory (usually C:\CFUSION). You may specify an alternate directory if desired.
Log Slow Pages
To help diagnose potential problems or bottlenecks in your site, you can have ColdFusion log the names of any pages that take over a specified length of time to return. When enabled, any output will be written to the SERVER.LOG file. If you enable this option a valid time value (in seconds) must be specified.
System Logging
In addition to writing error messages to the ColdFusion log files, ColdFusion can also log messages using whatever logging facilities your operating system provides. On NT that would be the EventLog (you could use the NT Event Viewer to browse these messages). On UNIX that would be the syslog facility.
Mail Logging
The Mail Logging screen (shown in Figure 4.17) is used to manage the logging of outbound SMTP e-mail generated within ColdFusion using the <CFMAIL> tag. When you have made your changes, click the Apply button to save them.
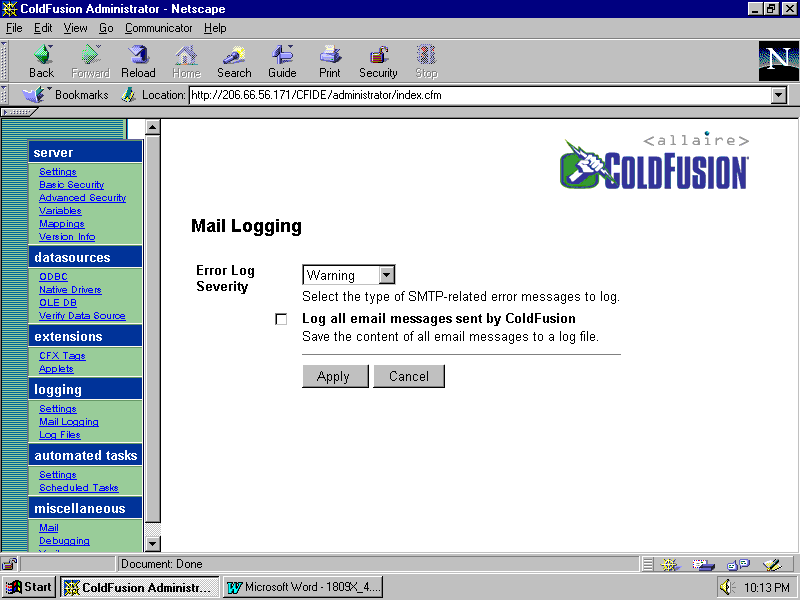
Figure 4.17. The Mail Logging screen is used to manage the logging of outbound SMTP e-mail transmissions.
Error Log Severity
By default ColdFusion logs warnings and errors in the mail server log. You may raise the level to "Error" to log just error messages, or lower it to "Information" to log informational messages in addition to all warnings and errors.
Caution
Only set the mail error log severity to "Information" if you absolutely need this information, and then set it back to "Warning" or "Error" when you have collected the information you need. Leaving the level at "Information" for an extended period of time will cause the log file to grow rapidly consuming lots of disk space.
Log all email messages sent by ColdFusion
To log the content of all outgoing mail messages, enable this option. This can be useful when debugging mail delivery problems.
Caution
Only enable this option when debugging mail delivery problems, and disable it when done. Leaving it enabled for an extended period of time will cause the content of all outgoing messages to be saved, and this can consume large amounts of disk space.
Log Files
You may view or download the ColdFusion log files directly from within the ColdFusion Administrator. The Log Files screen (shown in Figure 4.18) displays a list of all available log files, complete with file name, size (in bytes), and the last modified date.
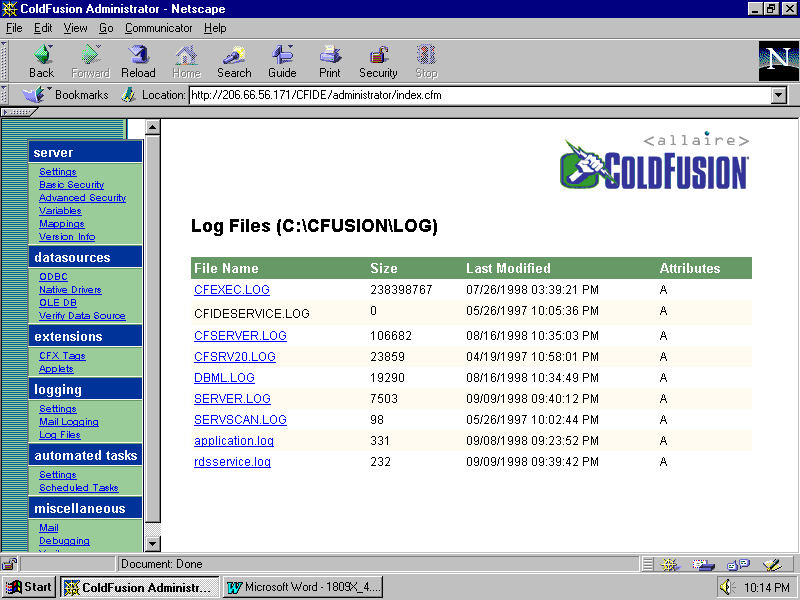
Figure 4.18. ColdFusion log files can be viewed or downloaded directly from within the ColdFusion Administrator.
Click on any log file to view it within the administrator, or to download it to your computer directly.
Using the "Automated Tasks" Options
ColdFusion can execute Automated Tasks, events that are scheduled to occur at a specific time, or on a regular basis. The Automated Tasks options are used to manage automated tasks and scheduled events.
Settings
The Settings screen (shown in Figure 4.19) is used to mange the behavior of the ColdFusion scheduling engine. When you have made your changes, click the Apply button to save them.
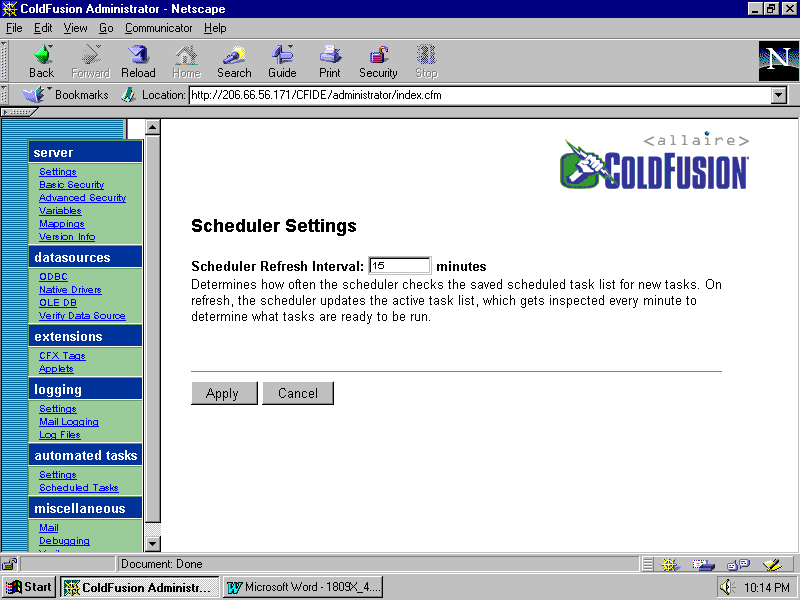
Figure 4.19. The Settings screen is used to manage the ColdFusion Application Server scheduling engine.
Scheduler Refresh Interval
How often ColdFusion should check to see if new events have been added to the scheduled events list. Once events are on the list, ColdFusion checks them once every minute to determine which events need to be run. The default value is every 15 minutes.
Scheduled Tasks
The ColdFusion Scheduler is used to configure events that ColdFusion can automatically execute. The Scheduled Tasks screen, shown in Figure 4.20, is used to create and configure scheduled events.
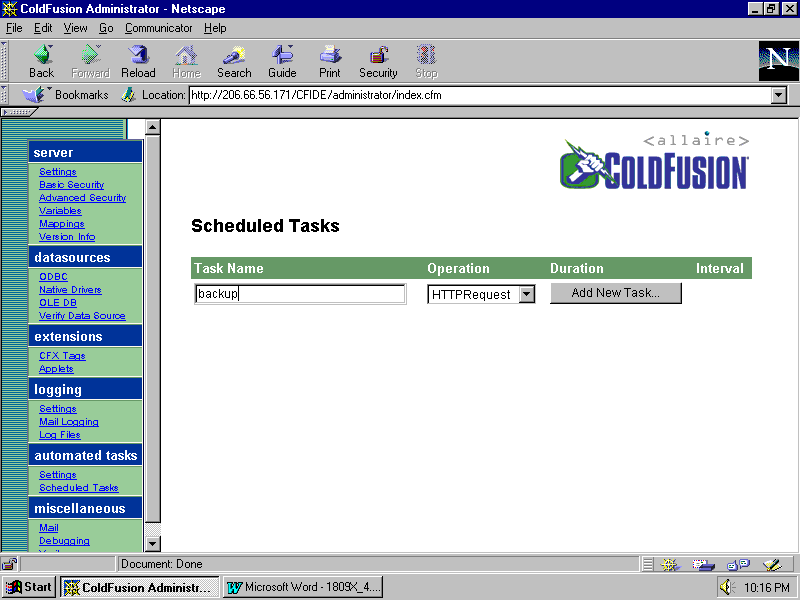
Figure 4.20. The Scheduled Tasks screen is used to configure timed events.
To add a new scheduled event, enter the event name in "Task Name" field, and click on the "Add New Task" button to display the Add Scheduler Task screen shown in Figure 4.21. Here you specify the duration and schedule, as well as URL and publishing information for the new task.
To edit a scheduled task, select it from the main Scheduled Tasks screen shown in Figure 4.20 above.
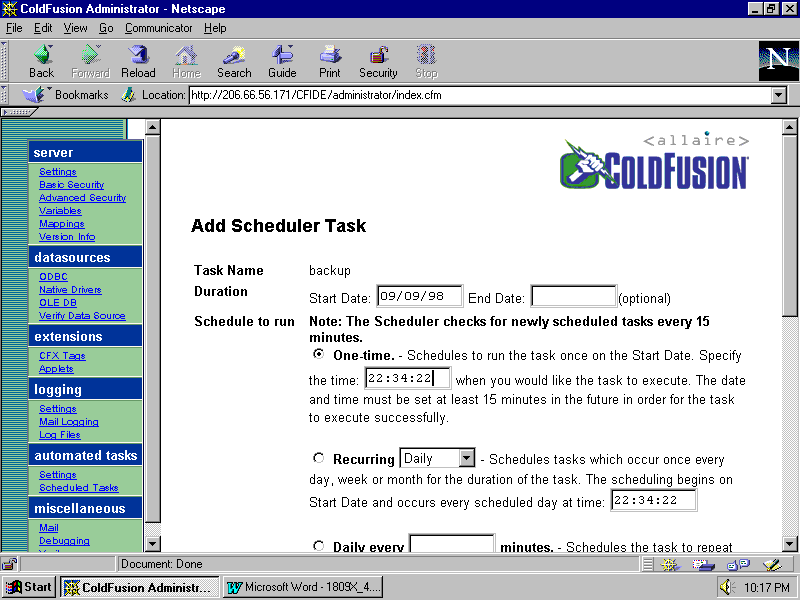
Figure 4.21. The Add Scheduler Task screen is used to specify the time, interval, and URL for the task to be scheduled.
Using the "Miscellaneous" Options
The Miscellaneous options are used to control ColdFusion E-Mail support, debugging features, and integration with the Verity engine.
Before you can use ColdFusion to generate SMTP based e-mail, you must configure the mail options in the Mail Server Connection Settings screen (shown in Figure 4.22). Once you have filled in the fields, click the Apply button to save the changes. You may also click the Verify button to verify that ColdFusion is able to communicate with the specified SMTP server.
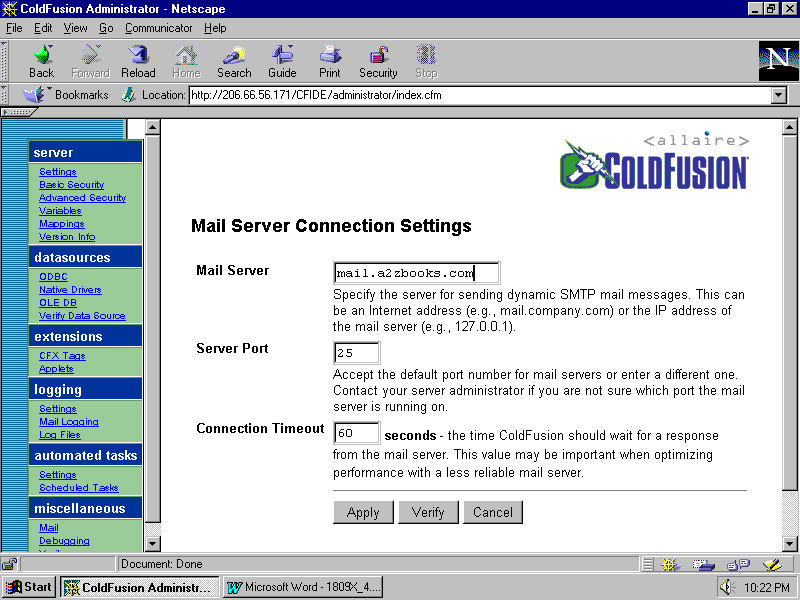
Figure 4.22. Before using the <CFMAIL> tag, e-mail settings must be configured in the Mail Server Connection Settings screen.
Caution
If you try to use the ColdFusion <CFMAIL> tag without having configured a mail server in the Mail tab, your code will fail and you will generate a ColdFusion error message.
Mail Server
Enter the DNS name or IP address of your SMTP mail server here. If you do not know this information, contact your mail administrator or ISP.
Server Port
Enter the port number that your SMTP server is assigned to. This should always be left at the default value of 25 unless instructed otherwise by your mail administrator or ISP.
Connection Timeout
Enter the amount of time ColdFusion should wait for the mail server to respond before timing out. This should only be raised from the default of 60 seconds if you are experiencing problems with an unreliable mail server.
TIP
When debugging mail delivery problems, the first thing you should check is that ColdFusion can communicate with the specified SMTP server. You can do this by clicking the Verify button on this screen.
Debugging
The Debugging tab (shown in Figure 4.23) is used to enabled and disable the display of debug information, as well as to specify what debug information should be displayed, and to whom. Select as many or as few options as you want, and then click the Apply button to save your changes.
For more information on debugging and using the debugging options, see Chapter 17, "Debugging and Troubleshooting"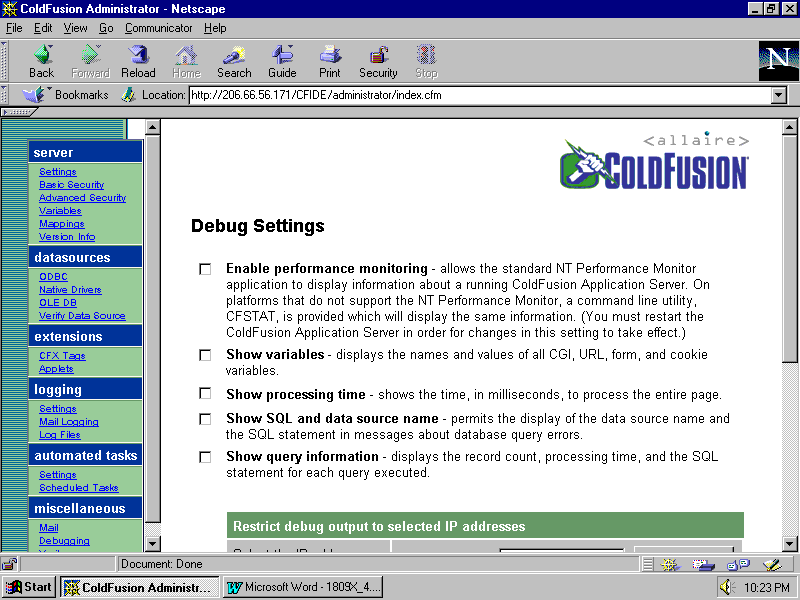
Figure 4.23. The Debugging tab is used to configure what debug information ColdFusion should display, and to whom.
Enable performance monitoring
ColdFusion can publish real time performance data for detailed analysis and monitoring of the ColdFusion services and their operation. The performance information is published to the Performance Monitor on Windows NT, and to a bundled software utility called CFSTAT on all other platforms.
Note
Unlike all other configuration options, turning on and off the publishing of performance monitoring data requires restarting the ColdFusion Application Server.
Caution
Performance monitoring is a valuable debugging tool, but its use comes with a hefty price. Publishing performance monitoring data is resource intensive, and when this option is checked system performance will degrade. As such, this option should only be enabled when needed, and it should be disabled as soon as the monitoring is completed.
Show variables
If this option is enabled, ColdFusion will automatically append a list of CGI variables, URL parameters, form fields, and HTTP cookies to the end of every ColdFusion page.
Show processing time
If this option is enabled, ColdFusion will display the total page processing time at the bottom of each and every page.
Show SQL and data source name
If this option is enabled, the data source name and SQL statement will be displayed in any error messages. If you would rather your visitors not know the details of your underlying databases then this option should be disabled. However, during routine debugging sessions, the information provided by enabling this option is extremely useful.
Show query information
If this option is enabled, the SQL statement, retrieved record count, and query processing time will be displayed at the end of each template. This option is useful in tracking down badly performing database queries.
TIP
To determine how long ColdFusion is taking to process code your page itself without query processing, subtract the total amount of time spent processing all queries from the processing time option mentioned above.
Restrict debug output to selected IP addresses
By default, any and all debugging information is sent to every visitor to your site. To restrict the display of debugging information to specific users, you may enter their IP addresses here. To add an address, enter it into the "IP Address" field, and click the Add button. The address will be displayed in the list below. To delete an address from the list of addresses to receive debugging information, select the address from the list, and click the Delete button.
Note
If debugging is enabled and no IP addresses are specified, then debugging information will be sent to every visitor to your web site. It is therefore a good idea to always have at least one address in the list. You might want to add address "127.0.0.1" as this refers to the local host (the server itself) as seen in above.
There is a add-on ColdFusion tag called "CFX_Debug" on the accompanying CD. This tag allows you to enable and disable the display of debugging information from within a ColdFusion template, without having to access the Administrator. This is very useful in environments that use dynamic IP addresses.
Verity
ColdFusion uses the Verity search engine to facilitate full text searching. Verity stores it’s index information in "collections", and the Verity tab, shown in Figure 4.24, is used to manage these collections.
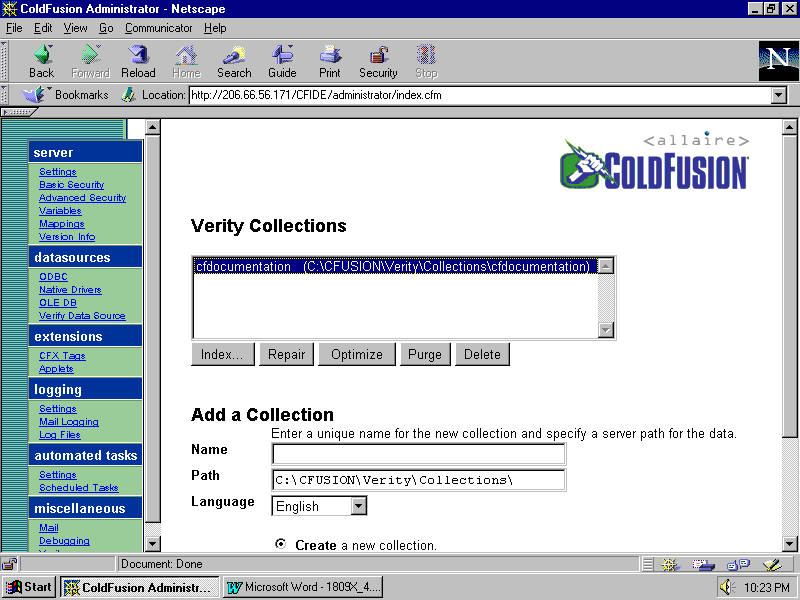
Figure 4.24. The Verity tab is used to manage and create Verity collections.
Verity Collections
To index, repair, optimize, purge, or delete a Verity collection, select it from the list of collections and click the appropriate button.
Note
The "CF31 Documentation" collection shown in Figure 4.16 above is automatically created the first time you try to perform a search on the online documentation.
Add A Collection
To create a new Verity collection, you enter the unique collection name, specify the path where the collection should be saved (the default path should usually be used), and choose the language of the data being indexed. When the information has been entered, click the Create button.
Note
Verity collections can also be created programmatically using the ColdFusion <CFINDEX> tag.