| |
Appendix I:
Break Properties
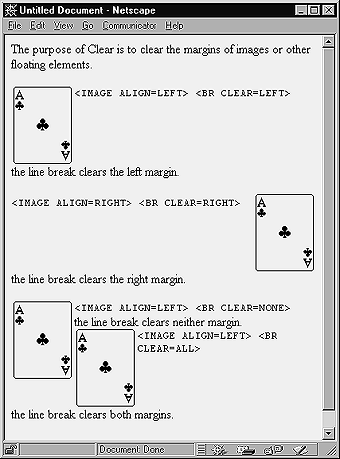
The break tag has a CLEAR attribute that can be used when combining text and floating elements, particularly floating images aligned at the left or right margin. In addition to LEFT, other CLEAR attributes are ALL, RIGHT, and NONE (Figure 1).

Figure 1. The CLEAR attribute of the break tag is demonstrated here in four possible permutations. The most obvious actions of the CLEAR attribute are visible when working with images aligned to the left or right marginčit stops the text from automatically wrapping the image. Refer to Chapter 5 for more on image alignment.
To add break properties:
- Click to place the insertion point where you want a line break.
- On the Properties inspector, click on the Quick Tag Editor button (Figure 2). The Quick Tag (QT) editor will appear, in Insert HTML mode.

Figure 2. Click on the Quick Tag Editor button on the Properties inspector.
- Mouse over the brackets so that the Tag Selector menu appears (Figure 3).

Figure 3. In a few seconds, the Quick Tag Editor will appear, in Insert HTML mode.
- From the Tag Selector menu, select br. The QT editor will now display the following text: <br>
- Type a space, and the QT Editor will pop up the clear attribute. Click on the menu (Figure 4).

Figure 4. Type a space after the <br> tag, and the clear attribute will appear as the only option in the menu.
- Mouse over the clear attribute, and a menu containing the options left, right, and all will appear (Figure 5). Click on the attribute you want; if you want none, you'll need to type it in.

Figure 5. Options for the clear attribute will appear.
The QT Editor should now display the following code:
<br clear=all>
where all may be another attribute.
- Press Enter (Return) and the code will be inserted onto the page. You can view it in the HTML inspector, if you like.
Tips
- If you view invisible elements, and adjust your preferences so that line breaks have markers as invisible elements, these make line breaks easier to work with. Their icons will show up in Design view, you can select them in the Document window and edit them just that much faster in Edit Tag mode.
- For more about using the Quick Tag Editor, see Chapter 4.
- For more about lists, see Chapter 9.
- To create lists using CSS modifiers, see Chapter 11. This allows you to use bullets as images while maintaining the integrity of your code.
|