This section describes setting properties for Shockwave, Flash, Java, and ActiveX, It also contains the same information about setting parameters that appears in Chapter 7.
Shockwave and Flash Properties
Additional Flash Properties
Additional Applet Properties
Additional ActiveX Properties
Extra Parameters
Shockwave and Flash Properties
You can set properties for Shockwave and Flash by selecting the placeholder in the Document window and using the Property inspector (Figures 1 and 2) to make your changes. To set extra parameters, see that section in the book or on this site.


Figures 1 and 2. The Property inspector lets you make changes to the way your Shockwave (top) and Flash files will appear on your page.
Properties you can set for Shockwave for Director and Shockwave Flash include the following:
Name the plug-in by typing a name for it in the text box.
Set dimensions for the Shockwave or Flash movie by typing the W(idth) and H(eight) in the associated text boxes. You can use percentages as well as pixels.
Change the Source by typing it in the File text box, or better yet, click on the Browse icon to browse for the file on your computer.
Set the Tag by selecting it from the Tag drop-down menu. The <object> tag is used by Internet Explorer, and the <embed> tag is used by Netscape Navigator. By default, Dreamweaver inserts code for both tags so the object shows up in both browsers. If you're making browser-dependent pages, choose the appropriate tag.
Set the alignment of the movie file on the page by selecting an alignment from the Align drop-down menu. These alignment options are the same as those for images. (I discuss image alignment in Chapter 5.)
To set the background color that will fill the dimensions before the movie loads and after it finishes playing, type a hex code for the color in the Bgcolor text box, or click on the Color button to choose a color. (I discuss choosing colors in the most detail in Chapter 3.)
ID sets the ID parameter for the Shockwave or Flash ActiveX control. This comes in handy if you're using a script to call a movie file.
V space and H space denote an amount of space around the plug-in. Border describes a visible border around the plug-in. (I discuss these options further with regard to images in Chapter 5.) The units for these options are in pixels. Type a number without units in the appropriate text box.
![]() Tip
Tip
- You can no longer provide an alternate image using the Property inspector. Consult your Flash documentation, book, or expert to find out if you can do this by setting a parameter; otherwise, make sure all the links that the movie may provide are listed elsewhere so that if your users can't play the movie for any reason (low technology, poor connection, crashed server), they can still navigate your site.
More Flash properties:
Quality sets the quality of Flash movies according to processor speed. Anti-aliasing is used to smooth the appearance of frame-to-frame playback in Flash, and that requires a fast machine. Low turns off anti-aliasing in favor of playback speed. High turns on anti-aliasing in favor of appearance. Autohigh starts out using anti-aliasing and turns it off if the machine's performance isn't keeping up. Autolow starts off without anti-aliasing and turns it on if possible.
Scale is used if the H and W settings are different from the original movie size, particularly if the H and W settings are in percent of the browser window size rather than in pixels. Default (Show All) scales the movie using its original aspect ratio and may fill in the blanks using borders. No borders makes these borders invisible. Exact fit abandons the original aspect ratio to make the movie fit the dimensions.
Autoplay causes the Flash movie to begin playing as soon as it loads. Loop makes the Flash movie loop as long as the page is in view.
You can set properties for Java applets by selecting the applet's placeholder in the Document window and using the Property inspector (Figure 3) to make your changes. To set extra parameters, see that section in the book or on this site.
Figure 3. The Property inspector lets you make changes to the appearance and behavior of any applets on your page.
Properties you can set for Java Applets include the following:
Name the applet by typing a name for it in the text box.
Set dimensions for the applet by typing the W(idth) and H(eight) in the associated text boxes.

Change the Source by typing it in the Code text box, or click on the Browse icon to browse for the .CLASS file on your computer. When you set the source for an applet, the Base text box is automatically filled in. This indicates the home directory for the applet.
Set the alignment of the applet on the page by selecting an alignment from the Align drop-down menu. These alignment options are the same as for images. (I discuss image alignment in Chapter 5.)
V space and H space denote an amount of space around the plug-in. (I discuss these options further in regard to images in Chapter 5.) The units for these options are in pixels. Type a number (without units) in the appropriate text box.
To provide an alternate image for browsers without Java capabilities, type the Image source in the Alt text box. Click on the Browse icon to browse for the image on your computer. This image will also display while the page loads.
You can set properties for ActiveX controls by selecting the control's placeholder in the Document window and using the Property inspector (Figure 4) to make your changes. To set extra parameters, see that section in the book or on this site.
Figure 4. The Property inspector lets you make changes to the appearance and behavior of any ActiveX controls on your page.
Properties you can set for ActiveX controls include the following:
Name the control by typing a name for it in the text box.
Set dimensions for the control by typing the W(idth) and H(eight) in the associated text boxes.
Set the Class ID for the control by selecting it from the drop-down menu or typing it in the Class ID text box. If you change your mind about the selected ID, select the text and press Delete. Clicking on the Minus button will permanently remove the ID from the list of options.
If the class is not on the list, type the URL from which Explorer can download the ActiveX control in the Base text box.
To set up the Netscape equivalent of the control using the <embed> tag, place a checkmark in the Embed checkbox. Once you've selected this option, the Src (source) text box will become available. Type the URL for the plug-in file source in the Src text box.
Data sets the source for a data file used by some ActiveX controls.
ID sets the ActiveX ID parameter. This optional number can be used to pass information from control to control; it can also be used for security purposes.
Set the alignment of the control on the page by selecting an alignment from the Align drop-down menu. These alignment options are the same as for images. (I discuss image alignment in Chapter 5.)
To provide an alternate image for browsers without ActiveX capabilities, type the Image source in the Alt text box. Click on the Browse icon to browse for the image on your computer.
V space and H space denote an amount of space around the plug-in. Border describes a visible border around the plug-in. (I discuss these options further in regard to images in Chapter 5.) The units for these options are in pixels. Type a number without units in the appropriate text box.
Some multimedia objects require other parameters for optimal performance. These parameters may be indicated in the documentation for the language or program you're using. Of course, if it's an applet or object you wrote yourself, you'll know all about it already. (See the sections on sound for details about embedded sound parameters.)
To set additional object parameters:
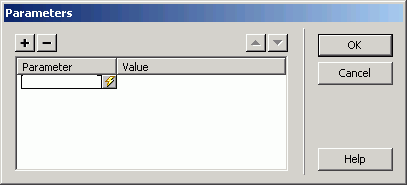
Figure 5. Add any extra attributes for your multimedia files in the Parameters dialog box.
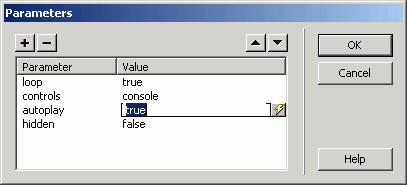
Figure 6. These are the parameters for an embedded sound file. I sometimes find it more expedient to type the parameters in the HTML inspector and then proof them in the Parameters dialog box.
Figure 6 shows the Parameters dialog box displaying parameters for an embedded sound file.
