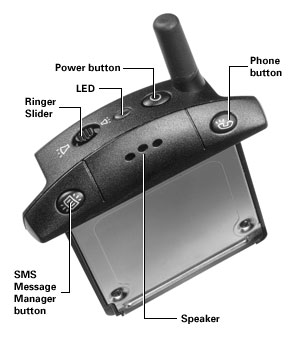
Figure 1 The anatomy of a VisorPhone (yes, this will be on the test).
From Handspring Visor: Visual QuickStart Guide by Jeff Carlson
When you leave the house in the morning, do you wear a Batman-style utility belt of dangling gadgets? Visor, pager, cellular phone... even though our modern organizational tools continue to get smaller and more portable, it's still a problem to juggle them all.
Although you could just get rid of the gadgets entirely and hole up in a cabin (a tempting alternative some days), another solution is afoot: keep the functionality, but reduce the number of devices. Back when Handspring began developing the Visor, they also conceived the VisorPhone: a Springboard module that turns your handheld into a cellular phone.
It's time to ditch your phone's wimpy little screen and talk to the Hand(spring).
The VisorPhone uses the GSM (Global System for Mobile communications) network, which is predominant throughout much of the world and is finally gaining ground in the United States (the land of competing cellular standards). In addition to making and receiving calls, GSM phones can take advantage of SMS (Short Message Service) text messaging and create data connections like a regular modem.
Since the VisorPhone uses the Visor's built-in microphone, you can hold it up to your ear like any other phone. Or, better, plug in the included headset to talk hands-free and continue using the Visor's other applications.
The VisorPhone includes a rechargeable battery to power roughly three hours of talk time and 70 hours of standby time. Like other GSM phones, it includes a SIM (Subscriber Identity Module) card that identifies your service account.
Physically, the device is fairly sparse, with buttons that launch the built-in phone applications, an LED to indicate status, and a slider that toggles between two settings. The surprisingly loud speaker is accompanied by a headset jack on the left side (not shown) for hands-free operation (Figure 1).
Figure 1 The anatomy of a VisorPhone (yes, this will be on the test).
Tips
Instead of going through the process of setting up the VisorPhone (which is explained in the manual), let's jump to making calls. You'll likely use the Speed Dial screen most, but a trusty Keypad screen is also available.
Tips
At the Speed Dial screen, you can assign up to 50 buttons for your most-dialed numbers (Figure 2). Simply tap an assigned button to start dialing its number.

| Figure 2 You can assign up to 50 speed dial buttons. |
To set up speed dial numbers:
| Figure 3 Drag names to any available slot to organize placement. |
| Figure 4 If the person is already in your Address Book, tap the Lookup button to choose a number. |
Tips
Although it's possible to dial numbers by writing them in Graffiti, we non-aliens prefer the numeric keypad (Figure 5).
 Figure 5 All thumbs? Forget those teeny buttons on most cellphones. |
To dial from the Keypad:
Tips
What's the point of having a phone attached to your Visor if you can't use all those numbers stored in the Address Book?
To dial from the Address Book:
 Figure 6 In the Address Book, tap the Dial button or just the number from the address list to begin dialing. |
Tip
When you're in the middle of a call, the Phone application displays the recipient's phone number (and name, if it came from your Address Book), the status and time of the call, plus buttons for actions you can take depending on the call (Figure 7). In addition to offering obvious commands like Hang Up and Hold, the VisorPhone makes it easy to juggle multiple callers and establish 3-way conference calls.
 Figure 7 Look at those big buttons! During a call, the Visor's comparatively large screen offers lots of information. |
To make a 3-way call:
 Figure 8 Keep two people on the line either by swapping between them or by enabling a 3-way call. |
During the call, use the following options (Figure 9).
 Figure 9 Remember all those prompts of "Are you still there?" while trying to set up conference calls on other phones? Forget 'em. Note that each call timer remains independent. |
Just as Christmas isn't only about giving, using a cellular phone isn't just about making calls. When your fans start calling, the VisorPhone can help you out. If your cellular service plan includes Caller ID, the VisorPhone compares the incoming phone number with your Address Book and displays the caller's name if it finds a match.
To answer an incoming call:
 Figure 10 Tapping the Ignore button transfers the caller to your voice mail. |
 Figure 11 The Call Back button saves time spent looking up the caller. |
Call History
The VisorPhone records details of the previous 1,000 incoming or outgoing calls, which are accessible from the Call History list. Tap the third icon in the lower-left corner of the screen to view your calls (Figure 12).
 Figure 12 See where your talk time is going at a glance. |
The triangle to the left of each item indicates outgoing ( ![]() ), incoming (
), incoming ( ![]() ), and
missed (
), and
missed ( ![]() ) calls. To dial
a number (if present), select an entry and tap the Dial button. Or, tap the
Details button to view information about the call (Figure 13).
) calls. To dial
a number (if present), select an entry and tap the Dial button. Or, tap the
Details button to view information about the call (Figure 13).
 Figure 13 The Call History records details of each call, and provides a Dial button to quickly get that person on the horn. |
I don't mind a good long conversation now and then, but sometimes I need to keep things short. Using SMS, you can send brief text messages to other GSM-capable phones or to Internet email addresses.
To send an SMS text message:
 Figure 14 Use included templates to quickly write text messages. |
 Figure 15 Messages can be sent immediately, or saved for editing later. |
Tips
To send an SMS email message:
 Figure 16 Send text messages to email addresses. |
 Figure 17 A saved message is ready to be edited and sent, or easily deleted. |
As long as you're making phone calls, why not transfer a little data too? The VisorPhone can act as a 14.4 Kbps modem, enabling you to send and receive email, access the Web, or anything else via the Internet.
To enable Internet access:
To connect to the Internet:
 Figure 18 The VisorPhone can be used like any regular data modem. |